This document contains both Custom Queries that you can import/run directly in Bloodhound, as well as as custom queries that you can run from within the Neo4j GUI directly.
cd /root/.config/bloodhound
curl -o "customqueries.json" "https://raw.githubusercontent.com/CompassSecurity/BloodHoundQueries/master/customqueries.json"
Once downloaded, just restart Bloodhound and you’ll see the Custom Queries available.
Within Neo4j GUI
In the Neo4j console (by default http://localhost:7474/browser/), you can run your own queries to get data out of the Bloodhound database. I like to do this for ease of copy/paste when report writing.
Find all computers that have an unsupported Operating System.
MATCH (H:Computer) WHERE H.operatingsystem =~ '.(2000|2003|2008|xp|vista|7).' RETURN H.name, H.operatingsystem

MATCH (H:Computer) WHERE H.operatingsystem =~ '(?i).*(2000|2003|2008|xp|vista|me|7).*' RETURN H.name,H.operatingsystem
Find all enabled users who are member of a particular group, such as Domain Admins.
MATCH (u:User)-[:MemberOf]->(g:Group {name:'DOMAIN ADMINS@<domain>'}) WHERE u.enabled = TRUE return u.name
Find all users that contain a keyword.
MATCH (u:User) WHERE u.name CONTAINS "<keyword>" return u.name, u.displayname, u.description, u.group
Print the name of all enabled users and their description field.
MATCH (n:User) WHERE n.enabled = TRUE RETURN n.name, n.description
Print various details about all enabled users.
MATCH (u:User) WHERE u.enabled = TRUE return u.name, u.description, u.samaccountname, u.pwdneverexpires, u.pwdlastset, u.lastlogontimestamp, u.lastlogon, u.distinguishedname
There are literally hundreds of these type of posts on the internet, with one of my favorites being https://wiki.wireshark.org/CaptureFilters. However, I wanted to create this ‘short’ list that contains my favorite go-to’s after performing Man in the Middle attacks.
This post will be updated as time goes on.
Understanding the Packet Capture
Before diving too deep, it’s always a good idea to get an idea of what type of traffic was captured so you know which filters to apply.
Viewing Protocol Statistics: In the Menu, click on Statistics and select Protocol Hierarchy.
Filtering HTTP
If non-encrypted HTTP traffic was captured, we may be able to extract juicy details.
View all plaintext HTTP GET requests: http.request.method == "GET"
View all plaintext HTTP POST requests: http.request.method == "POST"
Filtering by specific redirect location: http.location == login_success.php
To export HTTP objects (such as images or pages): Select File. Click on Export Objects, and then HTTP.
Remember to always Right-Click a packet, and Follow the TCP Stream to get more details from the raw data.
Filtering FTP
FTP is pretty simple, since all traffic is sent in plaintext.
To view all FTP related traffic: ftp
To export FTP objects (such as transferred files): Select File. Click on Export Objects, and then TFTP.
Remember to always Right-Click a packet, and Follow the TCP Stream to get more details from the raw data.
Filtering SMB
SMB is a favorite to capture, as it is usually not encrypted and you may be able to exfiltrate files over the wire.
To view packets related to SMB files: smb.file
To export SMB objects (such as transferred files): Select File. Click on Export Objects, and then SMB.
This post contains various commands and methods for performing enumeration the SNMP service. This article will be expanded upon as time goes on.
What is SNMP?
SNMP operates using UDP, which is a basic and stateless protocol, making it vulnerable to IP spoofing and replay attacks. Furthermore, widely adopted SNMP versions, such as 1, 2, and 2c, do not encrypt data, allowing for the easy interception of SNMP data and credentials over local networks. Additionally, conventional SNMP protocols often employ feeble authentication methods and are frequently set up with default public and private community strings, further compromising their security.
What are MIBs?
The SNMP Management Information Base (MIB) is essentially a database that typically holds data pertinent to network management. This database is structured in a tree-like format, where each branch symbolizes various organizations or network functionalities. The end points of these branches, akin to the leaves on a tree, are associated with distinct variable values. These values can be retrieved and examined by an external entity.
Using NMAP
Find hosts with SNMP running and output them to a file: sudo nmap -sU --open -p 161 <targetRange> -oG open-snmp.txt
Run all SNMP-related Nmap Scripts: sudo nmap -sU -p 161 --script snmp-* <ipAddr> -oG nmap/snmp.txt
Using SNMPWALK
Once you find SNMP services, and their associated community string, you can query them for specific data that might be interesting by enumerating the MIBs. This tool will automate walking through the MIB tree.
Enumerate SNMPv1 with a community string of “public” AND limit timeouts to 10 seconds: snmpwalk -c public -v1 -t 10 <ipAddr>
Enumerate SNMPv1 with a community string of “public” AND automatically translate any hexadecimal string into ASCII that was otherwise not decoded snmpwalk -c public -v1 -Oa <ipAddr>
Enumerate SNMPv2 with a community string of “public”: snmpwalk -v2c -c public <ipAddr>
Enumerate SNMPv2 with a community string of “public”AND search for installed software: snmpwalk -v2c -c public <ipAddr> hrSWInstalledName
Enumerate SNMPv2 with a community string of “public”AND search amount of RAM on the host: snmpwalk -v2c -c public <ipAddr> hrMemorySize
Querying Specific MIBs
Once you have the MIB tree for the target host, you can query specific MIBs directly to return specific data.
Enumerates Local Windows Users on a system using SNMPv1 with a community string of “public”. snmpwalk -c public -v1 <ipAddr> 1.3.6.1.4.1.77.1.2.25
Enumerates Currently Running Processes on a Windows system using SNMPv1 with a community string of “public”. snmpwalk -c public -v1 <ipAddr> 1.3.6.1.2.1.25.4.2.1.2
Enumerates Installed Software on a Windows system using SNMPv1 with a community string of “public”. snmpwalk -c public -v1 <ipAddr> 1.3.6.1.2.1.25.6.3.1.2
Enumerates current TCP Listening Ports on a Windows system using SNMPv1 with a community string of “public”. snmpwalk -c public -v1 <ipAddr> 1.3.6.1.2.1.6.13.1.3
Using ONESIXTYONE
First, build a text file that contains a list of community-strings. For example, some common ones are:
public
private
manager
management
To brute-force communities against a single IP using built-in wordlist: onesixtyone -c /usr/share/doc/onesixtyone/dict.txt <ipAddr>
To brute-force against a list of IPs: onesixtyone -c <wordList> -i <targetFile>
Using SNMPSET
To change an OID to a different value: snmpwalk -v2c -c public <ipAddr><OID> <newValue>
To change the sysContact OID: snmpwalk -v2c -c public <ipAddr> sysContact <newValue>
Sample Enumeration Workflow
You may first start by trying to enumerate all of the SNMP servers within your subnet. Using Nmap for this may be the best/fastest option. sudo nmap -sU --open -p 161 <ipRange> -oG open-snmp.txt
With this, parse the open-snmp.txt to get a list of only the IPs. Clean that up and save it as a file “snmp.hosts”. Pass that over to a tool like onesixtyone to try and brute-force a valid community string. onesixtyone -i snmp.hosts
With any luck, you’ll find a valid SNMP community string for a specific host, and you can enumerate it further with snmpwalk. If you do research, you can find a specific MIB to query to extract specific information. snmpwalk -c public -v1 <ipAddr>
This post contains various commands and methods for performing passive recon of a target. This article will be expanded upon as time goes on.
Performing Whois lookups
We can utilize public WHOIS databases to perform lookups on domains. https://lookup.icann.org/
It may also be worthwhile utilizing other services, such as Namecheap. Once you know who the registrar is, it is typically best to perform a Whois lookup for your target using their domain registrar. https://www.namecheap.com/domains/whois/
We can also utilize a Kali terminal for this: whois <targetDomain>
You can use additional options to instruct the tool to use a different server. whois -h whois.godaddy.com <targetDomain>
Performing DNS enumeration with Nslookup
To perform a lookup of the A records against a particular domain: nslookup <targetDomain>
To look up the mail records: nslookup -query=mx <targetDomain>
To look up Nameservers: nslookup -query=ns <targetDomain>
To get all records that are available: nslookup -query=any <targetDomain>
You can also drop into nslookup with no parameters interactively. nslookup
While interactively working with nslookup, you can set your query: set q=mx
You can also set your server if you wanted to query a different DNS server than your default one: server 8.8.8.8
Performing DNS enumeration with Dig
To extract A records and Namerservers of a domain: dig <targetDomain>
To query just A records: dig <targetDomain> A
You can also limit the output to a specific record, and just return the answer section: dig +nocmd <targetDomain> MX +noall +answer
Can attempt a DNS Zone transfer: dig +nocmd <targetDomain> AXFR +noall +answer @<targetDNSServer>
To see an IP address of a hostname: host www.example.com
To see a specific record, such as mx records: host -t mx example.com
To see txt records: host -t txt example.com
If you have a range of IPs, you can use a loop to enumerate valid hostnames via a reverse lookup. For example, the following will scan IP addresses 61.222.169.200 through 61.222.169.254 and ignore anything that returns “not found”: for ip in $(seq 200 254); do host 61.222.169.$ip; done | grep -v "not found"
Automating DNS Enumeration
Fierce can be used to enumerate subdomains, IP ranges, and hostnames by using public DNS queries, zone transfer attempts, and brute forcing techniques. fierce -dns <targetDomain>
You can also specify a specific DNS server for the tool to use. fierce -dns <targetDomain> -dnsserver <targetNamserver>
We can also leverage a tool called DNSEnum to do something similar. It will look for the A records of the target domain, looks up the NS and MX records. Finally, it will attempt a zone transfer attack. dnsenum <targetDomain>
You can also specify a specific DNS server for the tool to use. Sometimes the results will differ. dnsenum <targetDomain> --dnsserver <targetNamserver>
You can use DNSEnum to brute force subdomains as well. dnsenum <targetDomain> -f <dictionaryList>
DNSMap can also be used, but it doesn’t do much other than brute-force with a built-in wordlist. dnsmap <targetDomain> -w wordlist.txt -r /tmp/results.txt
DNSMap to enumerate subdomains in bulk fashion: dnsmap-bulk.sh domains.txt /tmp/results.txt
DNSRecon is an ‘all-in-one’ tool that can do most everything. This will run a standard scan. dnsrecon -d <targetDomain> -t std
To run a brute-force with DNSRecon: dnsrecon -d example.com -D ~/list.txt -t brt
Google and Bing Dorking
Bing offers a query filter that returns websites hosted on a given IP address by entering the following Bing search: ip:<targetIP>
Search Google for results within a particular website: insite:<targetURL>
Search Google for specific filetypes: insite:<targetURL> filetype:pdf
Search Google for particular text in title: insite:<targetURL> intitle:admin insite:<targetURL> intitle:index of
Search Google for particular text in body: insite:<targetURL> intext:admin insite:<targetURL> intext:index of
Using Nmap for a pingsweep without port discovery: sudo nmap -PE -sn -n <ipRange> -oA nmap/pingsweep
Using Nmap for pingsweep, with top 20 port discovery: sudo nmap -PE -n <ipRange> --top-ports 20
Using Nmap to scan UDP ports: sudo nmap -sU <ipRange>
Using Nmap for ARP Scan: sudo nmap -PR -sn <ipRange>
Sometimes filtering may in place to only allow certain source ports on the network. To get around that, we could use the following Nmap command to scan DNS port 53 with a source port of 53: sudo nmap -sS --source-port 53 -p 53 <ipRange> -oA nmap/dns-servers
Hping
Hping is also useful as its always a good idea to get a 2nd opinion. The following will scan a specific port with 3 SYN packets. sudo hping3 -S <ipAddr> -p <port> -c 3
To use Hping to scan a port range, but exclude port 525: sudo hping3 -S --scan '80,445,500-550,!525' <ipAddr> -V
To use Hping for UDP scans: sudo hping3 -2 --scan 1-1000 <ipAddr>
Sometimes filtering may in place to only allow certain source ports on the network. To get around that, we could use the following Hping command to scan DNS port 53 with a source port of 53: sudo hping3 -S -s 53 -k -p 53 <ipAddr>
Host Enumeration Using FPing
We can leverage fPing to do a quick search on the network for alive hosts. fping -A <targetIP>
We can also add an option to limit the number of retries attempted, speeding up the execution. fping -A <targetIP> -r 0
Adding another option will allow us to view the time it took to retrieve the reply. fping -A <targetIP> -e
To sweep a network efficiently, without retires, and only display the alive hosts: fping -q -a -g 10.0.0.0/24 -r 0 -e
From within a Meterpreter session:
Display the network adapters and their associated IP addresses: ifconfig
Display nearby machines on the network: arp
Display entries on the local routing table: route
Perform an ARP scan for a given IP range: run arp_scanner -r 10.0.0.0/24
View existing configured routes in Metasploit: route print
Forward specific port to a remote host, through the Meterpreter session. Any traffic send to the local port of our localsystem will route through the Meterpreter session. portfwd add -l <localPort> -p <remotePort><destinationIP>
Handy Metasploit modules:
Run a ping sweep through a compromised system: use post/multi/gather/ping_sweep
Configure a Metasploit route for pivoting: use post/multi/manage/autoroute
You can also configure a route while interacting with a Meterpreter session: run autoroute -s <subnet>
Run a TCP port scan (you may want to configure a route first): use auxiliary/scanner/portscan/tcp
NFS shares are not only common to come across during the OSCP and in capture the flag events like Hack The Box, but they’re also common to see during internal pentest engagements. This post intends to serve as a guide for enumerating a NFS share and different opportunities for abusing their functionality.
Note: In Linux environments, NFS is sometimes used as a home directory server.
Using ShowMount
To list the available NFS shares, you can use the following: showmount -e <ipAddr>
To list the connected clients, you can use the following: showmount -a <ipAddr>
Mounting NFS Shares
First, we’ll need to create a mount point in Kali. sudo mkdir /mnt/nfs-share
Then we can mount the open share to it. sudo mount -t nfs <ipAddr>:/<shareName> /mnt/nfs-share
Then you can change into the mounted share. cd /mnt/nfs-share
Enumerating Mounted NFS Shares
Once you’ve mounted a share (using the above steps), we’ll want to enumerate them to see what they have and what permission you have to interact with it.
Obviously you can then read/copy files, but testing to see if you can write/delete is an important step. touch test rm test
Can you overwrite existing files? For example, say that Web.config was present in the share. Try the following: touch /tmp/Web.config mv /tmp/Web.config /mnt/nfs-share/Web.config
Sometimes interacting with the share directly can be slow, so it may be helpful to run the following command. This will get a list of all the files in the share along with their associated permissions, and write that into a text document locally on your machine. This will let you search through this local file to hunt for handy files rather than querying the remote system each time. find . -ls > /tmp/nfs-share.dir
This post intends to provide a list of helpful commands and tools that you can use when enumerating Port 5985 on a machine. This list is far from exhaustive and will be updated as time progresses.
This post intends to provide a list of helpful commands and tools that you can use when enumerating Port 53 on a machine. This list is far from exhaustive and will be updated as time progresses.
Enumerating Hostname of Server
Run the following commands to see if you can make the server leak its own hostname.
nslookup
server <targetIP>
127.0.0.1
127.0.0.2
<targetIP>
Note: It’s probably worth enumerating other live hosts on the network to confirm the domain name is the same.
Performing DNS enumeration with Nslookup
To perform a lookup of the A records against a particular domain: nslookup <targetDomain>
To look up the mail records: nslookup -query=mx <targetDomain>
To look up Nameservers: nslookup -query=ns <targetDomain>
To get all records that are available: nslookup -query=any <targetDomain>
You can also drop into nslookup with no parameters interactively. nslookup
While interactively working with nslookup, you can set your query: set q=mx
You can also set your server if you wanted to query a different DNS server than your default one: server 8.8.8.8
Performing DNS enumeration with Dig
To extract A records and Namerservers of a domain: dig <targetDomain>
To query just A records: dig <targetDomain> A
You can also limit the output to a specific record, and just return the answer section: dig +nocmd <targetDomain> MX +noall +answer
Can attempt a DNS Zone transfer: sudo dig @<targetDNSServer><targetDomain> -t AXFR +nocookie
Fierce can be used to enumerate subdomains, IP ranges, and hostnames by using public DNS queries, zone transfer attempts, and brute forcing techniques. fierce -dns <targetDomain>
You can also specify a specific DNS server for the tool to use. fierce -dns <targetDomain> -dnsserver <targetNamserver>
We can also leverage a tool called DNSEnum to do something similar. It will look for the A records of the target domain, looks up the NS and MX records. Finally, it will attempt a zone transfer attack. dnsenum <targetDomain>
You can also specify a specific DNS server for the tool to use. Sometimes the results will differ. dnsenum <targetDomain> --dnsserver <targetNamserver>
You can use DNSEnum to brute force subdomains as well. dnsenum <targetDomain> -f <dictionaryList>
DNSMap can also be used, but it doesn’t do much other than brute-force with a built-in wordlist. dnsmap <targetDomain>
DNSRecon is an ‘all-in-one’ tool that can do most everything. dnsrecon -d <targetDomain>
Using DNSRecon to enumerate hostnames within local subnet.
We can use dnsrecon to attempt a “brute-force” attack by querying IP addresses for associated reverse lookup records.
-n : Will be the nameserver to use. -r : Will be the network “range” that you want to lookup records for. --db : Will save the found records to a SQLite DB file.
dnsrecon -n <ipAddr> -r <subnet> --db target.db
If you are unsure of any information, or even what network(s) to perform the lookup for, you can create a bash script that contains multiple commands. For example, we could create enumdns.sh that contains the following:
This post intends to provide a list of helpful commands and tools that you can use when enumerating Port 389 on a machine. This list is far from exhaustive and will be updated as time progresses.
Let’s start by performing a search with simple authentication:
ldapsearch -h <targetIP> -x
If you get results back, let’s run the following command to try and get additional details out.
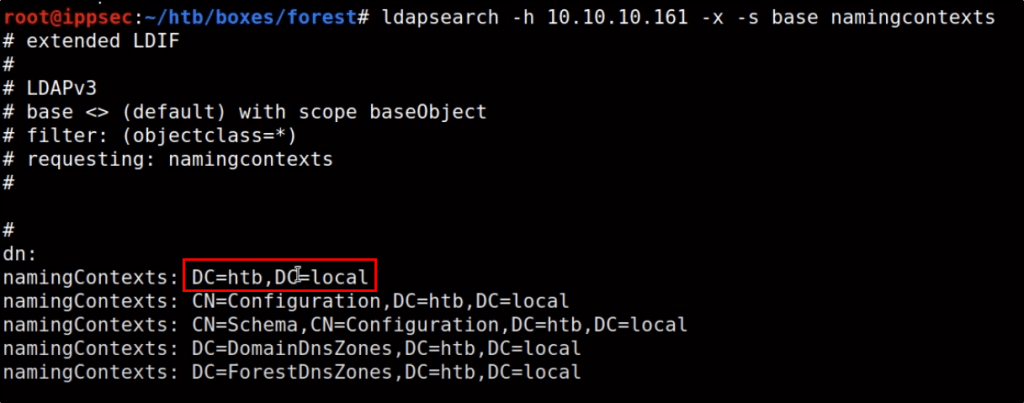
ldapsearch -h <targetIP> -x -s base namingcontexts
Based on the results, you’ll want to extract details about the primary Domain Component. For example, based on the above output, our next command would look like this.
ldapsearch -h <targetIP> -x -b "DC=htb,DC=local"
This should output a ton of information that you can then redirect to a file. If you do redirect to a file, the following commands may be helpful for extracting specific details.
If you wanted to query LDAP directly, you can do so by adding your query to the end of your ldapsearch command. For example, we can find details of objects that have a class of “Person” by running the following command:
If you find UDP ports 500 or 4500, the box is likely running some sort of IPSEC VPN tunnel. This post intends to serve as a guide for enumerating these ports and a list of tools that can help you.
Table of Contents
Helpful Commands
Installing IPSEC VPN Client on Linux
Installing IPSEC VPN Client on Windows
Troubleshooting IPSEC Errors
Helpful Commands
To extract the hash, or preshared key, you can run the following command as long as Aggressive mode is enabled.
ike-scan --aggressive <targetIP>
If this fails, you can run the following command to extract some details about the VPN configuration, such as what hashing format and encryption algorithms are being used.
ike-scan -M <targetIP>
Notice that the LifeDuration may be returned in Hex format. You can take this value and identify what its decimal format is to get the life duration in seconds using the following command.
python -c 'print int("<hex>", 16)'
To confirm whether or not the VPN is using IKE version 2, you can run the following command. If it returns successful output, then you know IKEv2 is in use.
ike-scan -M -2 <targetIP>
Note that Nmap scans across an established IPSEC connection will need to run with -sT to get accurate results. The default for Nmap is to run with SYN scans (-sS).
Installing IPSEC VPN Client on Linux
In this example, I will show how to connect to the challenge on Hack The Box called Conceal. Please note that this post does not intend to serve as a walk through or write-up of this machine, but rather is being used as an example for configuring IPsec tunnels.
On Linux, you can use StrongSwan to connect to VPN servers.
sudo apt install strongswan -y
To begin, let’s edit our /etc/ipsec.secrets file so that it contains the PSK (Pre-Shared Key) for our VPN server. This will allow StrongSwan to authenticate to our VPN server when we go to use the tool. You can view the man page of this configuration file by running “man ipsec.secrets”.
sudo vi /etc/ipsec.secrets
Add the following line:
<targetIP> %any : PSK "<presharedKey>"
Note: You need to provide the key in its unencrypted/non-hashed format.
Next, we need to edit our IPsec configuration file so that it contains the configuration of our VPN. You can view the man page of this configuration file by running “man ipsec.conf”.
sudo vi /etc/ipsec.conf
This is where things will vary based on the configuration of your VPN, but this is what is needed for things to work on the Conceal box. You will need to take the output from the commands we ran earlier to know exactly what values to enter for each of these. Refer to the man page for ipsec.conf as needed.
While this configuration should work in most cases, Conceal was a bit tricky. It was configured to only allow TCP ports over the VPN, rather than the default of both UDP and TCP. Because of this, we actually had to add two additional lines.
With our configuration in place, let’s try establishing our connection!
sudo ipsec start --nofork
Things to consider:
You may or may not need the fragmentation item in the above config(s), depending on how the VPN server is configured.
If you’re having weird issues, you can run the following command in an attempt to improve the connection. sudo ifconfig <interface> mtu 1000
Note that Nmap scans across an established IPSEC connection will need to run with -sT to get accurate results. The default for Nmap is to run with SYN scans (-sS).
Installing IPSEC VPN Client on Windows
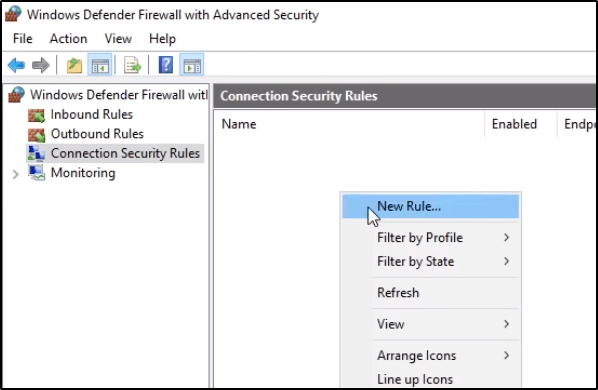
To begin, let’s launch Windows Defender Firewall with Advanced Security.
Navigate to Connection Security Rules, and then create a New Rule.
We want to create a Custom rule, and then click Next.
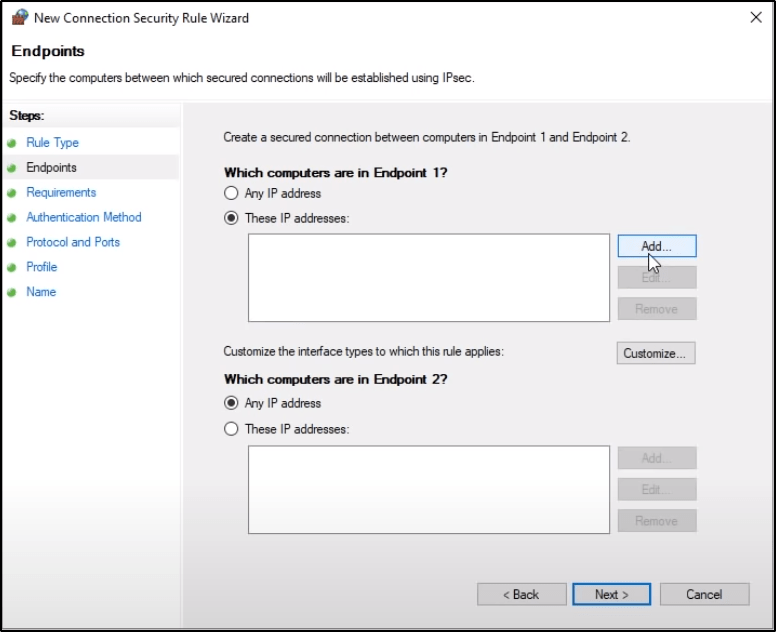
Within EndPoint 1, click on These IP Addresses and then select Add. You’ll want to enter the IP address of your interface that you’ll use to connect to the VPN.
Do the same thing with Endpoint 2, but specify the destination host or network. When finished, the populated window should have items in both panes, and then you can click Next.
Select the proper Authentication Method.
If using a Preshared Key, select Next in the above listed window, then select Advanced and click Customize.
Then click on Add, select Preshared Key, enter it, and then click OK.
Select the necessary Protocol/Port configurations. In some cases, your VPN tunnel may only allow UDP or TCP and not always both.