This post showcases the below graphic that outlines a list of machines on HTB that will best prepare you for the OSCP exam. To guide myself in my OSCP journey, and to hopefully help others along the way, I intend to develop write-ups on each box as I hack my way through them.
My goal is to knock out at least the 27 Linux/Windows boxes represented in the Green/Blue columns.
In this guide, I will demonstrate how easy it is to break into a Windows machine when you have physical access, even if you have a strong password securing the account. We will go from being completely locked out, to having full Administrator access in less than 5 minutes.
This is a Beginner level attack that anybody can do. Let’s dive in!
Table of Contents – Explaining the Attack – What You Will Need – Performing the Attack – Post Exploitation – Mitigation
Note: The following are requirements for this attack to work.
A Windows computer with drive encryption DISABLED.
A windows recovery disk or installation ISO. Can be installed on a USB drive.
Physical access to the machine.
Ability to boot into the BIOS.
Explaining the attack
Before we begin, I would like to explain how the attack works. Ever wonder what the name of the file is that launches the accessibility controls on the log-in screen? Probably not, but I have. When you click the accessibility control icon, Windows launches a utility called utilman.exe.
Well what could happen if we were to modify utilman.exe so that we can do more nefarious things? Perhaps we can replace utilman.exe with a command prompt window? Would this allow us to launch a command prompt instead of accessibility controls when the shortcut gets pressed?
What you will need
You must have a few things prepared ahead of time.
A Windows InstallerDisk or USB Drive. You can create a bootable Windows installer by downloading the ISO file from Microsoft and placing it on the USB drive using a tool such as Rufus. Let me know if a guide on this process would also be helpful.
Physical access to the machine.
That’s it. The rest can be done by hand!
Performing the attack
1) Place your Windows Installation Media into the machine and Reboot the system.
2) As the system boots, we need to press a key to boot into the BIOS. Each computer is different, but you can typically achieve this by pressing an F-Key as the system boots up, such as F12.
3) In this BIOS, navigate to the Boot Options and select your Installation Media Method. This will likely be listed as a USB Drive or a CD-ROM.
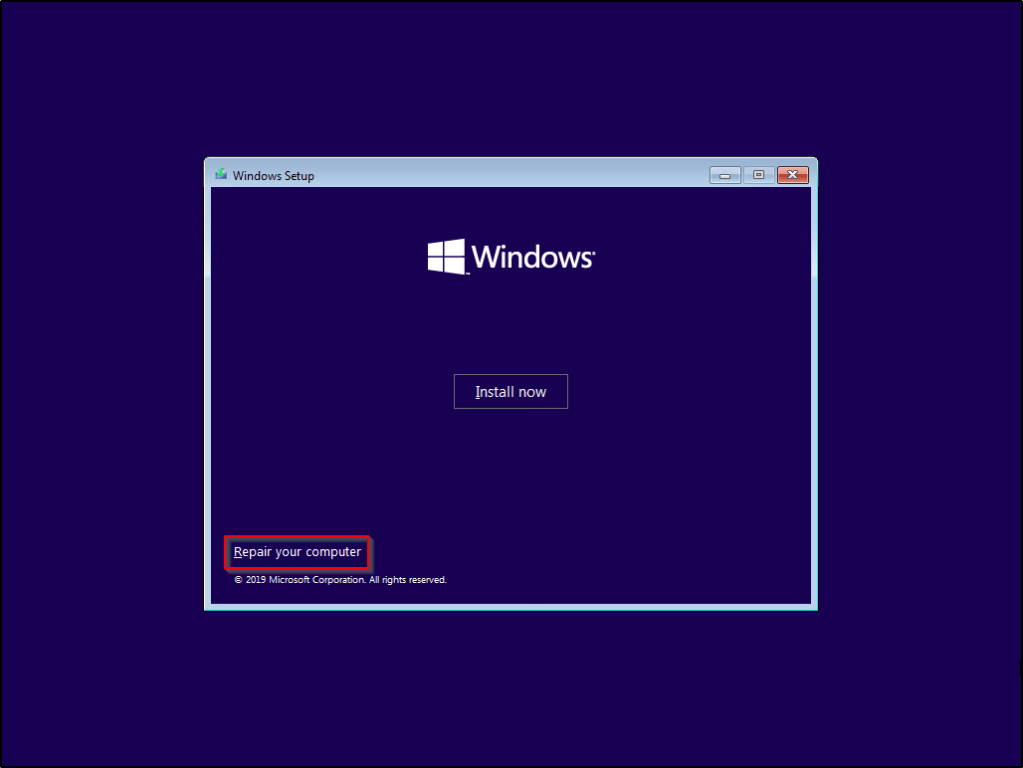
4) Allow the system to boot up. It should load into your Installation Media instead of the fully installed Operating System. Once booted, click on Next.
5) When taken to this screen, select Repair Your Computer.
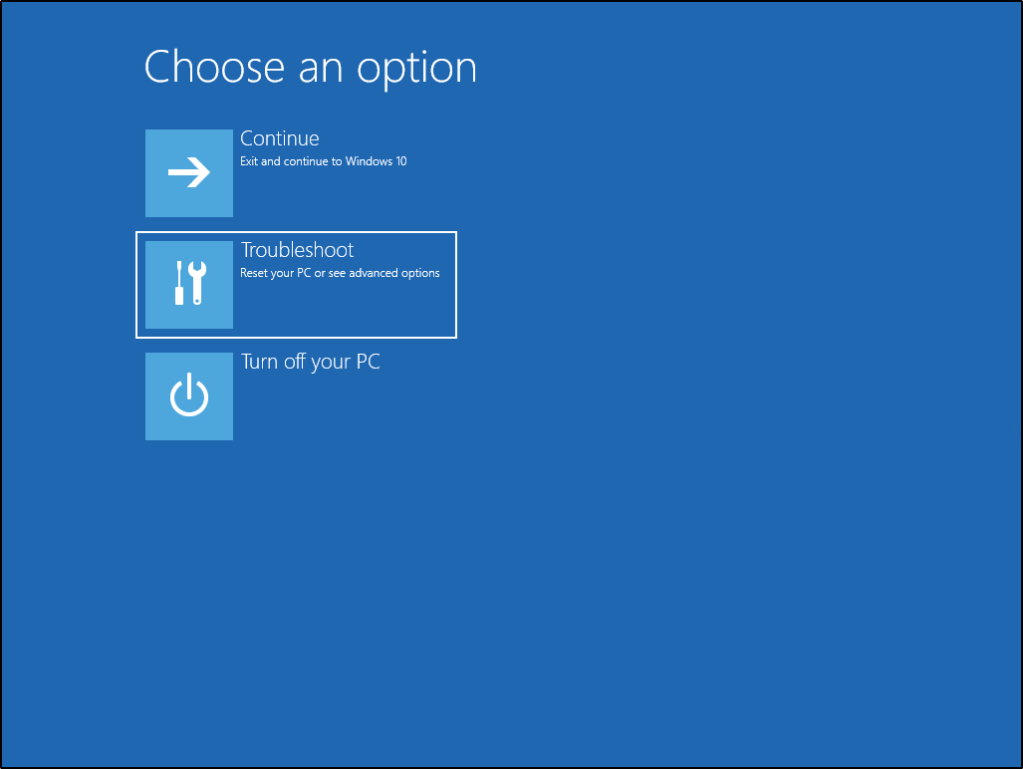
6) Out of the list of options, select Troubleshoot.
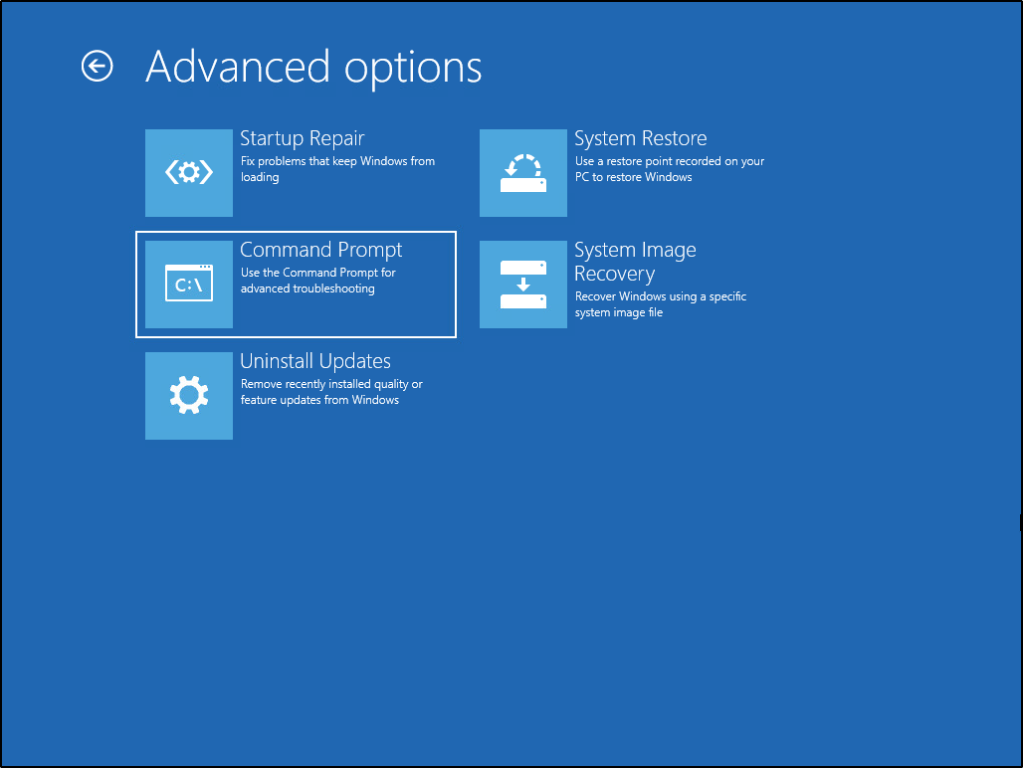
7) Now we have the option to select Command Prompt.
8) You should be presented with a shell that defaults to the X:\Sources directory. This is the present working directory of the installation media we’ve created. Since the Operating System (OS) isn’t actually installed here, we need to locate where the OS lives if we’re going to modify utilman.exe. Run the following command: diskpart
Once the DISKPART utility loads, run the command: list volume
You should see a list of all current volumes located on the machine, and their associated drive letters. Based on the label and size of the results, we can tell which drive letter is a System Restore partition, and which one isn’t. In my example, the system drive is represented by letter D:\
Type the following command to kill the DISKPART utility and go back to the regular shell. exit
9) Now that we know what drive letter represents the system drive, lets Change into it by typing the following command: d: Note: You may need to use a different drive letter based on the results of the above step.
We should see the current directory of the shell change to d:\Windows\System32>
10) Luckily for us, utilman.exe lives in the System32 folder. Let’s run the following command to rename the existing utilman.exe so we don’t lose the file. rename utilman.exe utilman.old
11) With utilman.exe safely out of the way, let’s take a copy of the Command Prompt utility and name that copied version utilman.exe. copy cmd.exe utilman.exe
12) With everything now in place, Remove the Installation Media and Reboot the machine. Allow it to boot into the fully installed operating system as normal.
13) Once the machine boots, you should be presented with the typical login screen. However, clicking on the Accessibility Options now launches cmd.exe instead of utilman.exe
We can run the following command to see that we have SYSTEM level access, the highest level of access you can have on a machine. whoami
Post exploitation
From here, you’ve already got all the access you need to browse the machine’s files, execute commands, or add/remove users. Some of my favorite things to do are below.
Reset an existing user’s password. net user <USERNAME> <PASSWORD>
Create a local administrator account. net user <USERNAME> <PASSWORD> /add net localgroup administrators <USERNAME> /add
Exploit Mitigation
This goes to show just how easy it is for an attacker to take control of a system within just a few minutes if they have pysical access to it. While having strong credentials are important, they prove useless in this case if we have the ability to just reset the credentials.
The best mitigation strategy in this case would be to implement hard-drive encryption. With the drive encrypted, we would have never been able to make changes to the directory storing system files without first knowing the encryption key.
Windows has a built-in drive-encryption mechanism called BitLocker. This is a free service and super effective at preventing these type of attacks, as well as provides protections against an attacker pulling your hard-drive and looking through its contents offline. More details on this topic in a future blog-post, but for now you can find out how to enable this protection for yourself by referencing Microsoft’s guide. https://support.microsoft.com/en-us/help/4028713/windows-10-turn-on-device-encryption
Please let me know what you thought of this post and if this was at all helpful to you. Let me know what you’d like to see next and whether or not a guide on implementing BitLocker is worthwhile.
This post intends to serve as a guide on activating a purchase ESU license key on a Windows 7 box. I’m making the assumption that you have already gone through the procedure to purchase the Windows 7 ESU key and have access to it.
If you haven’t, you should be able to purchase one through a distributor (such as Ingram Micro) and link it to your Office 365 tenant as a subscription-item. If you are a partner and need details on procuring Windows 7 ESUs through the Partner Center, see Purchasing Windows 7 ESUs as a Cloud Solution Provider
Table of Contents – Installation Prerequisites – Manual Installation and Activation – Automating via Batch Script – Additional References
Installation Prerequisites
There are some updates that you’re going to need to ensure are installed on your system(s) first. The official Microsoft documentation links to older KB’s, but those have been replaced by newer ones. As of this post’s creation dates, here are the latest KB’s that you will need.
One the prerequisites are installed, you can follow these steps to activate Extended Security Updates (ESU) for machines that are connected to the internet.
1) First, locate and Copy the ESU Key to your clipboard.
2a) Open an Elevated Command Prompt window and run the following command. slmgr /ipk <ESU KEY>
After a few moments, you should get a message confirming that the product key was installed.
2b) If you are unable to interact with the desktop GUI, you can leverage the cscript command to write the output to the console. cscript "c:\windows\system32\slmgr.vbs" /ipk <ESU KEY>
3a) Now that the key is on the system, we need to locate its Activation ID so we can activate the key in a future step. Run the following command: slmgr /dlv
3b) While the command above will present the Activation ID to us, it’s not easy to copy. Let’s run the command again, but leverage cscript so we can copy the Activation ID value from the console. cscript "c:\windows\system32\slmgr.vbs" /dlv
4) With the Activation ID copied, let’s move forward with the activation. slmgr /ato <ESU ACTIVATION ID>
5) Once you have activated the ESU product key, you can verify the status at any time by running the following command and referencing the License Status value. slmgr /dlv
Automating the Process via Batch Script
The ESU license is activated — Great! Now how do we automate this process for the rest of our machines? Lets create a quick batch script that we can then push out via a RMM solution and/or GPO logon scripts.
Note: I am not a scripting expert, but I was able to piece the following together. Please reach out or leave comments below if you see necessary improvements.Make sure you pass a value for the %Key% variable, or replace the variable in your script with your actual key.
@echo off
cscript "c:\windows\system32\slmgr.vbs" /ipk %Key%
for /f "tokens=*" %%a in ('cscript C:\WINDOWS\system32\slmgr.vbs /dlv ^| findstr /b ^"Activation ID: ^"') do set actID=%%a
set actID=%actID:Activation ID: =%
cscript "c:\windows\system32\slmgr.vbs" /ato %actID%
cscript "c:\windows\system32\slmgr.vbs" /dlv
Troubleshooting Tip: While the above script worked for me, the value that gets returned for %actID% may be incorrect for you if you have multiple products installed on your system, such as a previous ESU or OEM license. If you notice that your License Status still shows Unlicensed after running the script, the %actID% is likely populated with another product installed on your system.
EDIT: A user on Reddit sent in a tip that the ActivationIDs should remain the same across all machines for this year’s ESU. I haven’t verified if that’s the case or not, but that should resolve issues related to pulling down the incorrect %actID%. Updated batch script could be as follows in that case:
Check out Microsoft’s official documentation on this topic, including information on how to activate the ESU on machines without internet connectivity.