Harley’s list of recommended resources for beginners can be found below. While all of these resources are great on their own merit, it’s important that hackers reflect on what type of hacking is most interesting to them. For a complete beginner that doesn’t know what path to take, I would recommend dabbling in everything until you learn what interests you most, and then dive deeper into training materials related to that niche.
All threat of these platforms are free, but not all of the functions are available for the free versions. They are still great to be able to look up IOCs (indicators of compromise) on threat actors. All of these platforms you will have to register for, but are worth it.
VirusTotal – VirusTotal (a site to check the reputation of URLs and IPs as well as upload files to and see if they are detected by the Anti-Virus programs; remember this is a public site so any files that are uploaded can be seen by anyone)
In early July of 2021, I decided to take on TCM Security’s new PNPT certification and passed it on my first attempt! This post intends to serve as a review of my experience, as well as help answer some of the common questions that I’ve seen online regarding the exam.
What is the PNPT?
The exam begins with external enumeration and some OSINT in order to get your initial foothold. Once you have that, you’ll pivot inside the environment with the ultimate goal being to compromise a domain controller and set up some sort of persistence.
There are a number of machines in the internal network, and you’ll need to compromise each one of them before you’re able to make it to the end objective. To do this, you’ll need to know techniques for Active Directory enumeration, exploitation, lateral movement, and some privilege escalation.
There are no limitations on tools (including LinPEAS and Metasploit). Five day time limit to hack, with an extra two days to write and submit your report. The exam is not proctored and getting going is as simple as paying for the exam and getting it scheduled.
If you fail, you will get a 2nd attempt for free.
My Background.
Let’s take a step back so I can share who I am and what knowledge I had going into the PNPT. As a teen, I knew I wanted to become an ethical hacker and eventually explore the world of Pentesting. I graduated with an associates degree (2yr) in Cyber Security & Networking in 2016, but that really didn’t mean much since I finished that program with zero certifications. Really, it gave me the baseline understanding of security, networking, and computer concepts – enough to get me started in IT.
As soon as I graduated, I started working help desk for a small MSP. Before long, I became the lead technician there, an IT Manager, and helped hire and mentor every technician that we brought on to our team. Doing that for four years helped me learn a lot about Systems Administration, TCP/IP Networking, Office 365, Active Directory, PowerShell, etc. This job was great, but it wasn’t Pentesting – and I started to lose hope that I would ever make my dream a reality.
2019 is when that changed. I went to Defcon for the first time and really started to get involved with the Infosec community. When I got back home, I came across Heath Adams’ (the Founder of TCM Security) YouTube channel through his free 14hr “Zero to Hero” Ethical Hacking Course. The content on his channel helped me realize that becoming a Pentester is possible – you just have to put in the work.
Through his encouragement, I started down the OSCP path before 2019 was over, and unfortunately have been on it ever since. Countless hours of learning, and over $2,000 later, here I am in 2021 getting ready to take on the OSCP exam for the 5th time.
While I still haven’t earned the OSCP certification yet, I have definitely picked up a ton of skills along the way. I have since started Pentesting full time, and now help companies find vulnerabilities within their infrastructure, networks, and web applications. I have been doing this for a little over a year as of writing this post.
Why I Chose the PNPT
In late April, TCM Security announced the PNPT certification. By this point in time, I had already felt comfortable performing external and internal network penetration tests for real live companies, so taking on the PNPT was really only something I was interested in doing for two reasons:
To support TCM Security. In many ways, I have always credited TCM Security with giving me the confidence to take the leap, quit my job, and get into Pentesting to begin with. Creating a new certification and taking on the big dogs is no small task, so I wanted to show my support for what they are doing as I know there are others out there that are in a similar situation as I was. Educational content that is easy to understand and affordable is something that this industry needs more of.
To accredit my skills and give myself a boost of confidence. Failing the OSCP as many times as I have definitely doesn’t help with the rampant imposter syndrome that many folks in our community deal with day to day, and I really needed to prove to myself that I know what I’m doing. I had hoped the PNPT would help me verify that – and let me tell you, it really did.
My Exam Experience.
Let’s get down to the exam. The exam process is pretty straightforward and much like what you would expect if you were subcontracted on for a Pentest. You schedule a time for the engagement, that time comes around, and then you’re sent the Engagement Letter that contains the scope, limitations, and objectives. There will also be a VPN pack that you’ll use to connect to the environment and get to hackin’!
I decided to schedule my exam over the fourth of July holiday break since I had Monday off. I started my exam after work on Friday and was able to finish early Sunday afternoon – so roughly after 48 hours. I took the rest of Sunday to write up the report and actually received a reply later that same night, even though it was a US holiday. The 15 minute debrief call was scheduled for the next day, and I was told by the end of that call that I had passed!
I really enjoyed that the exam felt structured in a way where you’re able to make steady progress all the way through. While there are many rabbit holes, the exam felt architected so that you could tell whether or not you were on the right path and it seemed pretty clear that you would have to complete one objective before being able to move on to the next.
Ratings on Various Exam Aspects.
Note: Please keep in mind that these are my opinions as of time of writing. Because of this, these are subject to change in the future and do not represent the opinion of others.
Affordability – 10/10. Out of everything out there, I have not found another course/exam combo that can compete with the price offered by TCM Security. As of when I’m writing this post, the cost for the PNPT exam is $299, with various offers to get all of the training needed to pass for less than $100.
Course materials – 10/10. It’s refreshing to go through an exam where the course materials provided to you are sufficient for being able to pass the exam. For other exams in the industry, such as OSCP, it is common to have to pay an expensive amount for the course materials, and then fork out additional money for supplement materials in order to pass. In my experience, the materials offered by TCM Security Academy is sufficient to be able to pass the exam, with 80% of the necessary material being taught in the Practical Ethical Hacking (PEH) course.
Practicality – 10/10. As the name of the certification suggests, this exam is 100% practical. No multiple choice questions, no true or false – just you, computer systems, and your skills.
Lack of Stress – 8/10. Since you have 5 days before you have to worry about the report, there really isn’t a lot of pressure on this – especially compared to exams like the OSCP, where you only have 24 hours for exploitation. This exam also is not proctored, which can be seen as both a good and a bad thing. Considering there aren’t tool limitations in this exam, proctoring would only really be useful to try and validate your identity so that others don’t take the exam on your behalf. But in the end, you’re really just cheating yourself if you were to do something like that.
Realism – 7/10. There are many components of the exam that are realistic, but there are definitely items of the exam that are not realistic. For example, it never really felt like I was on actual corporate machines. The software installed on the various systems didn’t really make sense, especially when you correlate the job position of the user and the software on the systems. They also sprinkled in comedic bits throughout the exam, which I actually enjoyed quite a bit, but it does remind you that you’re in a fake environment and takes away from the “Real World” feel.
Difficulty – 6.5/10. During the exam, it is easy to feel pressure and get stuck. While I wouldn’t consider this exam difficulty “Advanced”, it was definitely challenging at times and you will find your emotions rising if you let them. Just remember that there are five days to complete this, which helps alleviate some of the pressure and puts things into perspective. You will also need to think a bit “outside the box” at times. You can’t just copy the course materials verbatim to get some attacks to work, rather, you’ll need to understand why the attack works and be able to apply critical thinking in order to successfully exploit them.
Recognition / Credibility – 3/10. This is, without a doubt, the number one drawback of taking the PNPT. As of today, the vast majority of organizations do not know what the PNPT is, nor what skillset it teaches. It is not currently recognizable by majority of HR departments, and likely not recognizable by many hiring managers in Infosec. This is not due to lack of the certification being worth anything, rather just a lack of time and exposure of the certification in the market. While holding this certification will definitely help you explain your skills within a job interview, I do feel like it will take some time before this certification will help you get passed the HR department on it’s own.
PNPT vs OSCP
This conversation could be its own independent post. In short, the OSCP and the PNPT are two very different exams with different requirements, different skillsets, and different objectives. They each hold a place in the market and I find them both valuable for various reasons.
While I do wish certain things about the OSCP and Offensive Security’s business practices were different, I cannot argue against the fact that the OSCP certification process is an extremely valuable experience for anybody getting into the world of Ethical Hacking. I would not be where I am today if it wasn’t for the OSCP journey.
With that said, the OSCP is not real-world realistic. It puts limitations on tools, sets an unrealistic timeframes, and uses unrealistic machines during the exam. The OSCP feels very much like a game in the sense that you’re only looking to pop shells while jumping through hoops – something that an organization doesn’t necessarily care about during a Pentest as long as you help them identify their most critical vulnerabilities.
Again, I could share a lot more on this topic – let me know if this is something you’d want to see.
Additional Tips
Remember the basics. It is easy to overthink things as you go into the exam. Just remember what you’ve learned and hold onto the basics. What is a reverse shell? What is a bind shell? 32bit vs 64bit executables. Common misconfigurations. Basics of enumerating common services. Etc.
Take breaks. This is a common suggestion for any practical exam in the Pentesting space, and it really is something that you must be doing. Don’t bang your head against the wall trying the same thing over and over – make sure to take breaks. Sometimes stepping away and coming back will help you find the item you’ve been missing.
Stay calm. This is a low pressure exam with plenty of time. If you’re ready to pass, you will know. If you’re not, well.. that takes us to my next tip.
Understand that failure is okay. TCM provides a free retake on their exam. Heath told me that only about 40% of their partipants pass on their first attempt, but majority make it on their 2nd. Failing doesn’t make you a loser – quitting does. Get back up, give it another shot, you’ll make it.
Encrypt and Anonymize Your Internet Connection for as Little as $3/mo with PIA VPN. Learn More
Microsoft Teams is a proprietary business communication platform developed by Microsoft, as part of the Microsoft 365 family of products. Teams primarily competes with the similar service Slack, offering workspace chat and videoconferencing, file storage, and application integration, and is used by hundreds of thousands of organizations across the world.
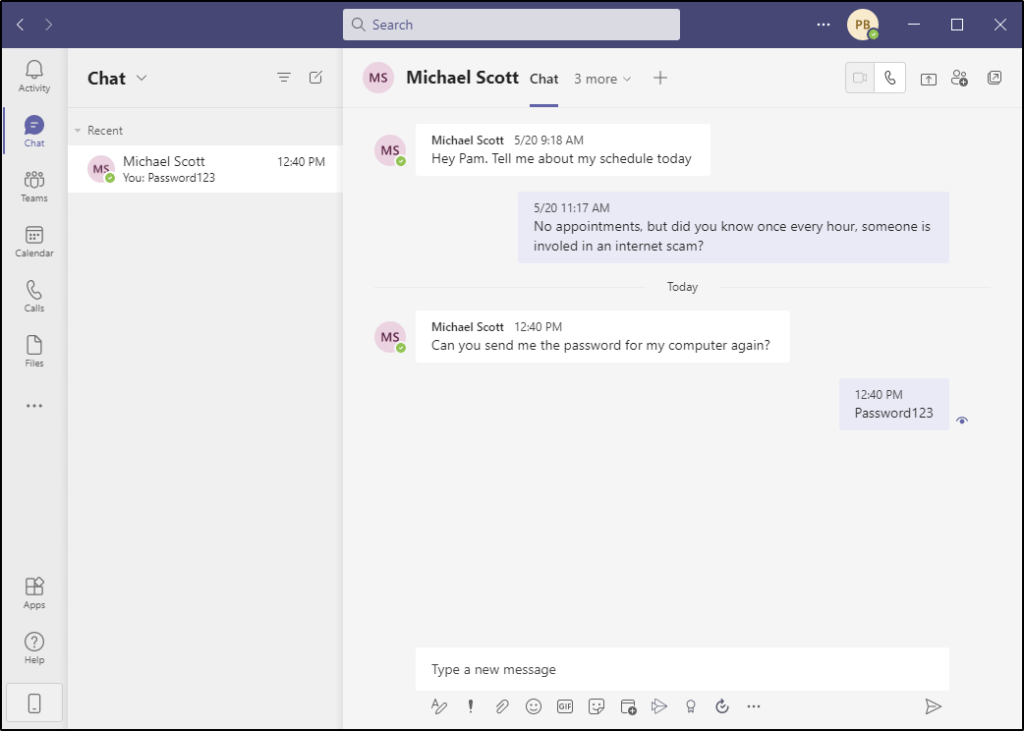
While some companies have policies that instruct users not to send sensitive information through cleartext channels, like Microsoft Teams, I’ve came across many organizations that do not adopt this behavior. A compromised Office 365 account could lead to all kinds of trouble, including giving an attacker access to communicated passwords, AWS keys, or PII through Microsoft Teams. To help counter this, companies may implement strict Conditional Access Policies and require MFA in order to gain access to a user’s Office 365 account. But what if I told you that you didn’t need the Office 365 account to read messages sent in Microsoft Teams?
Follow along and I’ll show you how access to a hard drive could be all an attacker needs to gain access to your “secret” Teams chats.
Where do Microsoft Teams messages live?
It’s no secret that Microsoft Teams is a cloud-based collaboration tool, so there is no doubt that the data sent to/from Microsoft Teams is stored in Microsoft’s cloud. However, it turns out that chat messages sent through Microsoft Teams also gets stored locally on a filesystem in the following location.
Within this directory is a .log file that contains a lot of information. At first glance, you may think the file just contains a bunch of computer gibberish, but sorting through the data can reveal some valuable secrets.
Let’s prove a concept.
So take a scenario where an end-user asks another end-user for help signing into an account. In this case, Michael Scott is asking Pam for his computer login since he can never remember. He sends the message through Teams, perhaps on his phone, and Pam replies.
Now let’s go review that log file on either one of their computers that has Teams up and running. Any user that has local administrator access to this computer would be able to access this file, even for other users on the system.
Surely there is a way to parse this data natively in Windows, but the following command works very nicely in Linux, so I will just copy the log file off the system and place it onto my Kali box.
Armed with this information, why does this matter? This is an important attack vector for the following reasons.
Organizations that communicate credentials over Microsoft Teams. As a Penetration tester, I’ve seen passwords, social security numbers, addresses, AWS keys, sensitive admin panels, and much more be communicated through Microsoft Teams. All of this could be potentially accessible to any user who gains access to a system or hard-drive that has ran the software.
Organizations that give everybody local admin rights. Many organizations still provide end-users local admin rights on their computer systems. Imagine a scenario where an end-user is compromised and runs a piece of malware that made it through the email security filter. This would allow a remote, unauthenticated threat actor full access to the filesystem, and therefor, any Microsoft Teams chat logs on this system.
Organizations that assign multiple users to the same system. Given that a user has a local admin rights, they’d have read access to any other user’s AppData directory. This would allow them to read the messages of other users on the same system as them, without ever generating access logs or needing to authenticate to Office 365.
Old hard drives that aren’t properly encrypted or wiped. When’s the last time you discarded a computer or hard-drive? Did you wipe it first? Did you ensure that all blocks on the drive has been rewritten? Did you have encryhption enabled before-hand? If the answer to any of these questions is “no”, then the next owner of that hard-drive may be able to read your Teams chat history.
Where do we go from here?
I’ve only performed very little research on this so far, and I’m left with many questions.
How long do these chat messages stay in the log file?
Is this limited to only chat messages, or can we extract details about Team Channel updates as well?
What about attachments or images being transferred?
Can scripts or tools be written to easily parse this in a much more efficient manner?
While I will continue to research this and develop my own tools, this is where I look to the community. If you know of security research on this topic, or a tool that is already developed that can easily parse these log files, please let me know.
I’ve made a handful of articles on attacking LLMNR within Active Directory environments, but I’ve never made anything that helps IT Admins mitigate this vulnerability. This post intends to serve as a guide for patching this vulnerability that is enabled by default in Windows.
Keep in mind that we need to not only disable LLMR, but also NBT-NS.
Table of Contents:
What is LLMNR & NBT-NS?
Great! So how can I exploit this?
Eek. So how do we patch this?
Disable LLMNR via Group Policy
Disable LLMNR via Command Line
Disable NBT-NS via Registry
Disable NBT-NS via PowerShell
What is LLMNR & NBT-NS?
Crowe.com does a fantastic job at giving you a high-level overview of what NetBIOS & link-local multicast name resolution do. Instead of reinventing the wheel, I will simply provide an excerpt from their website below.
“NetBIOS and LLMNR are protocols used to resolve host names and facilitate communication between hosts on local networks. NetBIOS is generally outdated and can be used to communicate with legacy systems. LLMNR is designed for consumer-grade networks in which a domain name system (DNS) server might not exist.”
If none of this sounds familiar, I highly recommend checking out the below link and reading more about these protocols before moving on.
When a computer requests access to a legitimate network resource, it usually follows a set of pre-defined queries. LLMNR and NetBIOS come into play as last resort options when other methods (such as DNS or local hosts files) don’t prove helpful. Since LLMNR & NetBIOS will attempt name resolution via broadcasted requests to the broadcast-domain, we can set up tools to listen for these requests and respond back pretending to be the intended recipient.
If you’re interested in learning how attackers abuse this protocol, check out one of my guides below.
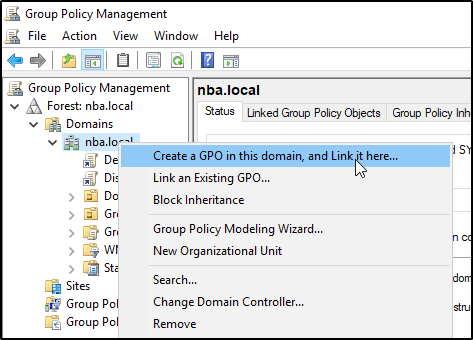
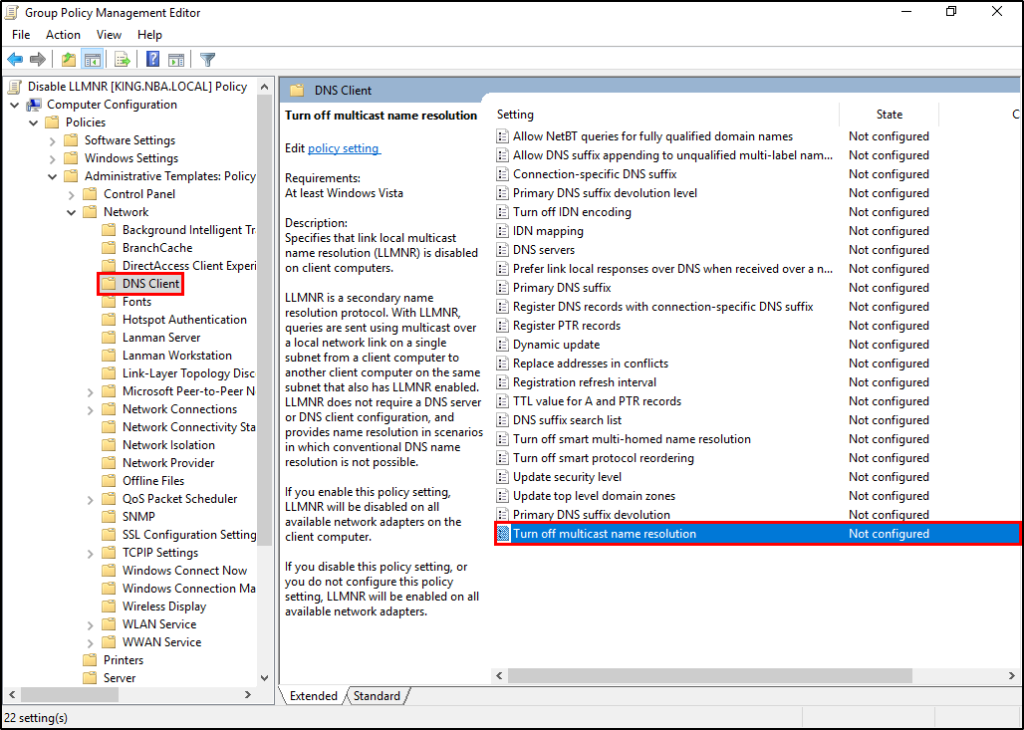
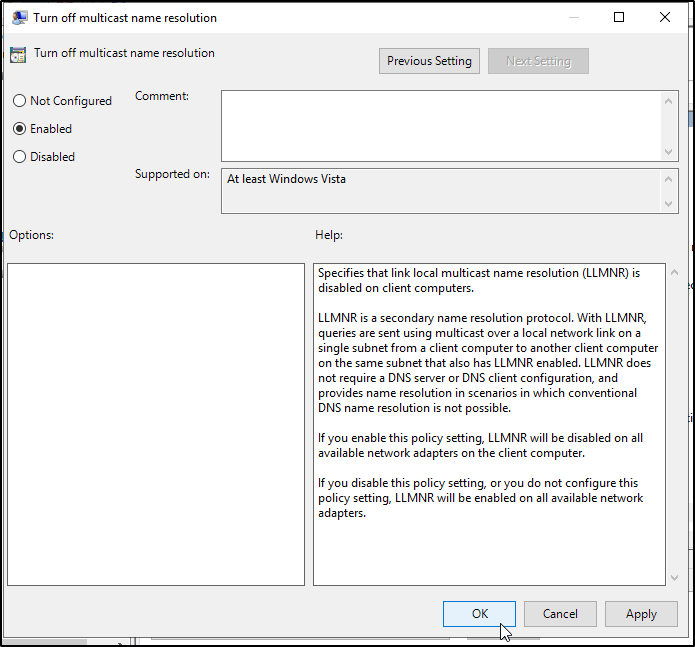
In Windows Active Directory, resolving this problem is as simple as applying a GPO. Sign into your Domain Controller and navigate to the Group Policy Management Editor. You’ll want to right click on your FQDN and select Create a GPO in this domain, and Link it here.
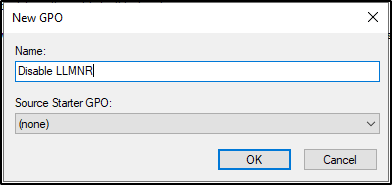
Go ahead and give it a name and click OK.
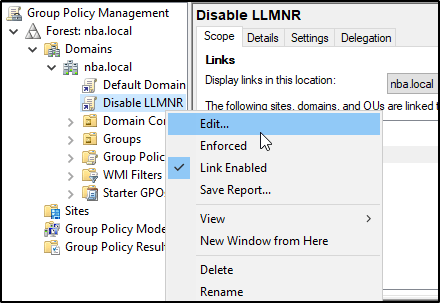
Then you’ll want to right-click on it and select Edit.
Now we just need to navigate to the following policy.
Computer Configuration -> Administrative Templates -> Network -> DNS Client -> Turn Off Multicast Name Resolution
Enable the policy by changing its value to Enabled.
Disable LLMNR via PowerShell / Command Line
But what do you do if you aren’t working with a Windows Active Directory domain? You can still patch this problem using the command line.
From here, we’ll be presented with multiple keys, each represents a network interface. You’ll want to adjust the NetbiosOptions value on each from the default of zero, to a value of 2.
Disable NBT-NS via PowerShell
To take care of the above mention step via PowerShell, you can run the following commands.
Ever since communication was invented, the need for encryption has been apparent and the solution has been sought after by all. This led many mathematicians down a path to create scalable, efficient solutions that not only encrypt communications, but creates a system that ensures integrity and confirms messages were truly sent by the person that it claims to be. While cryptography is a gigantic conversation piece that definitely deserves its own blog post, it is not our intention to get into the nitty gritty about the math behind cryptography. Instead, I’d rather talk about the fundamental purpose of digital certificates, and why IT admins seem to forget half of their purpose.
The purpose of digital certificates
Digital certificates serve two main purposes:
Provide information about the public key so that communication can be encrypted, and only decrypted by those that hold the paired private key. In other words, it ensures others can’t see the data within your session.
Certifies the ownership of a public key by the named subject of the certificate. In other words, it confirms that system you are communicating with is the one that you intended to.
But over time, many IT administrators seem to have forgotten about half the reason these digital certificates exist. From my time working at an MSP, to my time working as a Pentester, it is far too common to see self-signed certificates in use on important network infrastructure, including backup systems, remote desktop servers/workstations, switches, access points, camera systems, Hypervisors, and more — with many users trained to ignore certificate warnings because “that’s suppose to happen”.
What is a self-signed certificate?
Self-signed certificates have a useful purpose, which is to allow you to communicate with a device over an encrypted connection. This is obviously very important, but they lack in one critical area.
Digital certificates not only contain information about the public key used to encrypt the connection, but they also contain the digital signature of an entity that has verified the certificate’s contents (called the issuer). When a certificate is “self-signed”, that means there was no third party issuer to confirm the legitimacy of the system’s identity. This would be like a couple of police officers showing up with badges they printed themselves from Staples — It may look legitimate, but the police department (a trusted third party) didn’t actually issue those badges to verify the legitimacy of the “officers” identity.
Because of this, what would stop an attacker from pretending to be the system you meant to connect to? Sure, the communication would be encrypted, but if the attacker provides the public key used for the encryption, then they could also control the private key used to decrypt the communication. This is called a Man in The Middle attack.
What’s the impact?
When most people think of “Man in the Middle” (MitM) attacks, they usually think of connecting to insecure, public Wi-Fi networks. This is a problem.
MitM attacks are not restrained to only wireless networks, they’re prevalent in wired network environments too. The goal of these attacks can range from spying on somebody’s activity, harvesting credentials, or even redirecting the flow of traffic to a different location. All of these can have very real impacts, especially when you consider the high value of infrastructure that we commonly find using self-signed certificates.
For example, let’s talk about a technology that 2020 has us all more familiar with — the Remote Desktop Protocol (RDP). It is very common to see self-signed certificates in use when connecting to a remote computer via RDP. If you’re unsure if your computer is using a self-signed certificate, let me ask you: Does this image seem familiar?
If you answered “Yes” to that question, and if your first instinct when being displayed with this prompt is to click “Yes”, then your computer is likely using a self-signed certificate and you are vulnerable to Man in The Middle Attacks.
Seth is a tool written by Adrian Vollmer of German-based security company SySS that helps automate the process of performing RDP MitM attacks. If you’re interested in seeing just how easy it is to use this tool to perform attacks, feel free to check out my post Performing RDP Man in the Middle (MitM) Attacks Using Seth.sh to Steal Passwords.
Let me ask you another one. Are you an IT administrator that is used to seeing this when browsing to the web interface of your equipment? If the answer is “Yes”, then your equipment is likely using a self-signed certificate and you are vulnerable to Man in The Middle Attacks.
Where do we go from here?
The good news is that there are many articles online on how to replace self-signed certificates with trusted ones, which makes this problem easy to fix from a technical perspective. The bad news is fixing this problem at an organizational level may be a bit more difficult if your users are already used to blindly accepting these certificate warnings.
Once certificates are signed by a trusted authority, users will no longer be presented with these warnings as long as things are working properly. This means that in the event of a real MitM attack, users will need to be aware that these certificates errors should NOT be ignored, as it will be an indication that a real attack is underway. Should they choose to follow their untrained habit of ignoring these warnings, they will still be vulnerable to these attacks.
This is where user awareness training comes in, yet again, as a very critical piece of your security posture. If you need help getting your security awareness training programs dialed in, feel free to reach out to us at Lykosec.
The IT department must not be excluded from this training either, as they are probably the most at-risk of misunderstanding why they’re getting a certificate warning. Devices ship out of the box with self-signed certificates deployed automatically, and IT admins are very used to ignoring them when browsing the web interfaces of these devices. IT needs to not only be made aware of the impact of this problem, but also needs to understand how it works so they can determine properly when a certificate warning is safe and when it isn’t.
IT teams should make every effort to replace self-signed certificates. In an ideal scenario, equipment that ships with self-signed certificates should be prepped in an isolated subnet that no other users connect to. IT should make sure that they are the only devices connected to this subnet before accepting the certificate warning, and include replacing the self-signed certificate with a certificate signed by a trusted authority as a mandatory step before that device is put into production.
Conclusion
While self-signed certificates serve their purpose for encrypting communications, relying on them in production invites Man in the Middle attacks as users are no longer able to verify the legitimacy of the system’s identity. If you can’t confirm who you’re talking to, you don’t really know them, and as our mothers always told us, “you should never talk to strangers”.
Covenant C2 is described by its authors as “A . NET command and control framework that aims to highlight the attack surface of . NET, make the use of offensive . NET tradecraft easier, and serve as a collaborative command and control platform for red teamers.”
This post is meant to supplement a video that I uploaded to my YouTube channel.
Installing Prerequisites
To begin, we have some prerequisites to install. They both can be found at the following links. Both installers work well with default settings and just basic “Next, Next, Finish”.
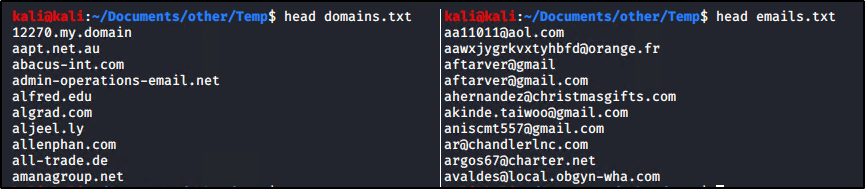
I recently had to migrate away from our third-party spam filter. I was able to get them to send us a CSV file that contains a list of all our blocked domains/email addresses, but that list was not very clean.
For example, it looked like this with a mix of domains and email addresses.
In order to make this work, I needed to clean up the list to extract emails to one file, and domains to another. To do that, I used the following commands within Kali Linux to make two new files; one that contains a list of emails, and a 2nd that contains a list of domains.
cat tmp.txt | grep @ | sort -u > emails.txt
cat tmp.txt | grep -v @ | sort -u > domains.txt
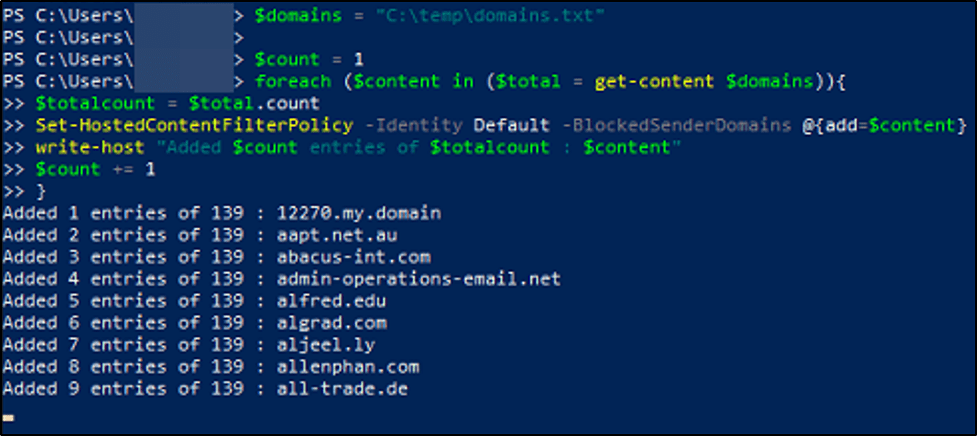
The PowerShell Section
Regardless which of the below scripts you use, you’ll need to connect to Exchange Online using something like the below.
A single, shared key is used to both encrypt and decrypt the data. You’ll want to handle this key with caution and only share it to those that need access to that data.
Pros:
Works great if we only need to secure data for a single machine or a single user.
Very fast to use. Uses little resources.
Because of this, it is efficient for large data.
Cons:
Does not scale very well. Since users must have the key to encrypt/decrypt the information, this key needs to be shared around to everybody who uses it, making it a lot harder to manage and keep secure.
Since you don’t want to make this single key public, actually sharing the key so that people can encrypt their communication to you can be difficult and opens the door for the key to be stolen by an intruder.
What are some algorithms that use this type of encryption?
AES (Advanced Encryption Standard)
DES (Data Encryption Standard)
Twofish
Serpent
Great, so when would you actually use this type of encryption?
While symmetric encryption is an older method of encryption, it is faster and more efficient than asymmetric encryption, which takes a toll on networks due to performance issues with data size and heavy CPU use. Due to the better performance and faster speed of symmetric encryption (compared to asymmetric), symmetric cryptography is typically used for bulk encryption / encrypting large amounts of data, e.g. for database encryption.
This is a great solution for data at rest. If the data is already present, you have no need to transfer it (and therefor transfer your encryption keys).
Payment applications where there are card transactions and PII needs to be protected.
Validations to confirms that the sender of the message is who they claim to be.
Random number generation or hashing for password storage.
Asymmetric Encryption
Oftentimes referred to public key cryptography. Unlike Symmetric Encryption, two keys are needed in Asymmetric Encryption. You have a private key that you never share with anybody else. Then, there is a public key that everybody can use. Anybody can see it, so you don’t need to worry about securing it. You can’t derive the private key from the public key.
The idea behind this is that anybody can encrypt data with your public key (since the key is readable by anybody), but the only key that can decrypt that data is the private key owned and secured by you. This means that only you should be able to decrypt the data because, in theory, nobody else would have the private key.
Pros:
Public key can be shared, resolving the problem of securely transporting keys.
Allows you to create secure encrypted channels across multiple devices and users a lot easier.
Cons:
Very resource intensive. Takes a lot of time to properly decrypt the message.
Because it’s slow, designed for small data. Inefficient for large data.
So what are some algorithms that use this type of encryption?
RSA
Diffie-Hellman
TLS
Great, so when would you actually use this type of encryption?
Asymmetric encryption is best useful in cases where data is in transit, or to create digital signatures that provide a layer of validation and security to messages sent through a non-secure channel.
It became apparent to me that my understanding of CSRF was lacking, or uh, basically non-existent. This post aims to fix that! Come learn about it along with me.
Note: This particular post is NOT a hacking tutorial on abusing CSRF, though I’m sure I will post one in the near future (make sure to subscribe or hit up my Twitter feed so you’ll know when that comes out).
What is Cross Site Request Forgery?
Well we know that it is consistently in the OWASP Top 10 for web application vulnerabilities, but what does it actually do?
CSRF is when another website is able to make a request, as a victim user, to the target website. What does that mean? Well, it means that an attacker may trick the users of a web application into performing unwanted tasks, such as transferring funds, changing their email address, deleting their account, posting a comment, etc.
Let’s say there is a web application running on vulnerable.com (please don’t try to actually visit this site, I have no idea what is there and whether or not its a valid webpage). In our fake scenario, vulnerable.com hosts a simple web application where you can create an account and post a comment on a text board. There is also a page for you to be able to delete your account. Normally, if an end-user wanted to actually delete their account, they would browse to this page, click the confirmation button, and then a request would be made to the webserver that looks something like this:
The key items to note about this is that there is a POST request to vulnerable.com/delete_my_account for a specific SessionID. Now in a perfect world, the only person who would initate this request would be the actual end-user behind that SessionID, but what if us — evil hackers — wanted to delete the account for them without their consent?
This is where CSRF comes in. Let’s, as attackers, spin up a malicious webpage at evil.com (same disclaimer as before) and add code so that we initiate that same request mentioned above once a user accesses our webpage. If vulnerable.com doesn’t have protections in place, we could leverage CSRF to send the same POST request and delete user accounts on a completely separate website without the users consent.
So how do we mitigate this?
There are a number of mitigation techniques.
Add a hash (session id, function name, service-side secret) to all forms. This method involves including a random, unique identifier to webforms when a user accesses the page. The idea behind this technique is that attack webservers will not possibly be able to know what unique identifier is being used for the victim user on the target website. This means that even if they attempt a CSRF attack, the target website will notice that the unique identifier is missing and reject the POST request.
Checking the Referrer header in the client’s HTTP request. When a web request is submitted, there is typically a referrer header added that specifies where that web request originated. Ensuring that the request has come from the original site means that attacks from other sites will not function.
Note: This method may not always be reliable for web-developers if the user utilizes ad-blocker or additional privacy protection methods, as the referrer header on a valid web request may indicate the request came from one of these third parties.
Signing off of webpages when not in use. While CSRF is really a problem with the web application, and not the end user utilizing the webpage, users can protect themselves by signing out or killing any active sessions for their sensitive webapps BEFORE browsing the web or accessing a different page.