If you find UDP ports 500 or 4500, the box is likely running some sort of IPSEC VPN tunnel. This post intends to serve as a guide for enumerating these ports and a list of tools that can help you.
Table of Contents
- Helpful Commands
- Installing IPSEC VPN Client on Linux
- Installing IPSEC VPN Client on Windows
- Troubleshooting IPSEC Errors
Helpful Commands
To extract the hash, or preshared key, you can run the following command as long as Aggressive mode is enabled.
ike-scan --aggressive <targetIP>
If this fails, you can run the following command to extract some details about the VPN configuration, such as what hashing format and encryption algorithms are being used.
ike-scan -M <targetIP>

Notice that the LifeDuration may be returned in Hex format. You can take this value and identify what its decimal format is to get the life duration in seconds using the following command.
python -c 'print int("<hex>", 16)'
To confirm whether or not the VPN is using IKE version 2, you can run the following command. If it returns successful output, then you know IKEv2 is in use.
ike-scan -M -2 <targetIP>
Note that Nmap scans across an established IPSEC connection will need to run with -sT to get accurate results. The default for Nmap is to run with SYN scans (-sS).
Installing IPSEC VPN Client on Linux
In this example, I will show how to connect to the challenge on Hack The Box called Conceal. Please note that this post does not intend to serve as a walk through or write-up of this machine, but rather is being used as an example for configuring IPsec tunnels.
On Linux, you can use StrongSwan to connect to VPN servers.
sudo apt install strongswan -y
To begin, let’s edit our /etc/ipsec.secrets file so that it contains the PSK (Pre-Shared Key) for our VPN server. This will allow StrongSwan to authenticate to our VPN server when we go to use the tool. You can view the man page of this configuration file by running “man ipsec.secrets”.
sudo vi /etc/ipsec.secrets
Add the following line:
<targetIP> %any : PSK "<presharedKey>"
Note: You need to provide the key in its unencrypted/non-hashed format.
Next, we need to edit our IPsec configuration file so that it contains the configuration of our VPN. You can view the man page of this configuration file by running “man ipsec.conf”.
sudo vi /etc/ipsec.conf
This is where things will vary based on the configuration of your VPN, but this is what is needed for things to work on the Conceal box. You will need to take the output from the commands we ran earlier to know exactly what values to enter for each of these. Refer to the man page for ipsec.conf as needed.
conn Conceal
     type=transport
     keyexchange=ikev1
     left=<localIP>
     right=<targetIP>
     authby=psk
     esp=3des-sha1
     fragmentation=yes
     ike=3des-sha1-modp1024
     ikelifetime=8h
     auto=start
While this configuration should work in most cases, Conceal was a bit tricky. It was configured to only allow TCP ports over the VPN, rather than the default of both UDP and TCP. Because of this, we actually had to add two additional lines.
conn Conceal
     type=transport
     keyexchange=ikev1
     left=<localIP>
     leftprotoport=tcp
     right=<targetIP>
     rightprotoport=tcp
     authby=psk
     esp=3des-sha1
     fragmentation=yes
     ike=3des-sha1-modp1024
     ikelifetime=8h
     auto=start
With our configuration in place, let’s try establishing our connection!
sudo ipsec start --nofork
Things to consider:
- You may or may not need the fragmentation item in the above config(s), depending on how the VPN server is configured.
- If you’re having weird issues, you can run the following command in an attempt to improve the connection.
sudo ifconfig <interface> mtu 1000
- Note that Nmap scans across an established IPSEC connection will need to run with
-sTto get accurate results. The default for Nmap is to run with SYN scans (-sS).
Installing IPSEC VPN Client on Windows
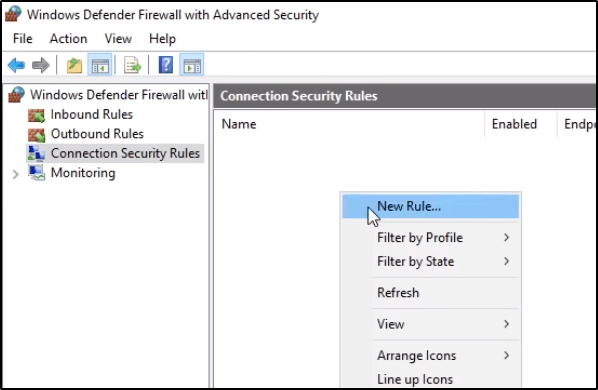
To begin, let’s launch Windows Defender Firewall with Advanced Security.

Navigate to Connection Security Rules, and then create a New Rule.
We want to create a Custom rule, and then click Next.

Within EndPoint 1, click on These IP Addresses and then select Add. You’ll want to enter the IP address of your interface that you’ll use to connect to the VPN.
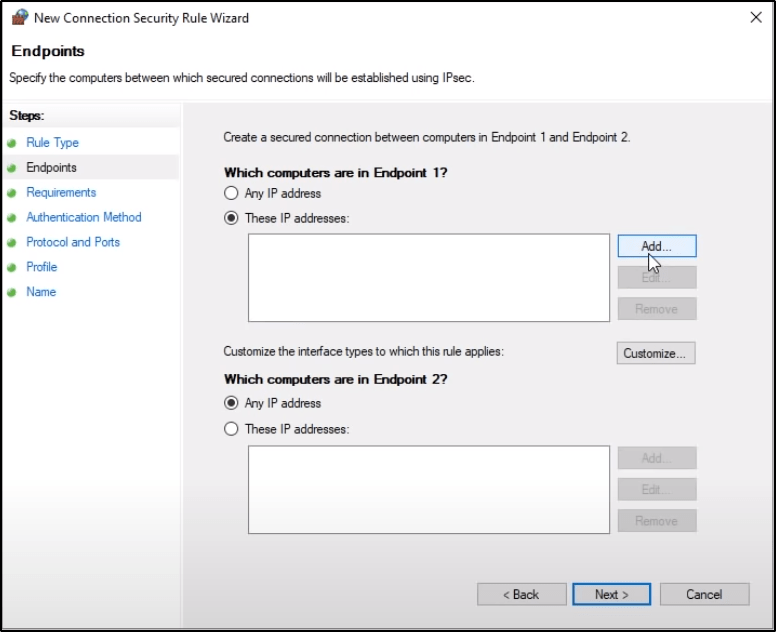
Do the same thing with Endpoint 2, but specify the destination host or network. When finished, the populated window should have items in both panes, and then you can click Next.

Select the proper Authentication Method.

If using a Preshared Key, select Next in the above listed window, then select Advanced and click Customize.

Then click on Add, select Preshared Key, enter it, and then click OK.

Select the necessary Protocol/Port configurations. In some cases, your VPN tunnel may only allow UDP or TCP and not always both.

Select the desired Profiles and click Next.

Finally, give it a Name.

Troubleshooting IPSEC Errors
Great documentation is found at https://docs.netgate.com/pfsense/en/latest/troubleshooting/ipsec.html
