When coming across an Oracle database, there is an awesome framework that you can use for pentesting it called The Oracle Database Exploitation Tool (ODAT). This post intends to serve as a guide for leveraging this tool, based on what Ippsec performs during his Silo video.
The SID is something that you have to provide with the rest of our commands in order to leverage this tool. I’m not sure exactly what a SID is, but I like to pretend that it’s a container that contains multiple databases. Because of this, we need to first identify what SIDs are in use before we can enumerate user accounts.
To begin our attack, we can use the following:
./odat.py sidguess -s <targetIP> -p <port>
Note: You can also use the Metasploit module /oracle/sid_brute
Eventually, the valid SIDs should be returned.
Brute Forcing User Accounts
Next, we can leverage the passwordguesser module to guess credentials. By default, ODAT will use a password file that is in all caps, but you may or may not want to alter and/or change the file used. For example, some versions of Oracle may be case sensitive and you won’t want a password file in all caps.
If you want to customize the wordlist, you can modify the file located at the following path:
/opt/odat/accounts/accounts.txt
You could even copy the wordlist that Metasploit uses, which is located at the following path. Just make sure to reformat your wordlist in the correct format:
Once you’re ready to run the attack, you can with the following command.
./odat.py passwordguesser -s <targetIP> -d <SID>
Gaining a Reverse Shell
A quick snippet of the help documentation can be found below.
To gain a shell, you can upload a reverse shell to the box, as long as you have identified a valid SID and valid user credentials with write privileges:
I’ve made a handful of articles on attacking LLMNR within Active Directory environments, but I’ve never made anything that helps IT Admins mitigate this vulnerability. This post intends to serve as a guide for patching this vulnerability that is enabled by default in Windows.
Keep in mind that we need to not only disable LLMR, but also NBT-NS.
Table of Contents:
What is LLMNR & NBT-NS?
Great! So how can I exploit this?
Eek. So how do we patch this?
Disable LLMNR via Group Policy
Disable LLMNR via Command Line
Disable NBT-NS via Registry
Disable NBT-NS via PowerShell
What is LLMNR & NBT-NS?
Crowe.com does a fantastic job at giving you a high-level overview of what NetBIOS & link-local multicast name resolution do. Instead of reinventing the wheel, I will simply provide an excerpt from their website below.
“NetBIOS and LLMNR are protocols used to resolve host names and facilitate communication between hosts on local networks. NetBIOS is generally outdated and can be used to communicate with legacy systems. LLMNR is designed for consumer-grade networks in which a domain name system (DNS) server might not exist.”
If none of this sounds familiar, I highly recommend checking out the below link and reading more about these protocols before moving on.
When a computer requests access to a legitimate network resource, it usually follows a set of pre-defined queries. LLMNR and NetBIOS come into play as last resort options when other methods (such as DNS or local hosts files) don’t prove helpful. Since LLMNR & NetBIOS will attempt name resolution via broadcasted requests to the broadcast-domain, we can set up tools to listen for these requests and respond back pretending to be the intended recipient.
If you’re interested in learning how attackers abuse this protocol, check out one of my guides below.
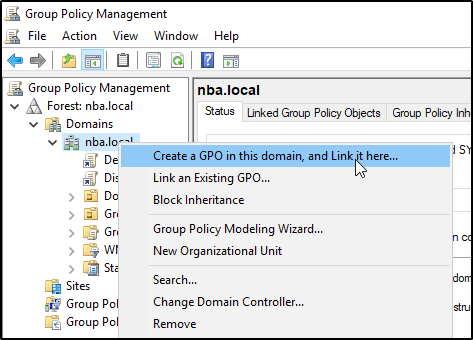
In Windows Active Directory, resolving this problem is as simple as applying a GPO. Sign into your Domain Controller and navigate to the Group Policy Management Editor. You’ll want to right click on your FQDN and select Create a GPO in this domain, and Link it here.
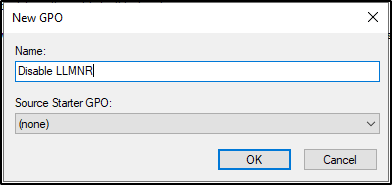
Go ahead and give it a name and click OK.
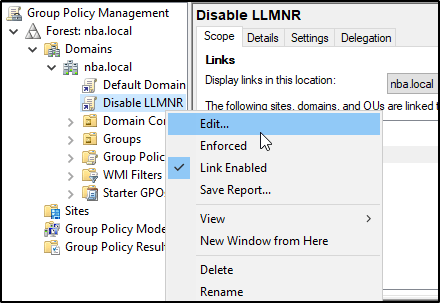
Then you’ll want to right-click on it and select Edit.
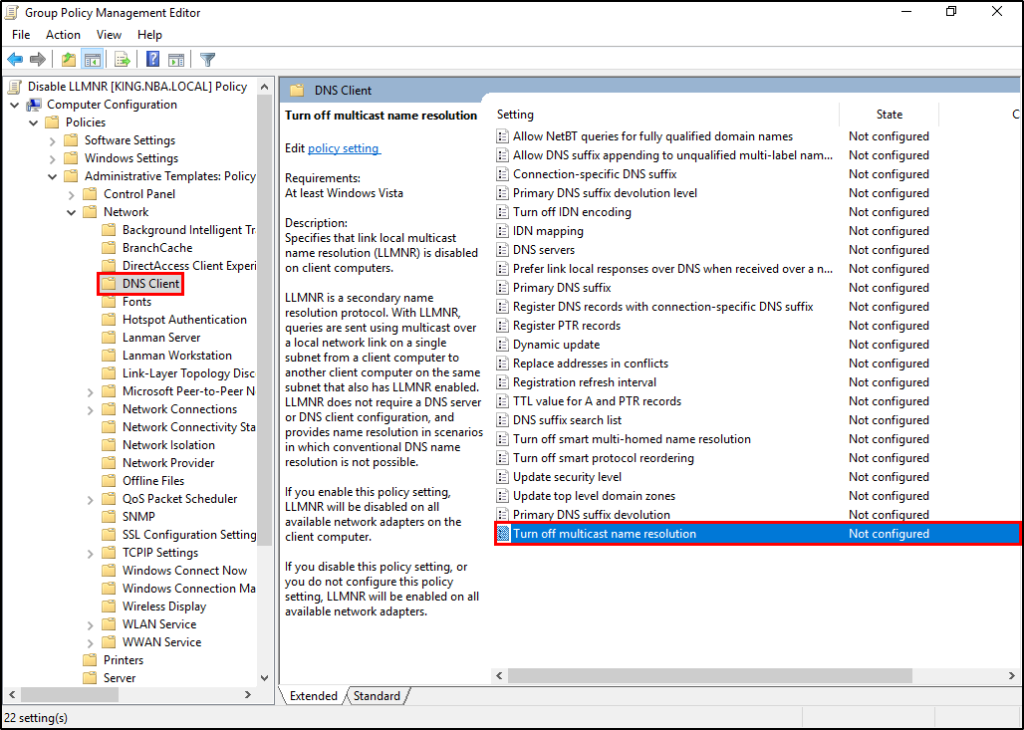
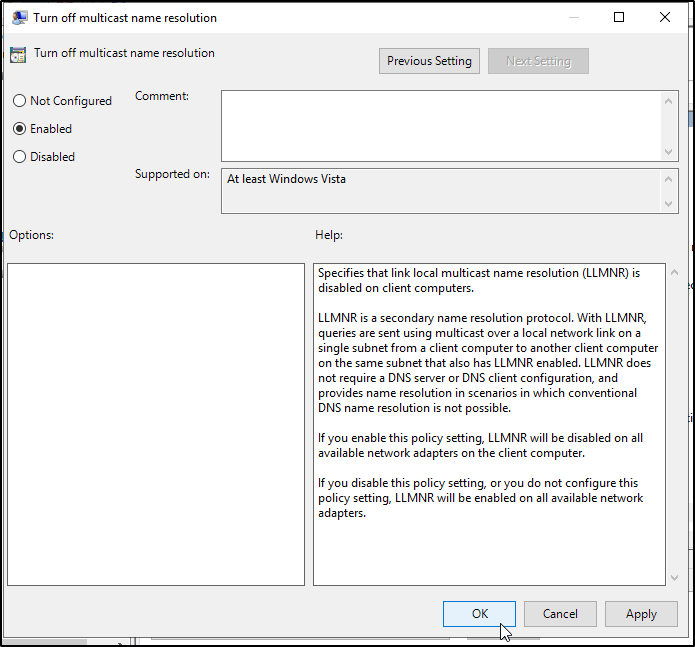
Now we just need to navigate to the following policy.
Computer Configuration -> Administrative Templates -> Network -> DNS Client -> Turn Off Multicast Name Resolution
Enable the policy by changing its value to Enabled.
Disable LLMNR via PowerShell / Command Line
But what do you do if you aren’t working with a Windows Active Directory domain? You can still patch this problem using the command line.
From here, we’ll be presented with multiple keys, each represents a network interface. You’ll want to adjust the NetbiosOptions value on each from the default of zero, to a value of 2.
Disable NBT-NS via PowerShell
To take care of the above mention step via PowerShell, you can run the following commands.
There are two different methods that will create an LFI if not used correctly. Those two are:
file_get_contents() – This is going to just display the text within the file by reading the contents as a string, and will not interpret PHP code for execution. If the LFI is using this method, you can only enumerate files on the filesystem.
include() – This is going to execute everything within the PHP tag as actual PHP code. If the LFI is using this method, then we SHOULD be able to get command execution.
You can tell which method is being used by using the LFI to read the PHP file that causes the LFI.
If the source code IS displayed, then the PHP code was interpreted by the server and you have a file_get_content() LFI.
If the code is NOT displayed, then you have an include().
Example: Say your request looks like this:
GET /news.php?file=../news.php
Because the source code is visible in the response, we can assume we’re working with a file_get_content() LFI with no possibility of code execution.
Once you have a reverse shell, you may want to consider dropping a SSH key so that you can return at a later time. This guide intends to serve as a quick tutorial on how to do this.
From the Compromised Remote Host:
Navigate to and/or create the following directory.
/home/<user>/.ssh
Change into it, and then run the following command.
ssh-keygen -f id_rsa
This should generate a private key along with a public key. You’ll want to create an “authorized_keys” file by running the following command.
cat id_rsa.pub > authorized_keys
Then you’ll want to take your private key to your local system by running the following command and copying the contents.
cat id_rsa
On Your Local System:
Create a new file by running the following command and pasting the contents of your clipboard.
vi id_rsa
Then make the appropriate file permissions changes.
Ever since communication was invented, the need for encryption has been apparent and the solution has been sought after by all. This led many mathematicians down a path to create scalable, efficient solutions that not only encrypt communications, but creates a system that ensures integrity and confirms messages were truly sent by the person that it claims to be. While cryptography is a gigantic conversation piece that definitely deserves its own blog post, it is not our intention to get into the nitty gritty about the math behind cryptography. Instead, I’d rather talk about the fundamental purpose of digital certificates, and why IT admins seem to forget half of their purpose.
The purpose of digital certificates
Digital certificates serve two main purposes:
Provide information about the public key so that communication can be encrypted, and only decrypted by those that hold the paired private key. In other words, it ensures others can’t see the data within your session.
Certifies the ownership of a public key by the named subject of the certificate. In other words, it confirms that system you are communicating with is the one that you intended to.
But over time, many IT administrators seem to have forgotten about half the reason these digital certificates exist. From my time working at an MSP, to my time working as a Pentester, it is far too common to see self-signed certificates in use on important network infrastructure, including backup systems, remote desktop servers/workstations, switches, access points, camera systems, Hypervisors, and more — with many users trained to ignore certificate warnings because “that’s suppose to happen”.
What is a self-signed certificate?
Self-signed certificates have a useful purpose, which is to allow you to communicate with a device over an encrypted connection. This is obviously very important, but they lack in one critical area.
Digital certificates not only contain information about the public key used to encrypt the connection, but they also contain the digital signature of an entity that has verified the certificate’s contents (called the issuer). When a certificate is “self-signed”, that means there was no third party issuer to confirm the legitimacy of the system’s identity. This would be like a couple of police officers showing up with badges they printed themselves from Staples — It may look legitimate, but the police department (a trusted third party) didn’t actually issue those badges to verify the legitimacy of the “officers” identity.
Because of this, what would stop an attacker from pretending to be the system you meant to connect to? Sure, the communication would be encrypted, but if the attacker provides the public key used for the encryption, then they could also control the private key used to decrypt the communication. This is called a Man in The Middle attack.
What’s the impact?
When most people think of “Man in the Middle” (MitM) attacks, they usually think of connecting to insecure, public Wi-Fi networks. This is a problem.
MitM attacks are not restrained to only wireless networks, they’re prevalent in wired network environments too. The goal of these attacks can range from spying on somebody’s activity, harvesting credentials, or even redirecting the flow of traffic to a different location. All of these can have very real impacts, especially when you consider the high value of infrastructure that we commonly find using self-signed certificates.
For example, let’s talk about a technology that 2020 has us all more familiar with — the Remote Desktop Protocol (RDP). It is very common to see self-signed certificates in use when connecting to a remote computer via RDP. If you’re unsure if your computer is using a self-signed certificate, let me ask you: Does this image seem familiar?
If you answered “Yes” to that question, and if your first instinct when being displayed with this prompt is to click “Yes”, then your computer is likely using a self-signed certificate and you are vulnerable to Man in The Middle Attacks.
Seth is a tool written by Adrian Vollmer of German-based security company SySS that helps automate the process of performing RDP MitM attacks. If you’re interested in seeing just how easy it is to use this tool to perform attacks, feel free to check out my post Performing RDP Man in the Middle (MitM) Attacks Using Seth.sh to Steal Passwords.
Let me ask you another one. Are you an IT administrator that is used to seeing this when browsing to the web interface of your equipment? If the answer is “Yes”, then your equipment is likely using a self-signed certificate and you are vulnerable to Man in The Middle Attacks.
Where do we go from here?
The good news is that there are many articles online on how to replace self-signed certificates with trusted ones, which makes this problem easy to fix from a technical perspective. The bad news is fixing this problem at an organizational level may be a bit more difficult if your users are already used to blindly accepting these certificate warnings.
Once certificates are signed by a trusted authority, users will no longer be presented with these warnings as long as things are working properly. This means that in the event of a real MitM attack, users will need to be aware that these certificates errors should NOT be ignored, as it will be an indication that a real attack is underway. Should they choose to follow their untrained habit of ignoring these warnings, they will still be vulnerable to these attacks.
This is where user awareness training comes in, yet again, as a very critical piece of your security posture. If you need help getting your security awareness training programs dialed in, feel free to reach out to us at Lykosec.
The IT department must not be excluded from this training either, as they are probably the most at-risk of misunderstanding why they’re getting a certificate warning. Devices ship out of the box with self-signed certificates deployed automatically, and IT admins are very used to ignoring them when browsing the web interfaces of these devices. IT needs to not only be made aware of the impact of this problem, but also needs to understand how it works so they can determine properly when a certificate warning is safe and when it isn’t.
IT teams should make every effort to replace self-signed certificates. In an ideal scenario, equipment that ships with self-signed certificates should be prepped in an isolated subnet that no other users connect to. IT should make sure that they are the only devices connected to this subnet before accepting the certificate warning, and include replacing the self-signed certificate with a certificate signed by a trusted authority as a mandatory step before that device is put into production.
Conclusion
While self-signed certificates serve their purpose for encrypting communications, relying on them in production invites Man in the Middle attacks as users are no longer able to verify the legitimacy of the system’s identity. If you can’t confirm who you’re talking to, you don’t really know them, and as our mothers always told us, “you should never talk to strangers”.
There are times where you want to run a quick Nmap scan to see what ports are open, and then rerun a more in-depth Nmap scan on those specific ports. Doing it this way will allow you to lessen the amount of time it takes to run the scan, as you aren’t wasting time trying to run Nmap scripts or enumerate version information on ports that aren’t open.
Your initial scan make look something like this.
sudo nmap -p- <target> -oA nmap/quick
You can then run the following to retrieve a command separated list of open ports you can copy/paste to your next command.
When you come in contact with a Windows domain, you may want to try and leverage Password Spraying attacks (really, you should –they’re super effective). But how do you get a valid list of usernames to load into your password sprayer?
Downloading the Tool
You could leverage a tool called KerBrute to pull this off. A quick Google search on this tool returns the following Github page.
With the tool in hand, we can view the help documentation.
Now we just need to prepare a list of users to enumerate. If you’ve already started to find usernames around the network, you can make your own customer user list. Otherwise, you can leverage something from the seclists usernames list, which can be downloaded at the following page.
The syntax for the command is very straightforward.
sudo ./kerbrute userenum -d <domain> <userList>
And just like that, we can see that all of the usernames we provided in our file are valid!
Note: It may be worthwhile to add a “known invalid” username to your userlist, just to make sure the server isn’t configured to respond stating all users are valid, whether or not that is true.
I love CrackMapExec. Seriously, it’s one of my favorite tools to use for internal Active Directory pentesting. Once you find valid credentials, you can throw it into this tool to pass it around the network and see where else those creds are valid. Let’s say you find a password within a log file, but don’t know what username its for? CrackMapExec will tell you. Let’s say you compromise a machine and dump the SAM database and are curious what other machines the hashes might be valid on? CrackMapExec will tell you.
This post intends to serve as a guide for some additional things that I’ve learned about CrackMapExec, that I want to remember in the future. This is far from a comprehensive list of what the tool can do, but it will be updated over time.
Mass Execution of Commands
Let’s say you’ve captured elevated credentials for a user that is admin on multiple machines across the domain. You can use the -c flag to execute commands.
Note: Be careful when doing this, as you will lock out users if there is a password policy in place.
Don’t Sleep on WinRM
Once you’ve found valid credentials, CrackMapExec’s SMB function will only display “Pwn3d” if the user is a local administrator. However, there is another function that you can try instead.
If you’re able to get valid user credentials, but you’re unable to login because the password has expired and/or needs to be changed, you can leverage this tool in Kali Linux.
smbpasswd -U <username> -r <domainController>
Note: You can use either the FQDN of the Domain Controller, or it’s IP address.
This tool will prompt you for the current password of the user, along with what password you desire.
When on an engagement, it is common to need a custom wordlists for either Password Spraying, or Password Cracking when you have captured some hashes. This post intends to serve as a quick guide for leveraging Hashcat rules to help you build effective custom wordlists.
To start, let’s begin with setting the scenario up. In our fictional scenario, we’ll be targeting an Active Directory domain named NBA.local. Let’s begin by creating a handful of words that would be likely for this domain. We’re only going to start with a few words, as our list is going to grow exponentially when we start applying rules to them. In a real engagement, you may want to gather 10-20 words to use.
Here’s the list I started with.
We should also append the current year to the words. There are dozens of ways to do this, but a simple method is to use a for loop. for i in $(cat list1.txt);do echo $i;echo ${i}2020;echo ${i}2021;done > t
Now we’ll take this list, and feed it through Hashcat’s Best64 rule. hashcat --force <wordlist> -r /usr/share/hashcat/rules/best64.rule --stdout > hashcat_words.txt
You can see from the screenshot that we turned our list that previously contained 4 words into a list that now contains 308 words! But if you look through the list, you’ll see it doesn’t contain any symbols. To fix this, we can create our own custom rule called append_exclamation.rule that contains the following:
:
$!
Now we can run hashcat again, but this time we’ll specify both rules instead of just the one. Just keep in mind that you may get duplicates, so you may want to also add the sort -u command.
This time when we check the number of words in the list, we see exactly double what we had before! This is because the list has the same 308 words as last time, but now also has them all with an exclamation added.
One of my favorite commands for creating wordlists: hashcat --force list.txt -r /usr/share/hashcat/rules/best64.rule -r /usr/share/hashcat/rules/toggles5.rule -r /usr/share/hashcat/rules/append_atsign.rule -r /usr/share/hashcat/rules/append_exclamation.rule --stdout | sort -u > list-uniq.txt
Hashcat Masking Attack
Some of my favorite masking attack commands to run:
hashcat -m 1000 -a 3 hashes\users.txt ?u?l?l?l?s?d?d?d?d
hashcat -m 1000 -a 3 hashes\users.txt ?u?l?l?l?l?s?d?d?d?d
hashcat -m 1000 -a 3 hashes\users.txt ?u?l?l?l?l?s?d?d
hashcat -m 1000 -a 3 hashes\users.txt ?u?l?l?l?s?d?d?d
hashcat -m 1000 -a 3 hashes\users.txt -1 ?u?l ?1?1?1?s?d?d?d?d
hashcat -m 1000 -a 3 hashes\users.txt -1 ?u?l ?1?1?1?1?s?d?d?d?d

hashcat -m 1000 -a 3 hashes\users.txt ?u?l?l?l?l?d?d?d?d
hashcat -m 1000 -a 3 hashes\users.txt ?u?l?l?l?l?l?d?d?d
hashcat -m 1000 -a 3 hashes\users.txt ?u?l?l?l?d?d?d?d
hashcat -m 1000 -a 3 hashes\users.txt ?u?l?l?l?l?d?d?d
hashcat -m 1000 -a 3 hashes\users.txt ?u?l?l?l?l?l?d?d
hashcat -m 1000 -a 3 hashes\users.txt ?u?l?l?l?l?l?l?d
hashcat -m 1000 -a 3 -1 ?u?l hashes\users.txt ?1?1?1?1?1?1?d?s
hashcat -m 1000 -a 3 -1 ?u?l hashes\users.txt ?1?1?1?l?d?d?d?d
hashcat -m 1000 -a 3 -1 ?u?l hashes\users.txt ?1?1?1?d?d?d?d?s
hashcat -m 1000 -a 3 -1 ?u?l hashes\users.txt ?1?1?1?d?d?d?d?s
hashcat -m 1000 -a 3 -1 ?u?l hashes\users.txt ?1?1?1?l?d?d?d?d?s
hashcat -m 1000 -a 3 -1 ?u?l hashes\users.txt ?1?1?1?l?d?d?s?s
hashcat -m 1000 -a 3 -1 ?u?l hashes\users.txt ?1?1?1?1?d?d?d?s